-
Docs
-
GitHub Actions
If at any point you would like some help, join us in Slack! You'll find the AppMap team there, along with other AppMap users.
Get Started with our GitHub integration
AppMap Analysis can work within GitHub Actions to collect, store, analyze, and report on the behavioral changes within each Pull Request. AppMap will analyze the changes in your application on each pushed commit or pull request. AppMap performs a thorough analysis of the runtime differences, giving you:
Root cause analysis of failed tests. Web service API changes, both breaking and non-breaking. New and resolved security findings. New and resolved performance findings. New and resolved findings in other categories: maintainability, reliability, and user-defined rules. “Behavioral diffs” as sequence diagrams showing changed runtime behavior within the PR.
How it Works
AppMap Analysis can work with your Continuous Integration (CI) system to collect, store, analyze, and report on the behavioral changes within each Pull Request. AppMap will analyze the changes in your application on each pushed commit or pull request. AppMap performs a thorough analysis of the runtime differences, giving you:
- Root cause analysis of failed tests.
- Web service API changes - breaking and non-breaking - via comparison of generated OpenAPI definitions.
- New and resolved security findings.
- New and resolved performance findings.
- New and resolved findings in other categories - maintainability, reliability, and user-defined rules.
- “Behavioral diffs” as sequence diagrams showing changed runtime behavior within the PR.
Install the AppMap GitHub App on the GitHub Marketplace to get started now!
The AppMap Analysis GitHub actions can run cooperatively or independently of your existing CI job. For example, AppMap Analysis can run as a GitHub Action even if you do not use GitHub Actions as your CI system.
AppMap Analysis runs entirely within your existing GitHub account and does not send code or data to an external or 3rd-party server. For more information, refer to the AppMap Security FAQ.
Once you create a pull request, AppMap Data is recorded as your test cases run. As AppMap Data is generated, an AppMap archive file is created that includes all the AppMap Data, plus some metadata about the job. As code is pushed to a branch, AppMap Analysis create an archive file for that code revision. This archive file is automatically saved as a CI artifact. Once an archive has been created, it can be compared to the “base” revision (i.e. your mainline or production branch).
1The value of AppMap in CI
We designed AppMap’s findings as a comment in the PR itself to enable the Development, QA, Architecture, and Security teams to review code faster, evaluate code independently, and catch deep-rooted code issues easier. This helps you determine the stability of new code in the context of where the code actually lives and allows for faster and more reliable code delivery.
By simply browsing the PR comments, a DevOps team can reliably deploy code with the assurance that it meets all needed code quality requirements, reducing the amount of unnecessary communication between teams just to get the code live long before it is ever pushed to production.
Requirements
If you have already generated AppMap Data outside of CI (for example, by running your test cases locally), you can quickly deploy AppMap in CI using the same commands used to execute your test cases. If you already have an existing CI job that builds an environment to execute your test cases, AppMap Analysis can be added to that job.
Getting Started
If at any point you would like some help, join us in Slack! You'll find the AppMap team there, along with other AppMap users.
Make sure to install the AppMap App from the GitHub Marketplace before you start the installation process.
Install AppMap for GitHub Actions
Overview
AppMap can work within GitHub Actions to collect, store, analyze, and report on the behavioral changes within each Pull Request. AppMap will analyze the changes in your application on each pushed commit or pull request. AppMap performs a thorough analysis of the runtime differences, giving you:
- Root cause analysis of failed tests.
- Web service API changes, both breaking and non-breaking.
- New and resolved security findings.
- New and resolved performance findings.
- New and resolved findings in other categories: maintainability, reliability, and user-defined rules.
- “Behavioral diffs” as sequence diagrams showing changed runtime behavior within the PR.
Step-by-step walkthrough
- Step 1: Install the AppMap GitHub App from the GitHub Marketplace.
- Step 2: Choose an Installation Method
- Step 3: Grant Access to your repositories.
- Step 4: Complete the Installation Process
- Step 5: Merge this PR to deploy AppMap
- Optional Post-Install Configuration
Configuration of the AppMap GitHub Action happens inside a branch and can be easily tested in a Pull Request before merging any code changes to the mainline branch. This allows users to easily test AppMap in the environment before deploying across the repository.
Follow the steps below for your project. If you need additional assistance contact AppMap at support@appmap.io or join us in our Community Slack
Step 1: Install the AppMap GitHub App from the GitHub Marketplace.
Click to install the AppMap GitHub Action
Installing the AppMap GitHub App into your repository will allow the AppMap installer to properly detect your repositories for installation. Your data is your data, AppMap does not store your code or any AppMap Data that is generated. For more details about AppMap security controls, review the Security FAQ.
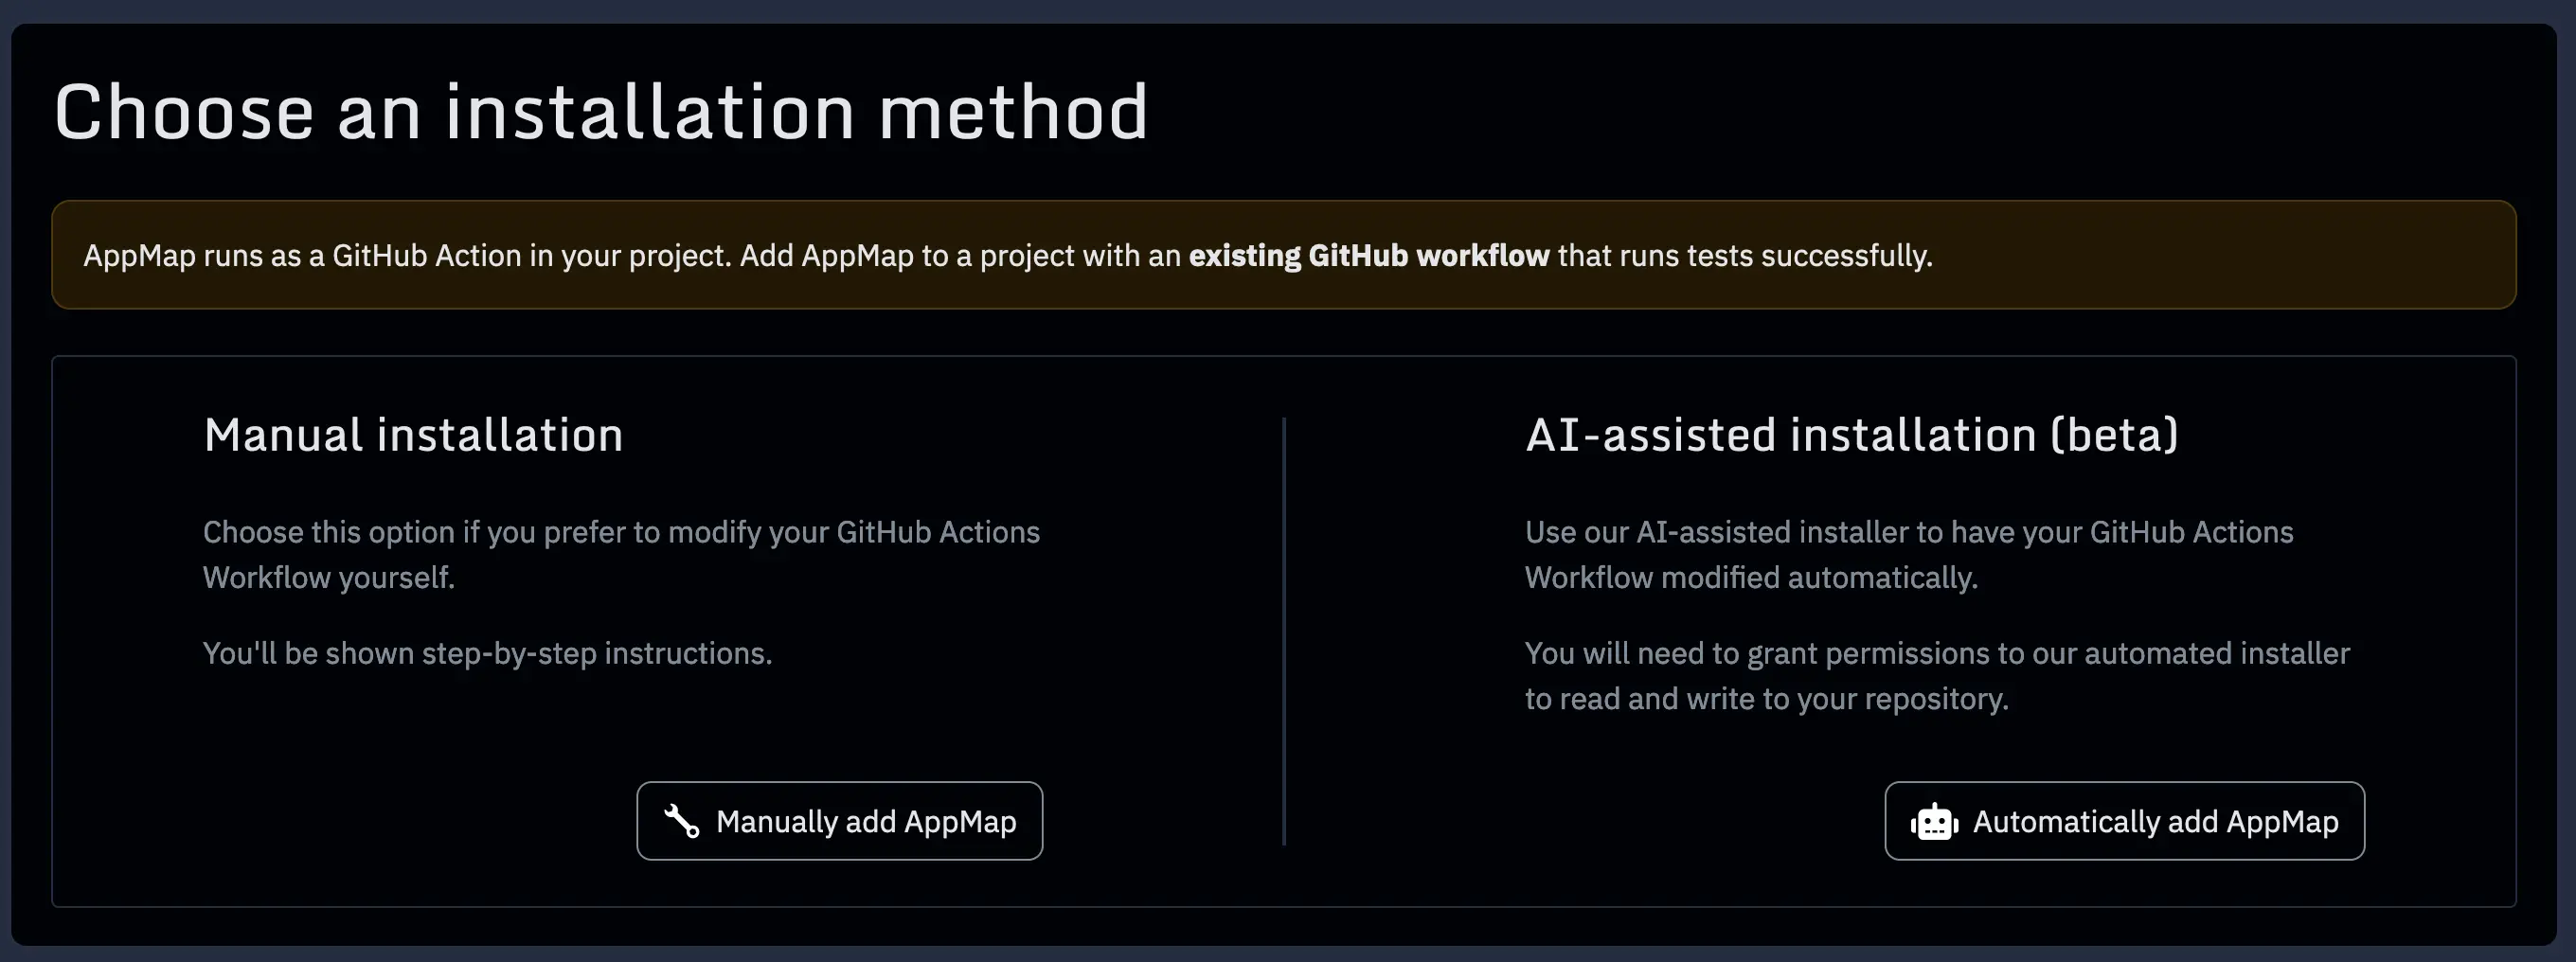
Step 2: Choose an Installation Method
AppMap runs as a GitHub Action in your project. Add AppMap to a project with an existing GitHub workflow that runs tests successfully. Choose if you would like to install AppMap manually into your project or use the automated AI assisted installation.
Step 3: Grant Access to your repositories.
Granting AppMap access to your repositories allows AppMap to complete an automated installation for your project. For the automated installation to be successful you’ll need an existing GitHub workflow which builds and tests your application successfully.
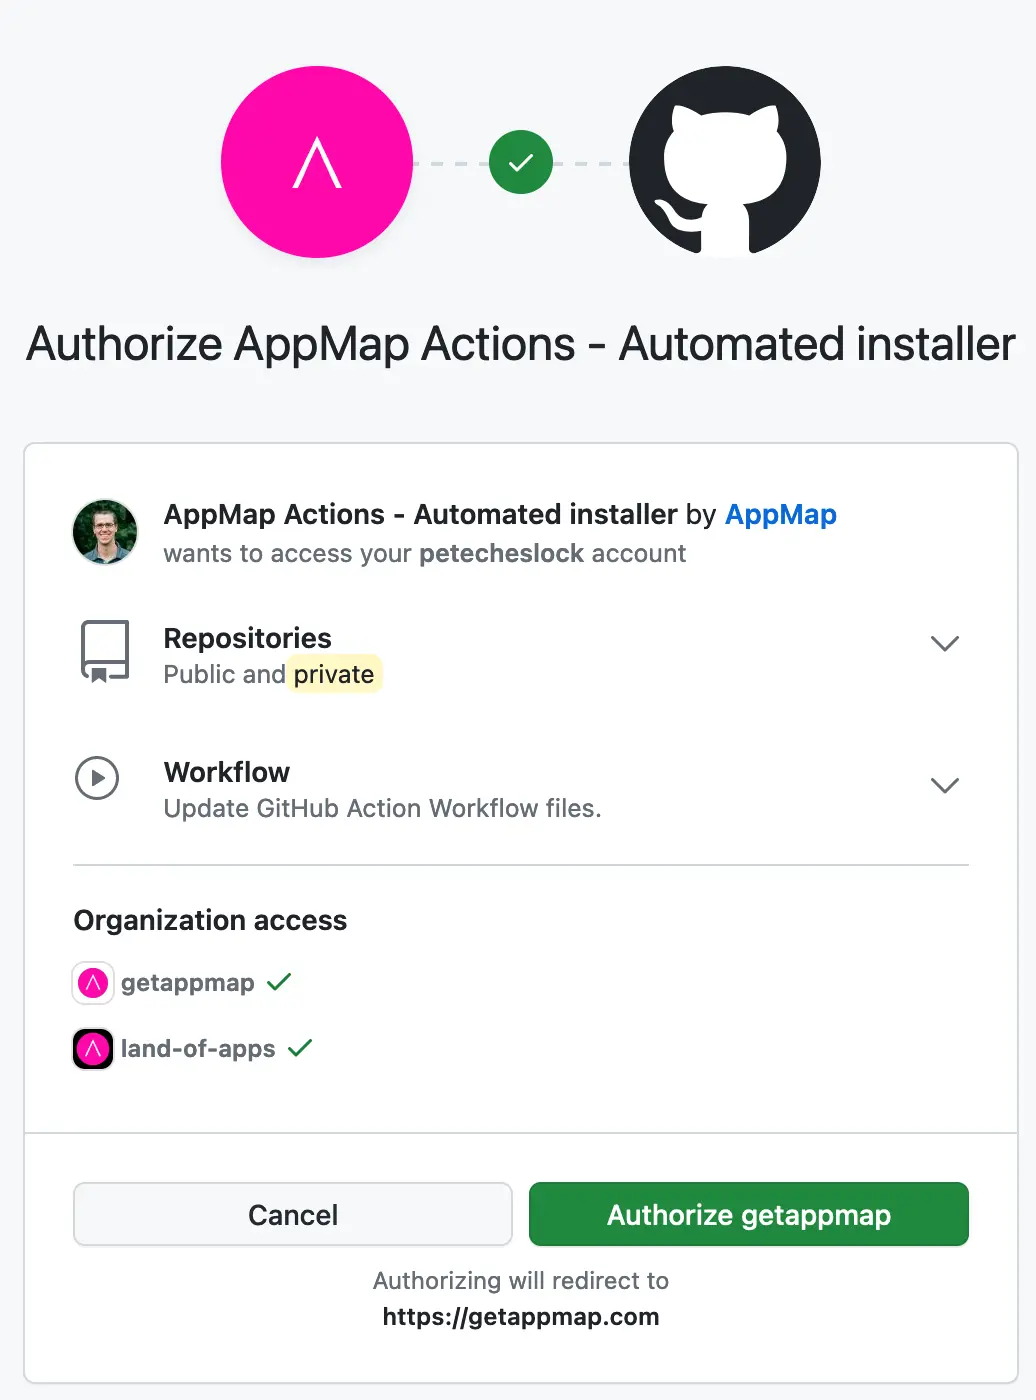
Note: If you do not currently have a GitHub Action that can run your test cases, refer to the GitHub documentation to build an Action that will execute your test cases.
Step 4: Complete the Installation Process
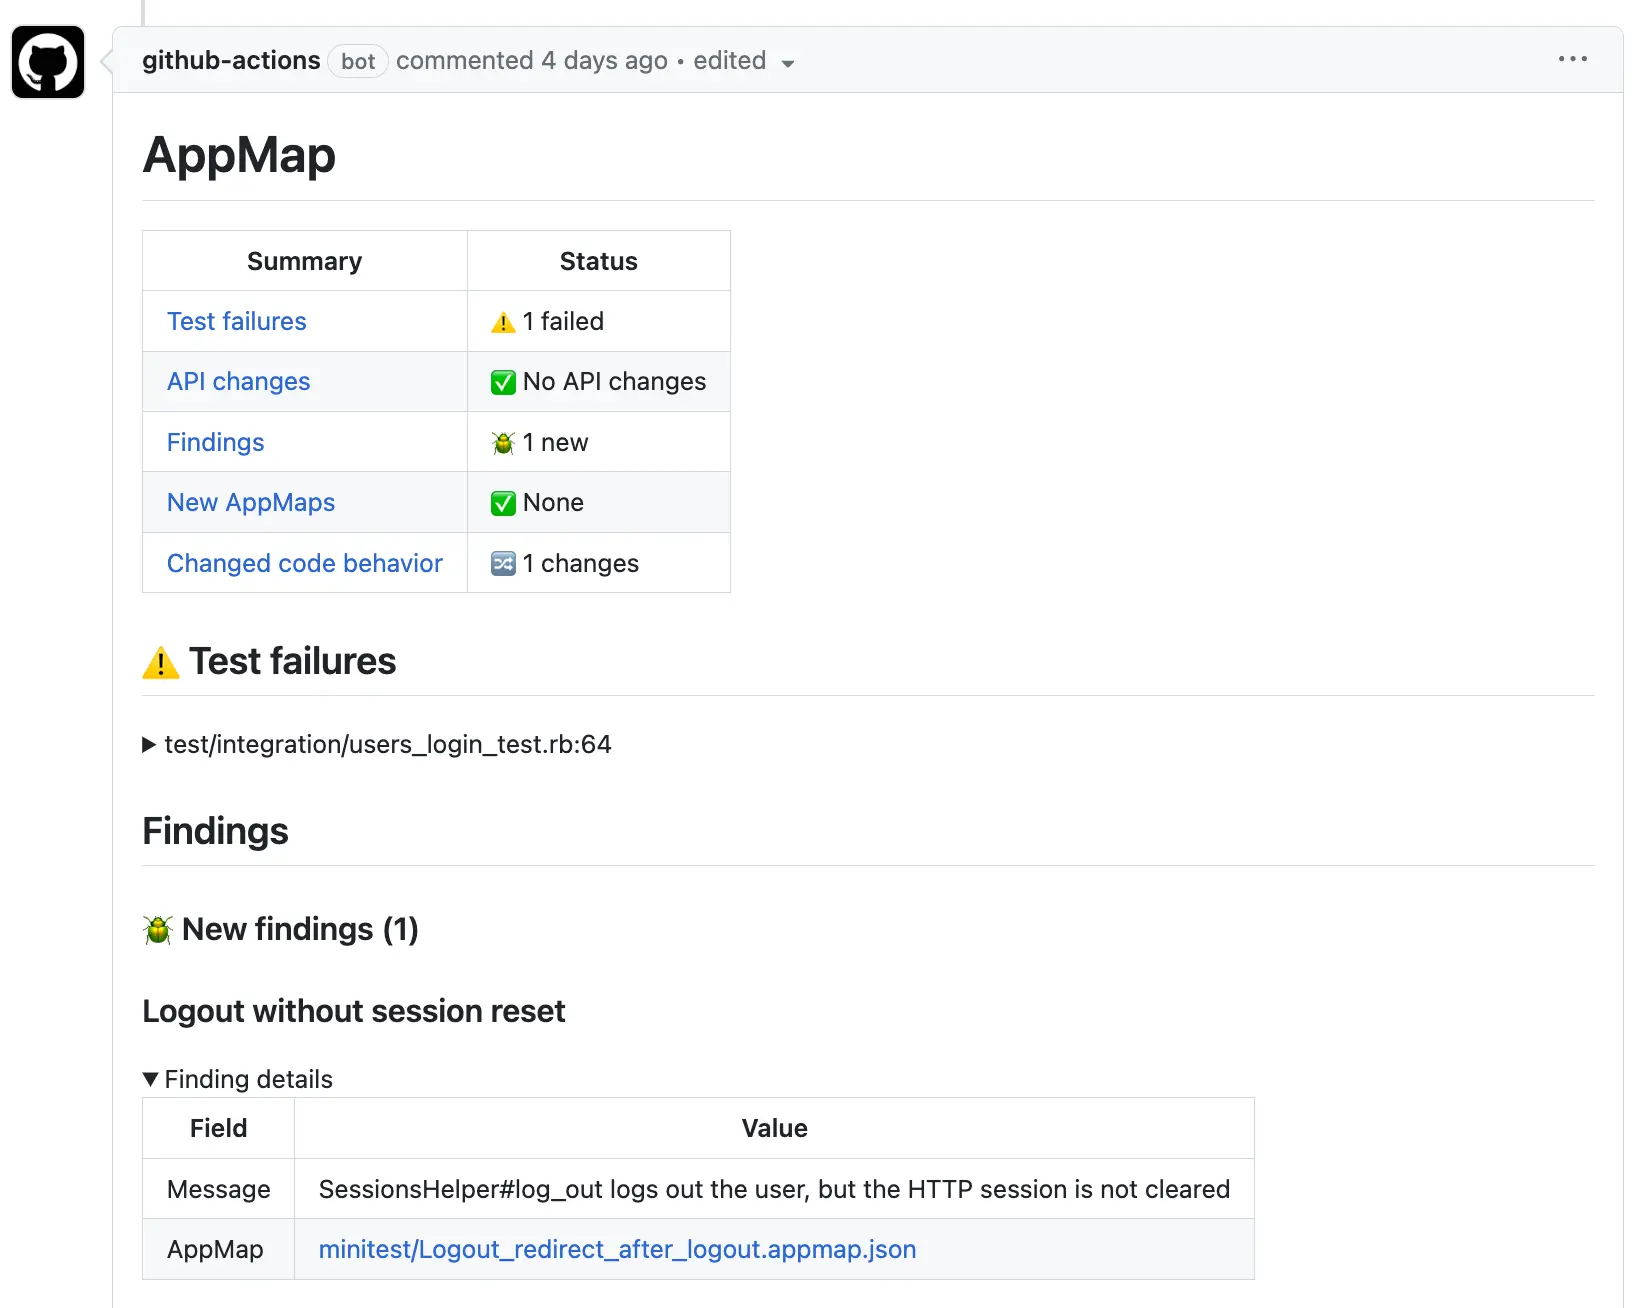
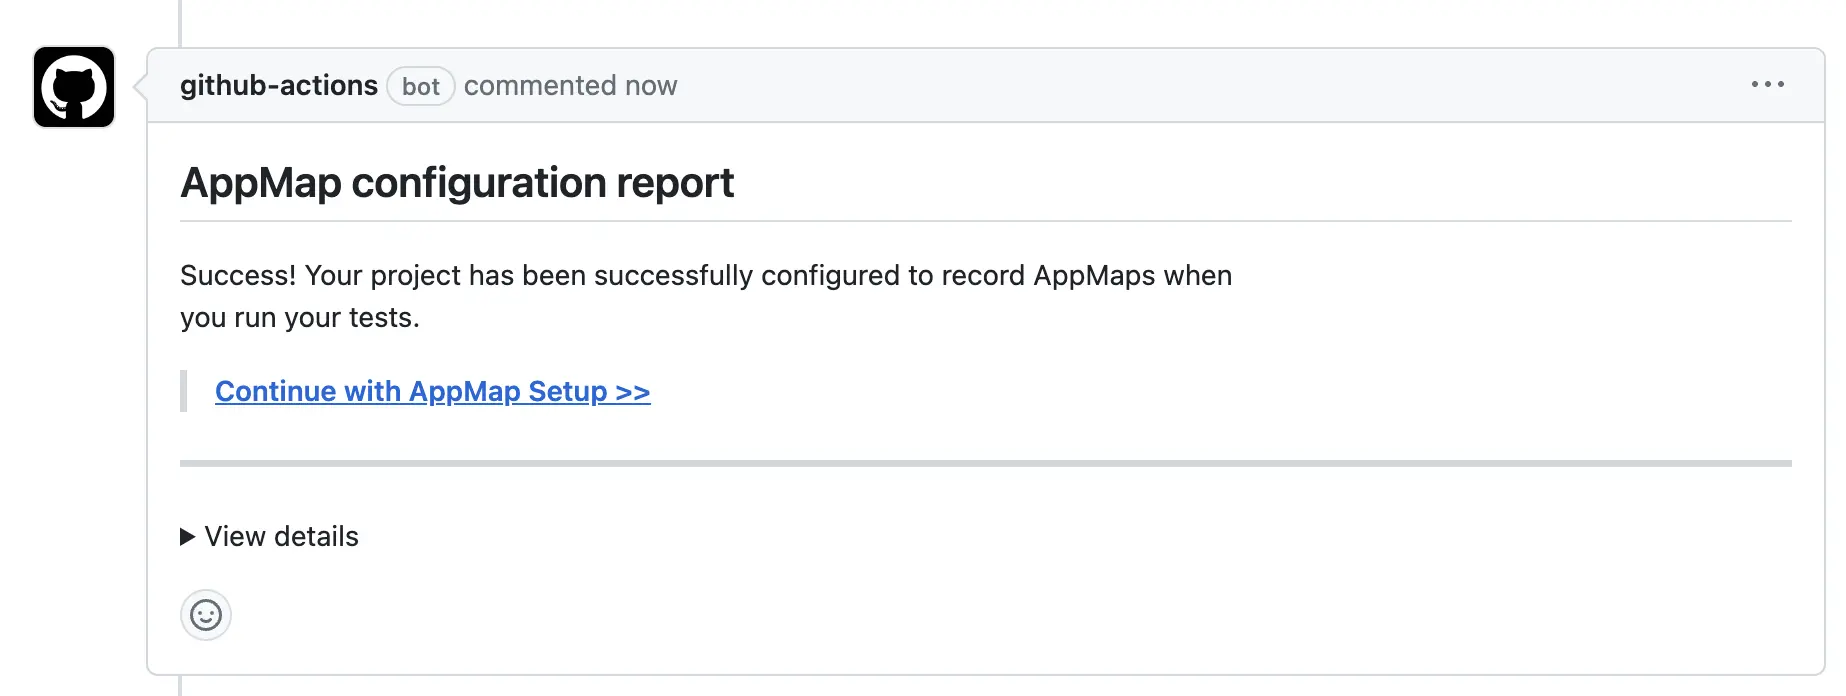
Follow the steps in the AppMap installation process to complete the AppMap Installation. AppMap will add a Configuration Report as a comment in the initial pull request.
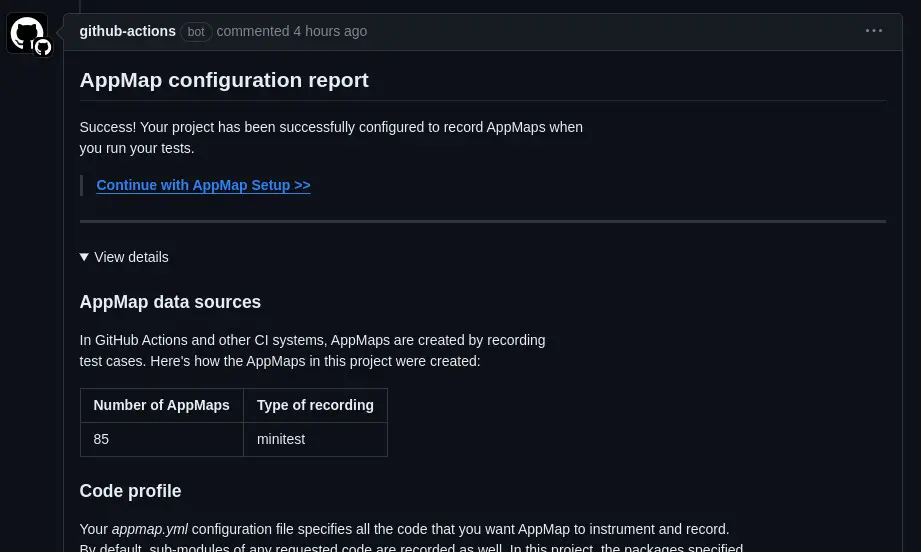
The initial AppMap report will give you details about:
- AppMap Data sources shows how many AppMap Diagrams were recorded, and which test frameworks were used.
- Code profile indicates which packages and modules were recorded.
- Web service API profile summarizes the HTTP requests observed while your tests ran. AppMap uses this information to automatically generate OpenAPI definitions.
- SQL profile summarizes the SQL queries executed in your tests.
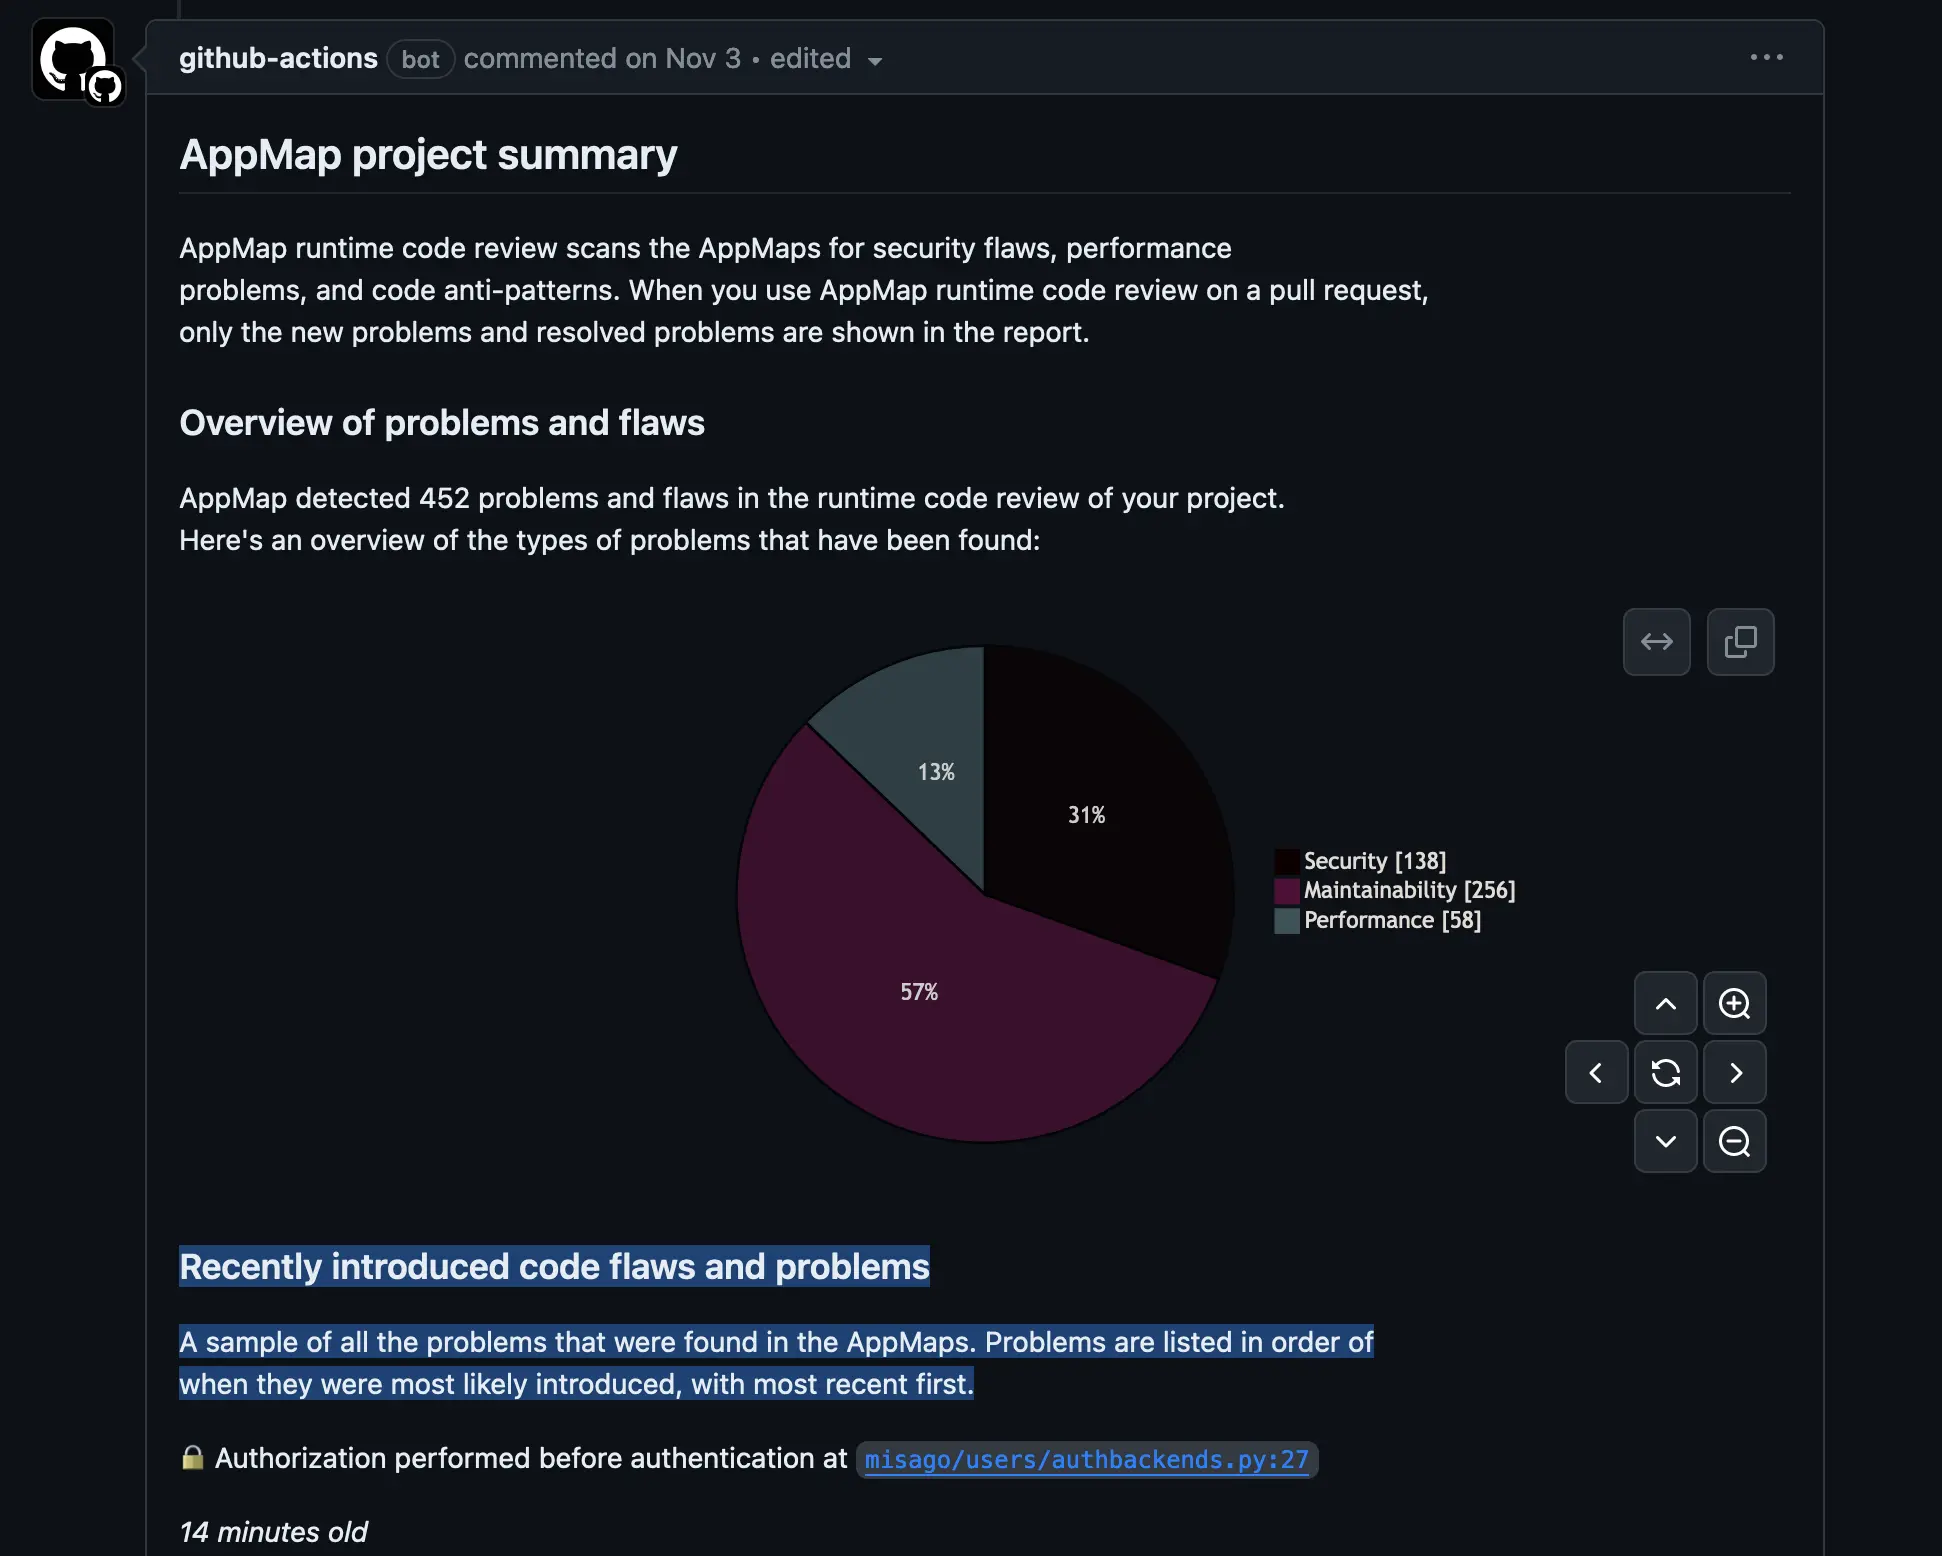
After completing the initial configuration report, AppMap will analyze your entire source code repository. In this report AppMap will display recently introduced code flaws and problems. A sample of all the problems that were found in the AppMap Data are listed in order of when they were most likely introduced, with most recent first.
Step 5: Merge this PR to deploy AppMap
Congratulations! You’ve successfully set up the AppMap GitHub Action and can now merge this into your project to make it available for every other developer to use on each of their subsequent pull requests.
To see AppMap in action, create a draft pull request with some changes that you don’t plan to merge. Some suggested changes include:
- Add a new test
- Add, change, or remove an API route
- Change how your application interacts with its database
AppMap will execute runtime code analysis on every pull request in this repository.
Optional Post-Install Configuration
Configure Additional AppMap analysis rules
AppMap comes with a comprehensive set of rules that are categorized by their impact on applications: Performance, Reliability, Maintainability, Stability, and Security.
You can refer to the AppMap Documentation for more information about all the rules that are available within AppMap.
To enable additional rules simply add them to an
appmap-scanner.ymlfile in the root of your project directory and commit it to your project.This is a sample
appmap-scanner.ymlfile which you can use to enable or disable certain AppMap analysis rules. Rules can be disabled by commenting them out with the#character.checks: - rule: authz-before-authn # - rule: circular-dependency - rule: deprecated-crypto-algorithm - rule: deserialization-of-untrusted-data - rule: exec-of-untrusted-command - rule: http-500 # - rule: illegal-package-dependency # properties: # callerPackages: # - equal: actionpack # calleePackage: # equal: app/controllers # - rule: incompatible-http-client-request # - rule: insecure-compare # - rule: job-not-cancelled - rule: logout-without-session-reset # - rule: missing-authentication - rule: missing-content-type - rule: n-plus-one-query # - rule: query-from-invalid-package # - rule: query-from-view # - rule: rpc-without-circuit-breaker # - rule: save-without-validation - rule: secret-in-log # - rule: slow-function-call # properties: # timeAllowed: 0.2 # functions: # - match: Controller#create$ # - rule: slow-http-server-request # properties: # timeAllowed: 0.5 # - rule: slow-query # properties: # timeAllowed: 0.05 - rule: too-many-joins - rule: too-many-updates # - rule: unbatched-materialized-query - rule: unauthenticated-encryption - rule: update-in-get-requestAdd these changes to Git and commit and put them into the PR branch.
$ git add .
$ git commit -m "ci: Add customized scanner configuration"
Push the changes upstream to your branch which updates the Pull Request.
$ git pushThe AppMap analysis report will be updated on the completion of the build and a new report will be displayed.
For more details about AppMap GitHub Actions refer to the reference documentation
Example Projects
Reference implementations of the AppMap GitHub Action are available for the following languages and frameworks:
- Ruby on Rails
- Ruby on Rails w/ Matrix Build
- Java Spring
- Java Spring w/ multiple sub-projects
- Python Django
- Python w/ Matrix Build
- Node.js Coming soon!
Matrix Builds
- Step 1: Modify Action to Support Matrix Build
- Step 2: Add the Build Triggers and Analysis Step
- (Optional) Step 3: Remove Installation Actions and Configuration
- Step 4: Merge this PR to deploy AppMap
If your project uses matrix builds in order to split your test runs across multiple runners, you will need some additional configuration for AppMap to properly save and merge AppMap Data from across all these runs.
From the GitHub documents on the
matrix strategies:A matrix strategy lets you use variables in a single job definition to automatically create multiple job runs that are based on the combinations of the variables. For example, you can use a matrix strategy to test your code in multiple versions of a language or on multiple operating systems. Use
jobs.<job_id>.strategy.matrixto define a matrix of different job configurations. Within your matrix, define one or more variables followed by an array of values.For example, to split tests across two runners you could set a matrix strategy like the following:
strategy:
  fail-fast: false
  matrix:
    ci_node_total: [2]
    ci_node_index: [0, 1]
For AppMap to analyze any failed test cases, you need to include the configuration flag
fail-fast: falsein your matrix strategy.Step 1: Modify Action to Support Matrix Build
When following the [Getting Started Guide0(#step-4-complete-the-installation-process), you’ll need to make a few changes and additions to your GitHub Workflow file before you commit the first step.
First, modify the
EndBug/add-and-commitaction to include an if statement so that only one of the runners will commit the AppMap library installation files to the project.For Example:
- name: Commit changes
  if: ${{ matrix.ci_node_index == 0}} #Only run this action on a single runner
  uses: EndBug/add-and-commit@v9
Next, you’ll modify the
archive-actionto configure anarchive-id:set to the unique index of the runner. This will archive each tarball of AppMap Data from each runner in your Action.For example:
- name: Archive AppMap Data
  if: always()
  uses: getappmap/archive-action@v1
  with:
    archive-id: ${{ matrix.ci_node_index }} # Set this equal to the unique index of the runner
After the action which runs your test cases, you will create a new job that will merge the AppMap Data archive from your individual runners, archive them, and provide the initial AppMap inventory report.
Create a new job at the same level as the job which runs the test cases, and make this job dependant on the previous job.
For example:
merge-and-archive:
  runs-on: ubuntu-latest
  if: always()
  needs: [test]

  steps:
    - name: Checkout
      uses: actions/checkout@v3
      with:
        ref: ${{ github.event.pull_request.head.ref }}

    - name: Install AppMap tools
      uses: getappmap/install-action@v1
      with:
        install-appmap-library: false

    - name: Merge AppMap Data Archives
      uses: getappmap/archive-action/merge@v1
      with:
        revision: ${{ github.event.pull_request.base.sha }}
        archive-count: 2 # Set this equal to the total number of test runners (i.e. total archives created)
Commit the changes:
$ git add .
$ git commit -m "ci: Bootstrap initial AppMap archive"
View an example workflow file for this step here.
Push the changes upstream to your branch and open a new Pull Request which will trigger the GitHub action. Once the build of this PR completes, AppMap will comment on the PR with an initial report about your software project.
The initial AppMap report will give you details about:
- Runtime Analysis: Analyzing the AppMap Data for security flaws and anti-patterns
- REST API analysis For AppMap Diagrams that include HTTP server requests, AppMap can automatically generate OpenAPI definitions.
- SQL Profile When your code makes a SQL query, AppMap records the SQL query in detail. It even parses the queries to figure out which tables your app is using, and how it’s using them.
Step 2: Add the Build Triggers and Analysis Step
With the previous step complete, and a inventory report in your pull request, you can now replace the
merge-and-archivejob we used in the last step and replace it with theappmap-analysis-matrixreusable workflow with an additional configuration optionarchive-count.The
archive-countis the total number of test runners which have generated AppMap archives. For example, if you have split your test runner across 2 hosts, you need to set thearchive-countequal to2.For example:
appmap-analysis:
  if: always()
  needs: [test]
  uses: getappmap/analyze-action/.github/workflows/appmap-analysis-matrix.yml@v1
  with:
    archive-count: 2 # Set to the total number of test runners
  permissions:
    actions: read
    contents: read
    checks: write
    pull-requests: write
Pull the latest commit made by the previous GitHub Action workflow run
$ git pullCommit the changes:
$ git add .
$ git commit -m "ci: Add build triggers and analysis step"
Push the changes upstream to your branch.
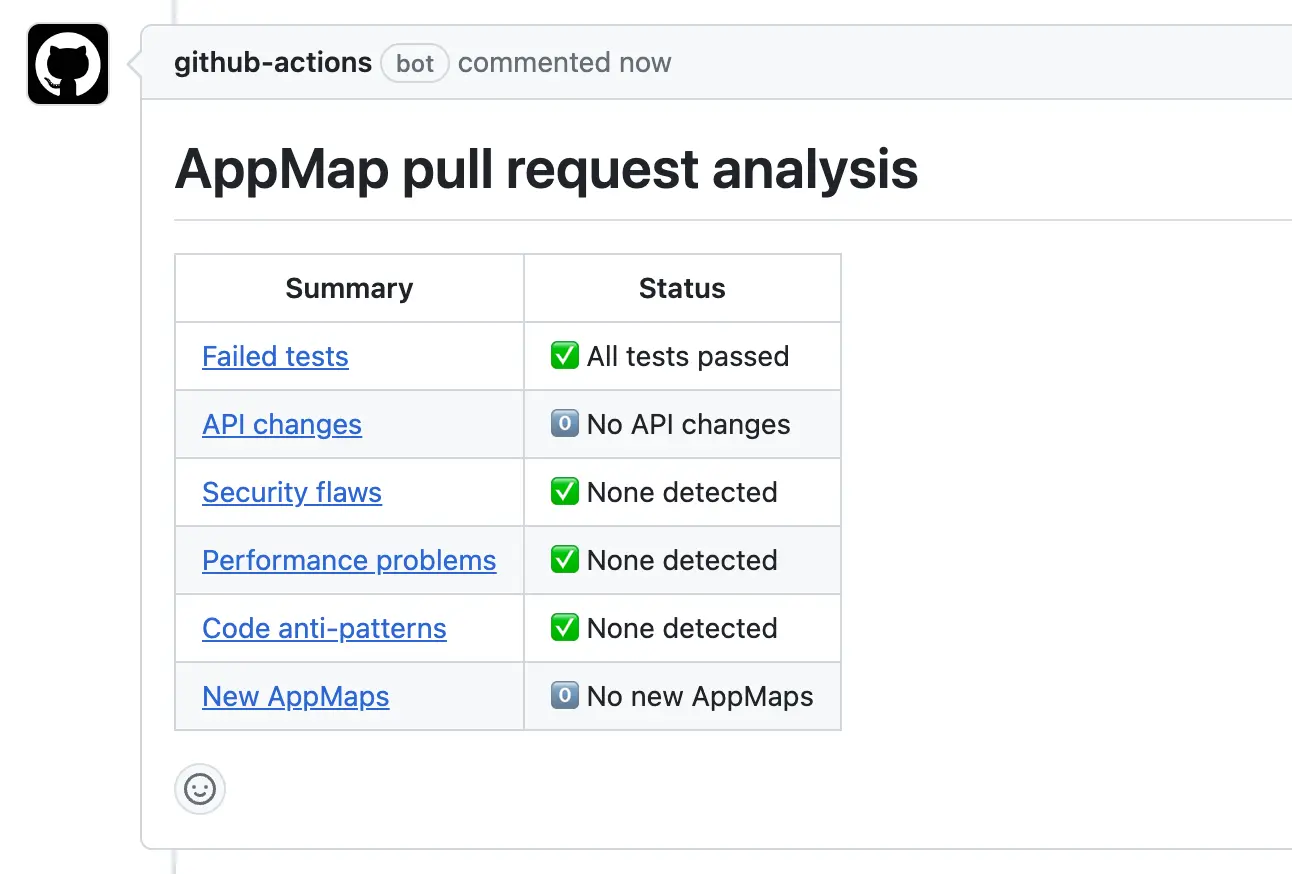
$ git pushAfter the build completes, AppMap will post details of the Analysis build into your pull request.
View an example workflow file for this step here.
If your pull request report shows changes to code behavior or new AppMap Data (when no changes are made), you may have some non-deterministic tests. For additional help resolving this, please contact the AppMap engineering team via email or join the AppMap Community Slack.
(Optional) Step 3: Remove Installation Actions and Configuration
Now that AppMap configuration files are included in your project, you no longer need the
permissionsblock at the top of your action (unless required for other actions) andadd-and-commitactions in your project. Additionally, modify theinstall-actionto disable library installation. The Action will require the AppMap CLI tools installed to successfully archive the AppMap Data archive from each runner. If they are left in place your project will always update to the latest released versions of AppMap libraries. Remove the following lines to have more control over future software updates.This action can be deleted.
- name: Commit changes
  if: ${{ matrix.ci_node_index == 0}}
  uses: EndBug/add-and-commit@v9
Unless needed for other Actions in your workflow, modify this section with updated permissions from Step 1:
permissions:
  contents: write
Modify the
install-actionwith the following setting:- name: Install AppMap tools uses: getappmap/install-action@v1 with: install-appmap-library: falseFinally, you can set your
checkoutaction back to the default.- name: Checkout uses: actions/checkout@v3After removing those Actions, add and commit to your branch.
$ git add .
$ git commit -m "ci: Remove installation actions"
Push the changes upstream to your branch.
$ git pushSee an example GitHub Action configuration with AppMap working with a multi-runner matrix build.
Step 4: Merge this PR to deploy AppMap
Congratulations! You’ve successfully set up the AppMap Github Action and can now merge this into your project to make it available for every other developer to use on each of their subsequent pull requests.
Troubleshooting
- The AppMap GitHub Action Does Not Run in my Environment
- I Can’t Open AppMap Diagrams in my Pull Request Report
The AppMap GitHub Action Does Not Run in my Environment
Add AppMap to GitHub Allowed Actions
If your organization limits which GitHub Actions can be used, update your organization settings to allow the specific AppMap actions required for this integration to work. All AppMap Actions are published on the GitHub Marketplace under the
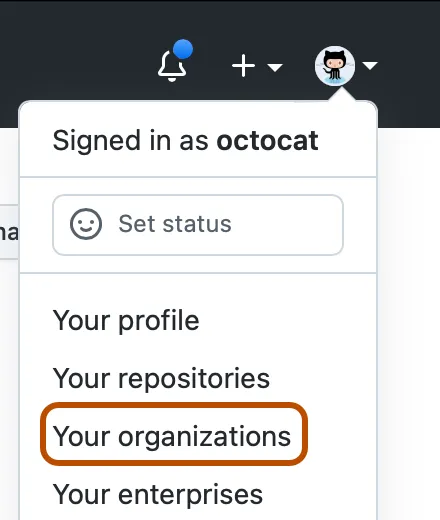
getappmapowner namespace.In the top right corner of GitHub.com, click your profile photo, then click Your organizations.
Next to the organization, click Settings.
In the left sidebar, click Actions, then click General.
Under “Policies”, select Allow OWNER, and select non-OWNER, actions and reusable workflows and add the following AppMap required actions. This will ensure that current and future actions will be supported.
getappmap/*Alternatively, if you would like to restrict to only the current list of actions further you can list them individually. You will need to keep this list updated as new features and functionality are added.
getappmap/install-action@*,getappmap/archive-action@*,getappmap/analyze-action@*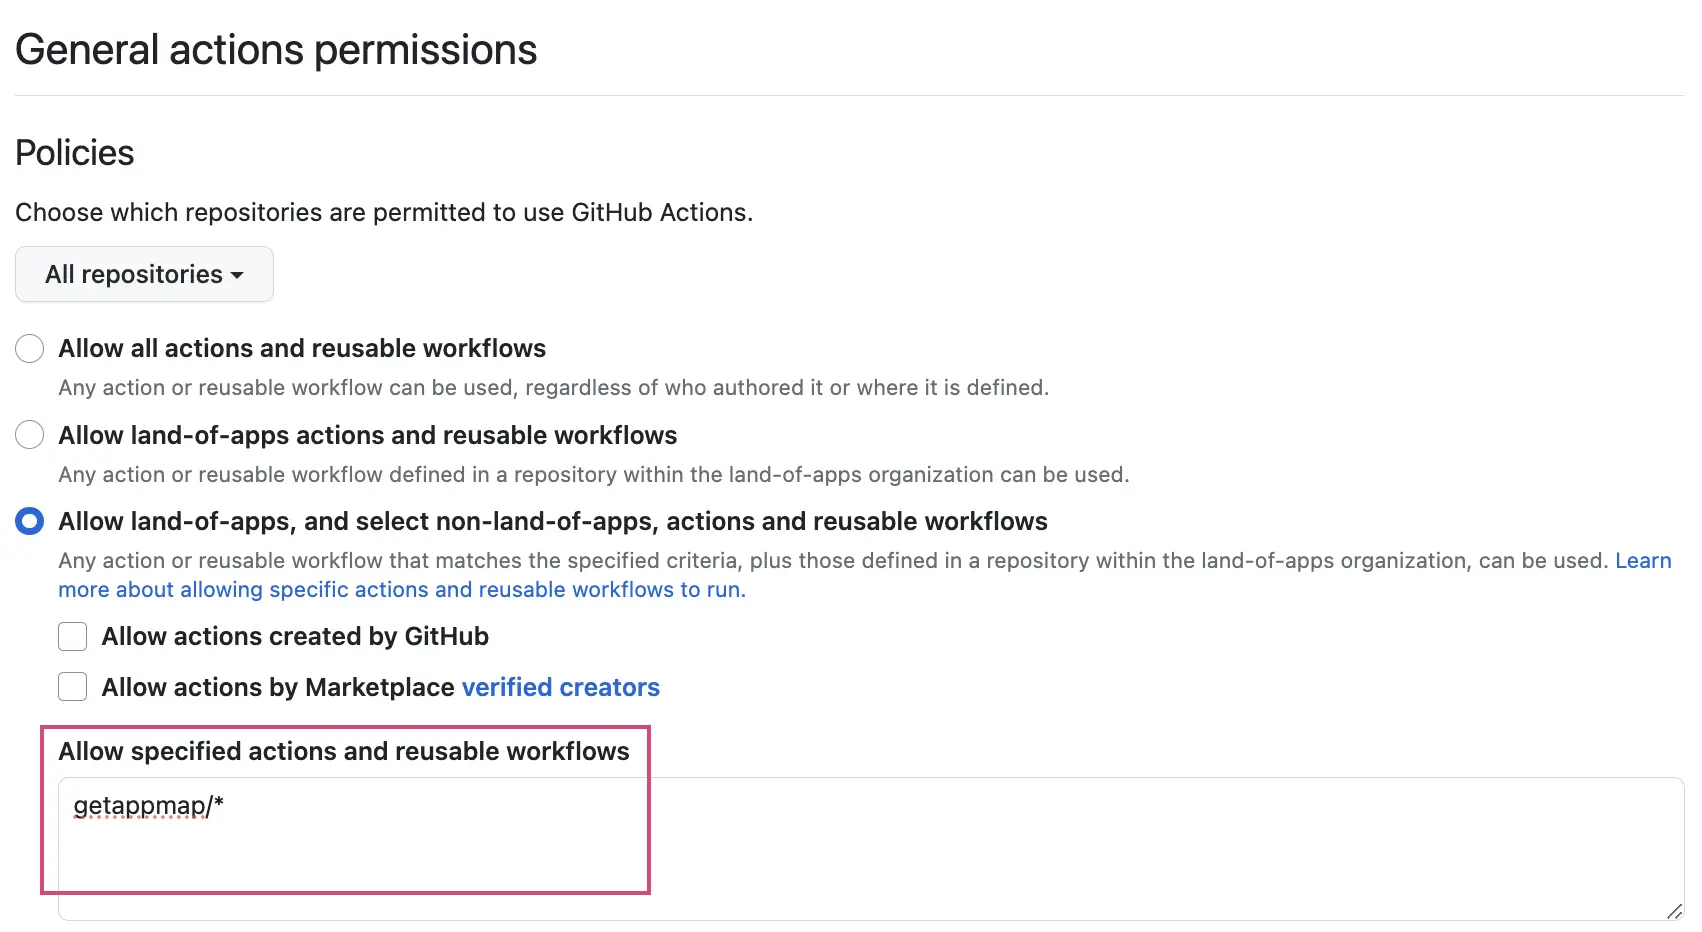
I Can’t Open AppMap Diagrams in my Pull Request Report
This is caused by not having the AppMap GitHub App installed in your GitHub account.
Install or Request the AppMap GitHub App
The AppMap application authorizes your account to run AppMap in CI. It also enables you to open AppMap Diagrams in your browser.
The AppMap application:
- DOES NOT transfer any of your repository code, data, or AppMap Data to an external server.
- DOES confirm that you have access via GitHub permissions to the AppMap Data stored in your repository action.
- DOES open a browser tab with a signed URL that enables your browser to securely download the AppMap Data from your GitHub and display it.
- DOES directly transfer data from YOUR GitHub to YOUR browser, without going through any other other 3rd party services.
Organization owners can install GitHub Apps on their organization. If you are not an organization owner, you can still initiate the install process. GitHub will then send a notification to the organization owner to request them to approve the installation. Ask your organization owner to approve that request.
If you’re installing into your personal account, you will already have permissions to install this app there.
1) Open the AppMap GitHub marketplace page and click
Set up a plan.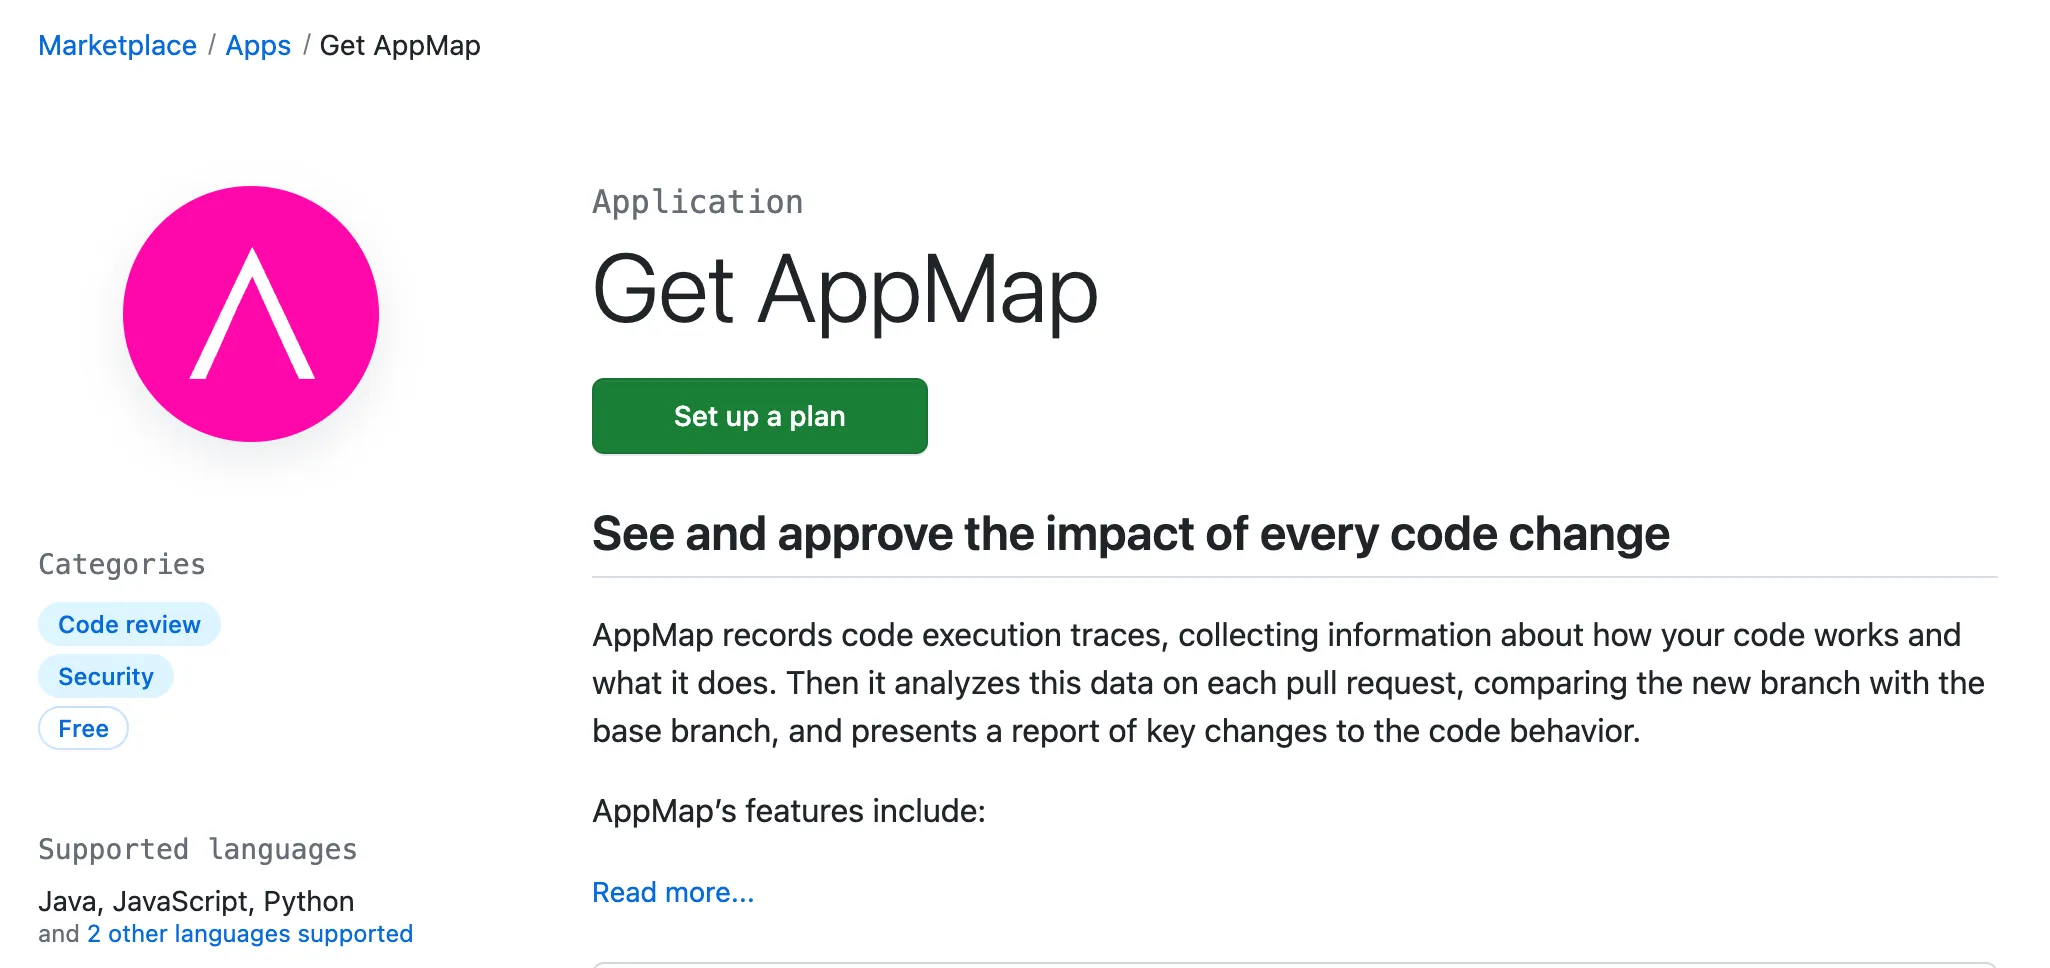
2) Select the GitHub account in which you are using AppMap, and then click the
Installbutton.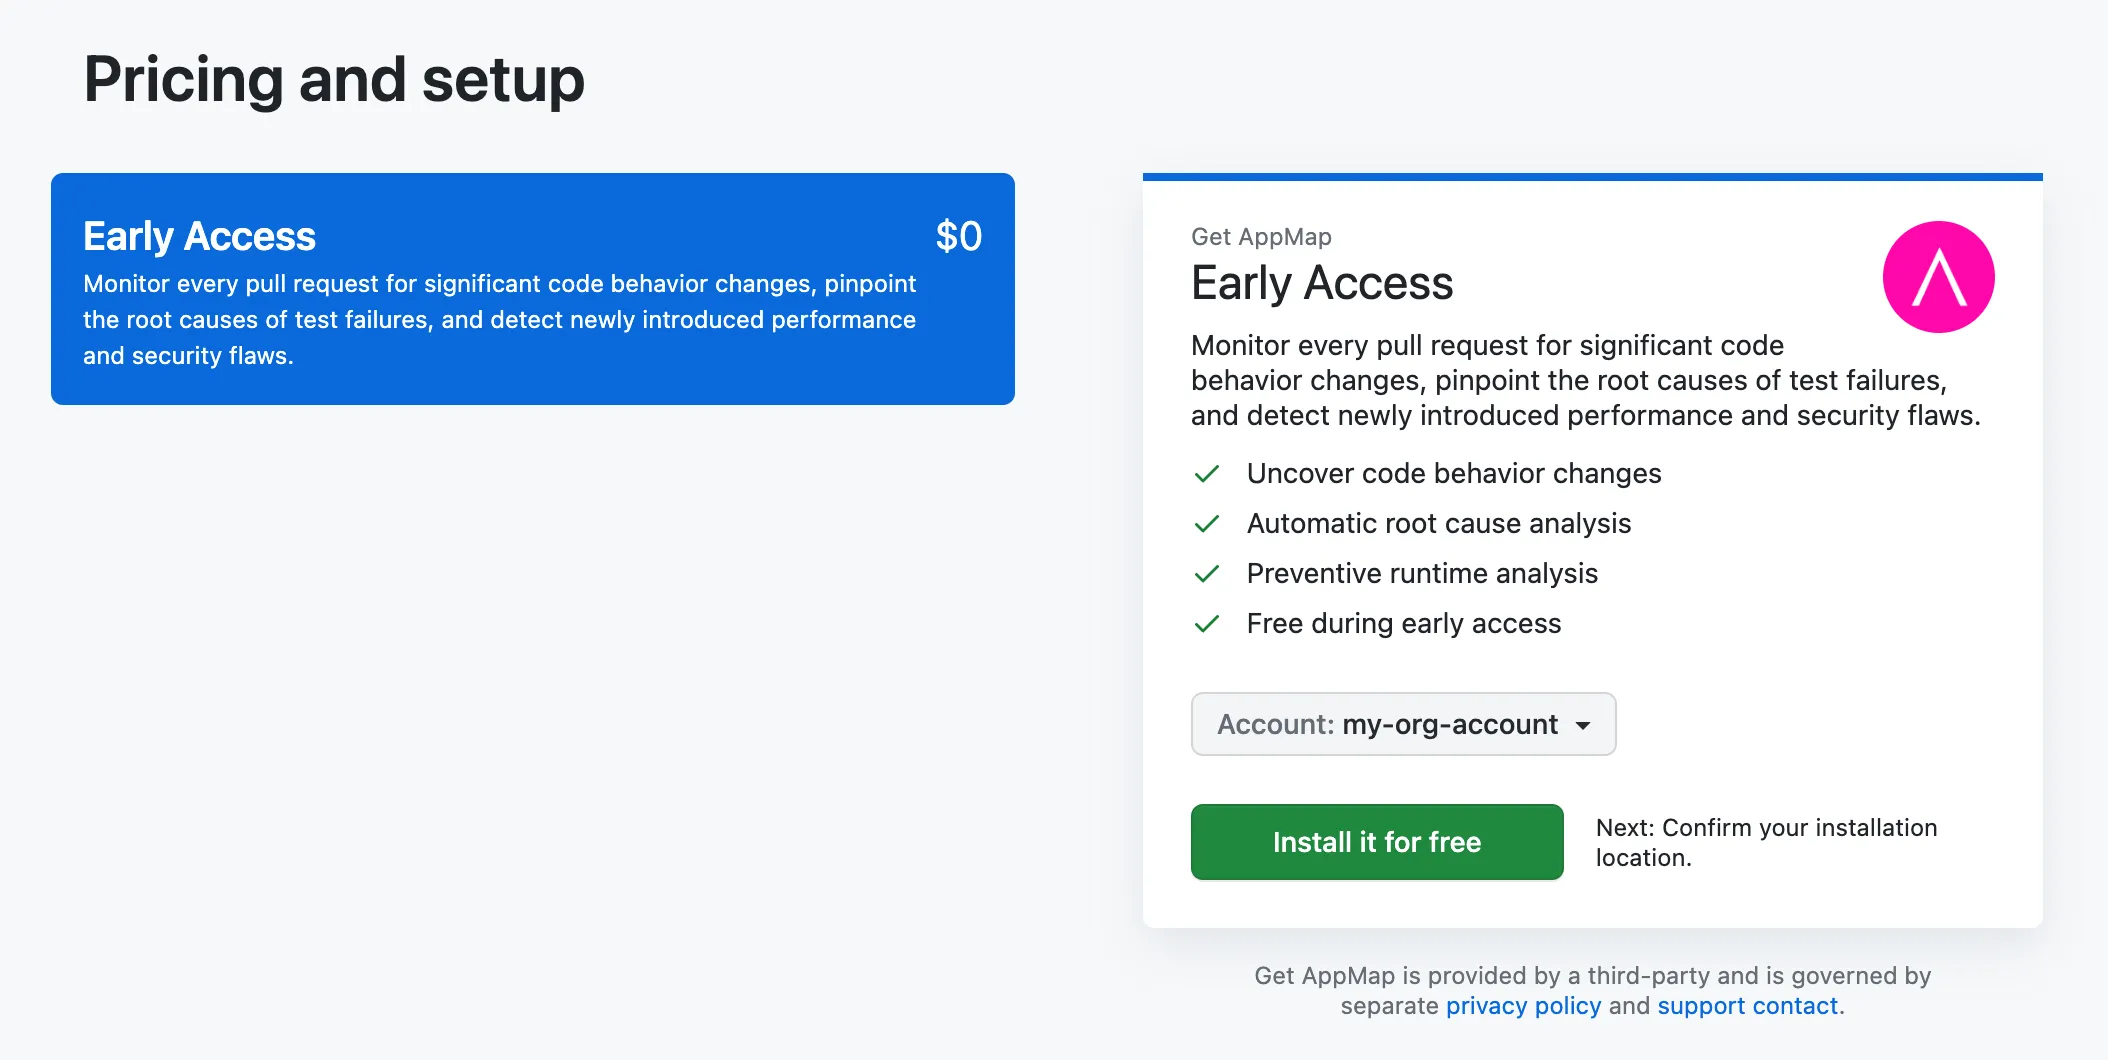
3) Select
All Repositories, or select to install the app into specific repositories.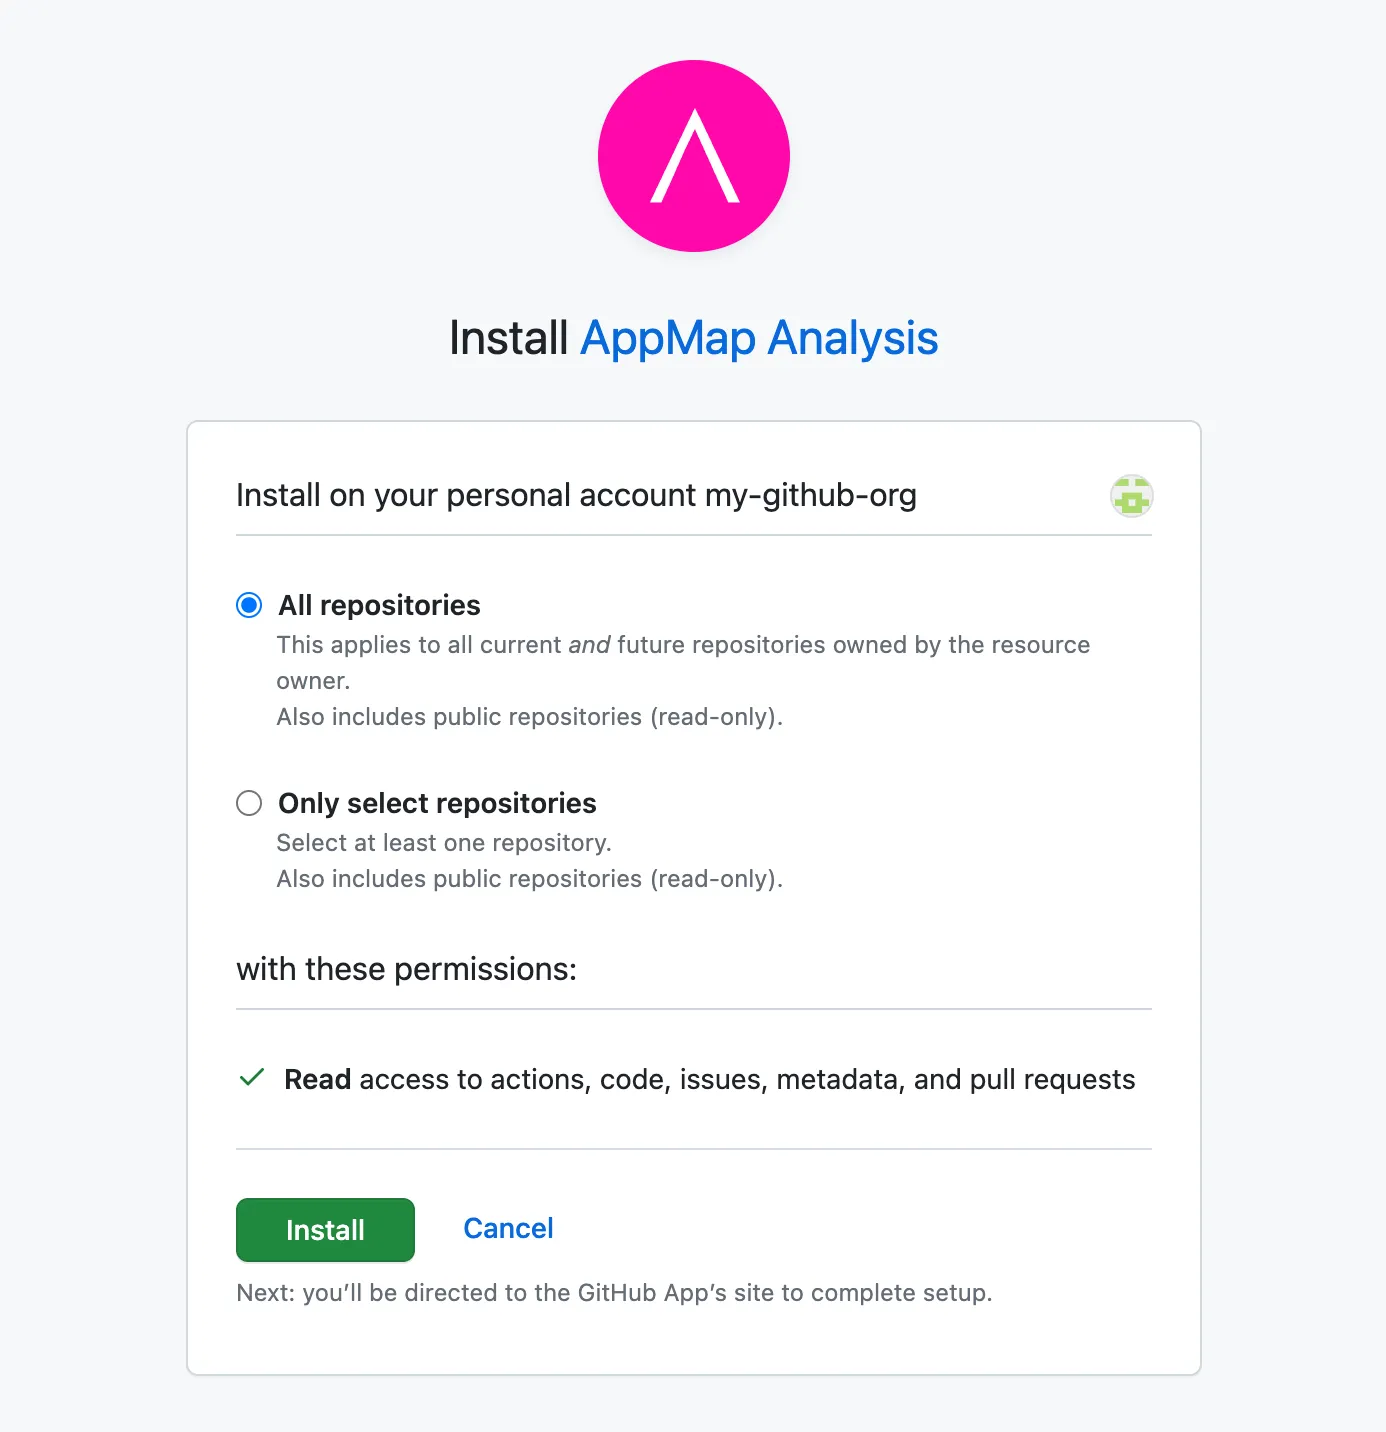
Thank you for your feedback!
