-
Docs
-
AppMap Command line interface (CLI)
Overview
The AppMap CLI provides utility commands to install AppMap client libraries and work with AppMap Data.
Prerequisites
Install AppMap CLI Precompiled Binary
AppMap publishes binaries of the command-line installer for various operating systems, you can find the most recent version of the AppMap command-line installer on GitHub. Expand the “Assets” section to find binaries for Windows, Mac, and Linux.
Save this file locally and rename it to
appmap(orappmap.exefor Windows). If you intend to access it from the command-line, ensure that you place the binary somewhere on yourPATH.The AppMap binary is all that is necessary to run the AppMap CLI (or
appmap.exefor Windows).Usage
Run the precompiled binary on the command line.
$ appmap --helpinstallOpen a terminal window in the top level folder of your project and run this command:
$ appmap installYou will be guided through a series of steps for installing and configuring AppMap. Additionally, you’ll have an option to auto-commit the library and configuration file to your repo, so that the rest of your team can use AppMap without having to repeat the setup process.
Installing AppMap agent for ....
? AppMap is about to be installed. Confirm the details below.
  Project type: Bundler
  Project directory: /Users/username/repos/sample_rails_app
  Git remote: origin	git@github.com:land-of-apps/sample_rails_app.git (fetch)
  Ruby version: 3.1.2p20
  Gem home: /Users/username/.asdf/installs/ruby/3.1.2/lib/ruby/gems/3.1.0

? AppMap is about to be installed. Confirm the details below.
? Commit these files to your repo so that everyone on your team can use AppMap
  without them having to repeat the setup process. Bring runtime code analysis
  to your whole team!
  Gemfile
  Gemfile.lock
  appmap.yml

  Commit? Yes
✔ Validating the AppMap agent...

   ╭─────────────────────────────────────────────────────────────────────╮
   │                                                                     │
   │              Success! AppMap has finished installing.               │
   │                                                                     │
   │                      NEXT STEP: Record AppMap Data                  │
   │                                                                     │
   │   You can consult the AppMap documentation, or continue with the    │
   │     instructions provided in the AppMap code editor extension.      │
   │                                                                     │
   ╰─────────────────────────────────────────────────────────────────────╯
The installer changes your project’s build process (yarn.lock for JavaScript, Gemfile for Ruby, etc) to run AppMap when the tests run and when developing locally. It will not be added to your production system.
indexUse this command to compute fingerprints and update index files for all AppMap Data in a directory. Indexing also builds the query database (
query.db) that thequerycommand reads.Usage
Run the command in your project directory. It will locate AppMap Data using the
appmap_dir:setting inappmap.yml(or the--appmap-diroption), index every AppMap it finds, and exit:$ appmap indexThe query database is stored outside of your project, at
~/.appmap/data/<sha>/query.db, where<sha>is derived from the resolved path of the AppMap directory. Each AppMap directory therefore gets its own query database. You can override this location with the--query-dboption.Re-run
appmap indexafter recording new AppMap Data to bring the index and query database up to date. Alternatively, use the--watchoption to keep the indexer running continuously; it will index new and changed AppMap files as they appear:$ appmap index --watchThe
--portoption (which implies--watch) additionally starts a JSON-RPC server on the given port. This mode is used by the AppMap code editor extensions and Navie, and is not usually invoked directly.Arguments
appmap index Compute fingerprints and update index files for all appmaps in a directory Options: --version Show version number [boolean] -v, --verbose Run with verbose logging [boolean] --help Show help [boolean] -d, --directory program working directory [string] --appmap-dir directory to recursively inspect for AppMaps -w, --watch watch the directory for changes to appmaps [boolean] -p, --port port to listen on for JSON-RPC requests [number] --query-db path to query.db (overrides default ~/.appmap/data/<sha>/query.db) [string] --log-navie Log Navie events to stderr [boolean] [default: false]queryUse this command to search and analyze indexed AppMap Data.
queryprovides a family of subcommands (“verbs”) that answer questions about recorded application behavior: which routes were exercised, which requests failed, which functions and SQL queries are slowest, how behavior differs between branches, and more.queryreads from the query database built by theindexcommand, so runappmap indexfirst. If the query database is missing,querywill exit with an error prompting you to build it.Query verbs
Verb Description endpointsPer-route summary table. A good first command for orienting yourself in a set of recordings. find <type>Row-level search across recordings. Types: appmaps(aliasrecordings),requests,queries,calls,exceptions,logs.tree <appmap>Render the call tree of one recording. related <appmap>Rank recordings that are similar to the given recording. hotspotsRank functions or SQL queries by cumulative elapsed time. compare <branch-a> <branch-b>Per-route latency delta between two branches. mcpRun an MCP (Model Context Protocol) server on stdio that exposes the query verbs as tools, for use by AI assistants. uiLaunch a local web UI for browsing the query database (dashboard, endpoints, hotspots, traces). Run any verb with
--helpfor its full set of options:$ appmap query find --helpCommon options
Most verbs accept
--appmap-dir(directory containing the AppMap Data) and--query-db(explicit path to the query database), as well as--jsonto emit machine-readable output instead of a formatted table. Thefindverb supports a rich set of filters, including--route,--class,--method,--status,--duration,--branch,--commit,--since,--until, and--table.Examples
Summarize all recorded routes:
$ appmap query endpointsFind failed requests:
$ appmap query find requests --status ">=500"Find SQL queries that touch the
userstable, as JSON:$ appmap query find queries --table users --jsonRank the slowest functions and SQL queries:
$ appmap query hotspotsrpcUse this command to run the AppMap JSON-RPC server. The server exposes AppMap Data and Navie AI methods over JSON-RPC, and is the integration point used by the AppMap code editor extensions. You can also run it directly to integrate AppMap and Navie into your own tools and scripts.
Usage
$ appmap rpcBy default the server listens on a port chosen by the operating system (
--port 0); the selected port number is printed to stdout on startup. Pass an explicit--portto use a fixed port.The server provides JSON-RPC methods for:
- Searching AppMap Data and retrieving AppMap statistics, metadata, data, and sequence diagrams.
- Asking Navie AI questions about your application (
explain), including managing conversation threads, message attachments, and pinned items. - Getting and setting configuration, and listing and selecting Navie AI models.
To invoke a single RPC method from the command line without keeping a server running, use the companion
rpc-clientcommand:$ appmap rpc-client <function> [request]Arguments
appmap rpc Run AppMap JSON-RPC server Options: --version Show version number [boolean] --help Show help [boolean] --verbose Verbose output [boolean] [default: false] -d, --directory program working directory. May be repeated. [array] --log-navie Log Navie events to stderr [boolean] [default: false] --ai-option Specify an extended option to the AI provider, in the form of a key=value pair. May be repeated. [array] --prompt A file containing custom system prompts to send to the LLM [string] --code-editor Active code editor. This information is used to tune the @help responses. If unspecified, the code editor may be picked up from environment variables APPMAP_CODE_EDITOR, TERM_PROGRAM and TERMINAL_EMULATOR. [string] --thread-id The thread ID to use for the question. If not provided, a new thread ID will be allocated. [string] --trajectory-file File to write the LLM interaction history, in JSONL format [string] -p, --port port to listen on for JSON-RPC requests. Use port 0 to let the OS choose a port. The port number will be printed to stdout on startup. [number] [default: 0]inspectSearch AppMap Data for references to a code object (package, function, class, query, route, etc) and print available event info.
$ appmap inspect --helpappmap inspect <code-object> Positionals: code-object identifies the code-object to inspect [required] Options: --version Show version number [boolean] -v, --verbose Run with verbose logging [boolean] --help Show help [boolean] --appmap-dir directory to recursively inspect for AppMap Data [default: "tmp/appmap"] -i, --interactive interact with the output via CLI [boolean]You can use this command to search and display events and associated data from across all the AppMap Data in a directory (recursively explored).
The
code-objectargument is a required argument, composed of a type and identifier. The inspect command will find all events that match this code object across the AppMap Data. Whether an event matches thecode-objectargument is defined as follows:code-object type match criteria function The event is a call to the specified function class The event is a call to any function on the specified class package The event is a call to any function on any class in the specified package database The event is a SQL query table The event is a SQL query which includes the specified table query The event is a SQL query which, when normalized, matches the specified query route The event is an HTTP server request which matches the specified route method and normalized path. Examples of supported search syntax:
function:my/package/My::Class#instance_methodfunction:my/package/My::Class.static_methodclass:my/package/My::Classpackage:my/packagetable:table_namedatabase:-
route:REQUEST_METHOD /route/:id(HTTP request method followed by normalized path) -
query:SELECT * FROM tables WHERE some_column = ?(normalized SQL)
Interactive mode
With the
--interactiveoption, the results are presented in table form, and you can refine and drill into the data using the command line.$ appmap inspect --interactiveWithout the
--interactiveoption, all matching results are printed as JSON. This mode is suitable for searching AppMap Data and printing results that can be piped into other scripts (e.g. using jq) for further processing.Interactive mode arguments
(h)ome
The home screen is displayed at the beginning of interactive mode. The
(h)omecommand will generally return you to the home screen, when you are in other parts of the app.The home screen presents the following data:
Field index Field name Description 1 Events A list of AppMap Diagrams and event indices that match the initial search term and filters. 2 Return values Enumeration of all the different values returned by the matching object (most applicable when searching for a function). 3 HTTP server requests Distinct routes in which the code object is found. Each listed result is a unique request method, normalized path, and status code. 4 SQL queries Unique normalized SQL which is a descendant (or self) of the matching code object. 5 SQL tables Unique tables which are found in the SQL queries, as defined in field 4. 6 Callers Unique functions which are the parent of each matching code object. 7 Ancestors Unique HTTP server requests and labeled functions which appear as an ancestor of a matching code object. 8 Descendants Unique labeled functions which appear as a descendant of a matching code object. 9 Package trigrams Unique combinations of caller → code-object → callee, converted to package names. 10 Class trigrams Unique combinations of caller → code-object → callee, converted to class names. 11 Function trigrams Unique combinations of caller → code-object → callee, as functions, SQL, or HTTP client requests. On the home screen, a field is displayed if there are only a small number of distinct values. Otherwise, the number of distinct values is shown, and you can use the
(p)rintcommand to see the full details.(p)rint
Prints the full details of a numbered field. Unlike the
(h)omeview, which will summarize fields with many values, the(p)rintcommand will always print out all the distinct values of a field (even if there are thousands of them…).(f)ilter
Applies a filter to the result set. You can use this command to reduce the number of search matches that are displayed, both on the
(h)omescreen and in the(p)rintviews.When you choose the
(f)iltercommand, you’re first prompted to select which field you want to choose the filter value from. For example, you may see a table that includes(2) Return values (3) HTTP server requests (6) Callers. On choosing one of these fields, you are then prompted to select a value. The values will be the same as if you chose to(p)rintthe selected field. Each field value is numbered; enter the number of the field value to activate it as a filter.The result set is then recomputed, matching only events that match BOTH the main code-object argument that you initially provided to the search command, AND the filter.
For example, if you searched for
table:usersand then filtered byrequest:GET /user 200, the search would match every query that accesses the users table within an HTTPGETrequest to/userthat returns status code200.If you apply another filter, then BOTH filter conditions must match each result.
(u)ndo filter
Un-apply the most recently applied filter.
(r)eset filters
Remove all filters.
(q)uit
Quit the interactive program.
sequence-diagramappmap sequence-diagram <appmap...> Generate a sequence diagram for an AppMap Positionals: appmap [array] [required] [default: []] Options: --version Show version number [boolean] -v, --verbose Run with verbose logging [boolean] --help Show help [boolean] -d, --directory program working directory [string] --output-dir directory in which to save the sequence diagrams --show-browser when using a browser to render the diagram, show the browser window [boolean] [default: false] --loops identify loops and collect under a Loop object [boolean] [default: true] -f, --format output format [choices: "png", "plantuml", "json"] [default: "png"] --filter Filter to use to prune the map [string] --exclude code objects to exclude from the diagram [deprecated] --expand code objects to expand in the diagramFor example, to generate a PNG of an AppMap named
example, but with two packages namedcom.techcom.modelsandcom.techcom.viewsexpanded into their constituent classes on separate lifelines:appmap sequence-diagram --expand package:com/techcom/models --expand package:com/techcom/views example.appmap.jsonsequence-diagram-diff
appmap sequence-diagram-diff base-diagram head-diagram Diff sequence diagrams that are represented as JSON Positionals: base-diagram base diagram file or directory to compare [required] head-diagram head diagram file or directory to compare [required] Options: --version Show version number [boolean] -v, --verbose Run with verbose logging [boolean] --help Show help [boolean] -d, --directory program working directory [string] --output-dir directory in which to save the sequence diagrams [default: "."] --format output format [choices: "plantuml", "json"] [default: "plantuml"]openapi$ appmap openapi --helpappmap openapi Generate OpenAPI from AppMap Data in a directory Options: --version Show version number [boolean] -v, --verbose Run with verbose logging [boolean] --help Show help [boolean] --appmap-dir directory to recursively inspect for AppMap Data [default: "tmp/appmap"] -o, --output-file output file name --openapi-template template YAML; generated content will be placed in the paths and components sections --openapi-title info/title field of the OpenAPI document --openapi-version info/version field of the OpenAPI documentUse this command to generate OpenAPI documentation from all AppMap Data in a directory (recursively explored).
openapiships with a defaultymltemplate but you can use a custom template if you specify its file with the optional--openapi-templateparameter.The
--openapi-titleand--openapi-versionparameters override the values of theinfo/titleandinfo/versionproperties in the generated document.statsUse this command to show statistics about events from a single AppMap Diagram or all diagrams in a directory.
Usage
The
statscommand takes a directory of AppMap Data and will identify the largest diagrams, and will also calculate which functions have the highest AppMap overhead. You can use this data alongside theprunecommand to reduce the size of your AppMap Diagram or remove noisy functions. To target a specific AppMap use the--appmap-fileoption with the name of the map.For example:
To get statistics for all the AppMap Data in a directory, this will look recursively in all directories below
tmp/appmap:$ appmap stats tmp/appmap ✔ Computing AppMap stats... Largest AppMaps (which are bigger than 1024kb) 1.5MB minitest/Microposts_interface_micropost_interface.appmap.json 1.5MB minitest/Valid_login_redirect_after_login.appmap.json 1.1MB minitest/Invalid_password_login_with_valid_email_invalid_password.appmap.json ✔ Computing functions with highest AppMap overhead... Total instrumentation time 1947ms Functions with highest AppMap overhead Time | % | Count | Function name 546ms | 28.1% | 2082 | sprockets/Sprockets::EncodingUtils.unmarshaled_deflated 268ms | 13.8% | 2082 | ruby/Marshal.load 180ms | 9.2% | 3211 | ruby/Array#pack 154ms | 7.9% | 375 | actionview/ActionView::Resolver#find_all 85ms | 4.4% | 2054 | logger/Logger::LogDevice#write 64ms | 3.3% | 7 | app/mailers/UserMailer#account_activation 61ms | 3.1% | 120 | ruby/Marshal.dump 59ms | 3% | 9 | app/mailers/UserMailer#password_reset 58ms | 3% | 517 | openssl/OpenSSL::Random.random_bytes 52ms | 2.7% | 1042 | activesupport/ActiveSupport::Callbacks::CallbackSequence#invoke_afterTo get stats for an individual AppMap, pass the full directory where the AppMap lives, and use the
--appmap-fileoption to list the name of the AppMap.Example:
$ appmap stats tmp/appmap/pytest --appmap-file tests_integration_catalogue_test_category_TestCategoryFactory_test_can_use_alternative_separator.appmap.json
Analyzing AppMap: /tmp/appmap/pytest/tests_integration_catalogue_test_category_TestCategoryFactory_test_can_use_alternative_separator.appmap.json

1. function:oscar/apps/catalogue/abstract_models/AbstractCategory#get_ancestors_and_self
      count: 131033
      estimated size: 48.8 MB

2. function:oscar/apps/catalogue/categories.create_from_sequence
      count: 3
      estimated size: 1.2 KB

3. function:oscar/apps/catalogue/abstract_models/AbstractCategory#save
      count: 3
      estimated size: 1.7 KB

4. function:oscar/apps/catalogue/abstract_models/AbstractCategory#generate_slug
      count: 3
      estimated size: 1.1 KB

5. function:oscar/core/utils.slugify
      count: 3
      estimated size: 794.0 bytes
Arguments
$ appmap stats --helpappmap stats [directory] Show statistics about events from an AppMap or from all diagrams in a directory Options: --version Show version number [boolean] -v, --verbose Run with verbose logging [boolean] --help Show help [boolean] -d, --directory program working directory [string] --appmap-dir directory to recursively inspect for AppMap Data -f, --format How to format the output [choices: "json", "text"] [default: "text"] -l, --limit Number of methods to display [number] [default: 10] -a, --appmap-file AppMap to analyze [string]pruneUse this command to remove events from an AppMap, to make it have better performance, and to make it easier to understand.
Pruning works by finding the most repetitive calls in the map and then removing events associated with those calls. Non-application events such as HTTP requests and SQL queries will always be retained.
Usage
The
prunecommand expects either a--sizeargument or a--filterargument. It will not work if neither are provided. Using the--sizeargument allows you to automatically shrink the AppMap file to a specified file size, while the--filteroption allows you to specify what events to remove.Arguments
You must provide either a
--sizeargument or a--filterargument. You can find more information about the prune command by using the--helpargument:$ appmap prune --helpappmap prune <file> Make an appmap file smaller by removing events Positionals: file AppMap to prune [required] Options: --version Show version number [boolean] -v, --verbose Run with verbose logging [boolean] --help Show help [boolean] -o, --output-dir Specifies the output directory [string] [default: "."] --format How to format the output [choices: "json", "text"] [default: "text"] -s, --size Prune input file to this size [string] [default: "15mb"] -d, --directory Working directory for the command [string] --filter Filter to use to prune the map [string] --output-data Whether to output all AppMap Data or just output what was removed [boolean]Prune to a specific file size
The simplest way to use the
prunecommand is to provide a target size for the map. The prune command will automatically remove functions until the desired size is reached. Using theprunecommand in this way does not give you control over what gets removed, but often times the removed functions are relatively uninteresting (getters, setters, etc.).Prune specific events
The most powerful way to use the
prunecommand is to pass it specific instructions about which events to remove. This is done by using the--filteroption. Here are the steps for using this technique:- Open an AppMap in the code editor.
- Use the filtering available in the AppMap to hide certain events.
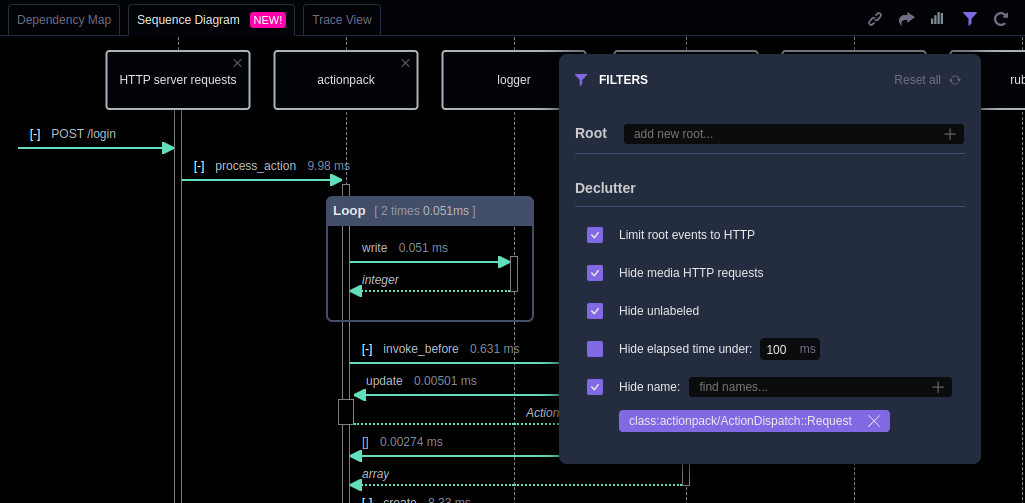
- Open the command palette using
CTRL+SHIFT+PorCOMMAND+SHIFT+Pon macOS, typeAppMap: Copy Current AppMap State to Clipboard, then hitEnter. - Use the copied state as the
--filterargument to theprunecommand. Theprunecommand will remove whatever was filtered in the AppMap in your code editor.
$ appmap prune <APPMAP_FILE> --filter eyJjdXJyZW50VmlldyI6InZpZXdTZXF1ZW5jZSIsImZpbHRlcnMitrimUse this command to shrink AppMap files by truncating captured value strings — parameters, return values, receivers, log messages, and exceptions.
Unlike
prune, which removes events from an AppMap,trimkeeps every event. Only the capturedvaluestrings are shortened; the call structure, code objects, SQL, and all other properties are untouched. A trimmed AppMap is therefore behaviorally identical to the original, but much smaller — which makestrimwell suited to preparing AppMap Data for long-term storage, such as committing a baseline to a repository.Usage
Pass one or more AppMap files to trim. By default, each file is overwritten in place; use
--output-dirto write the trimmed files to a different directory instead. The command reports the size reduction for each file:$ appmap trim tmp/appmap/minitest/*.appmap.json trim tmp/appmap/minitest/Valid_login_redirect_after_login.appmap.json: 1548288 -> 216430 bytes (14%)The
--max-lengthoption controls how aggressively values are truncated. Plain strings are capped at this length (default: 120 characters), while structured values (objects, arrays, hashes) are budgeted per field, so their overall shape remains readable.Each trimmed file records what was done to it in
metadata.trimmed: the tool version and the cap applied. Runningtrimagain on a file that the same version already trimmed to the same cap is skipped. Re-running with a smaller cap truncates further; a larger cap cannot restore what was already cut (the command warns — re-record the AppMap to grow values back). After repeated runs the marker records the smallest cap applied.Arguments
appmap trim <files..> Shrink AppMaps by truncating captured parameter, return, receiver, and message values Positionals: files AppMap file(s) to trim [string] Options: --version Show version number [boolean] -v, --verbose Run with verbose logging [boolean] --help Show help [boolean] --max-length Maximum length of a captured value string (structured values are budgeted per field) [number] [default: 120] -o, --output-dir Write trimmed AppMaps here (default: overwrite each file in place) [string] -d, --directory Working directory for the command [string]sanitizeUse this command to remove secrets and PII from AppMap files before committing or sharing them.
sanitizereplaces every captured runtime value string with a token, so the sanitized file is structurally incapable of carrying a secret.Tokens are equality-preserving within each AppMap: values are replaced with
<v1>,<v2>, … in order of first appearance, and the same original value always receives the same token wherever it occurs — whether as a parameter, a return value, or an HTTP header value. This means data-flow correlation within the AppMap still reads naturally, even though no content characters are retained. When a value has a recognizable shape, the token is annotated with its kind for readability — for example<uuid:v3>,<iso8601:v7>,<hex:v2>, or<int:v5>. Recognition affects only the annotation; a UUID or timestamp is still tokenized like any other value.Each file gets its own token namespace, so values cannot be correlated across AppMap files or across revisions.
Each sanitized file records what was done to it in
metadata.sanitized: the tool version and the allowed values that were applied. Runningsanitizeagain on a file that the same version already sanitized with the same options is skipped; with different options it is re-applied. Re-applying can only tighten: masking is one-way, so allowing a value on a later run cannot restore it if an earlier run already masked it (the command warns — re-record the AppMap to loosen the allowlist). After repeated runs the marker records the values allowed by every run.What is sanitized
Before masking, each file is normalized — the same transform every AppMap viewer applies on load: event updates are merged into their events, event ids are re-indexed, and unreturned calls are balanced. Masking then runs over this canonical form.
Sanitization is positional, driven by the AppMap format: it touches only the fields defined to hold captured runtime data.
- Parameter, message, receiver, and return values
- Exception messages
- HTTP header values on requests and responses (header names are kept)
- The concrete request path (
path_info) and client request URLs, which can carry path parameters such as ids - Metadata that carries captured data: the git user name and email, credentials embedded in the repository URL, and exception and test-failure messages
Code object names, classes, source paths, labels, and normalized route templates are schema, not data, and are never modified.
SQL is handled specially: statements are parameterized rather than tokenized, with literals replaced by
?, so the statement shape remains readable. If a statement cannot be reliably parameterized, the entire statement is downgraded to a token — sanitization fails closed rather than risk leaking a literal.HTTP request routes are also handled specially. A client request URL, and a server request path that has no route template, are the two captured values that feed the
appmap comparedigest — a per-file token there would make two otherwise-identical recordings compare as different. Instead of tokenizing these fields,sanitizenormalizes them to a route template: anyuser:passwordpart of a URL is stripped, the query string and fragment are dropped, the host and static path words are kept, and path segments that look like values are replaced with a placeholder (/users/123becomes/users/:int). The result is the same for every recording of the same route, so comparison stays stable, and the concrete id is erased rather than encoded, so nothing can be reversed. One caveat: without the application’s route table this is a heuristic, so a purely alphabetic path segment — such as a username in/users/alice— cannot be told apart from a route word and is kept. When a server request does have a route template, the concrete path is not used for comparison, and it is fully tokenized like any other value.Allowed values
A small built-in allowlist keeps values that have no secret capacity, such as
true,false,null,nil, andNone. You can extend it with project-specific public vocabularies — enum strings such as state or role names — using--allow(repeatable) or--allow-file(one value per line;#comments and blank lines are skipped). Matching is exact whole-value only: an allowed word appearing inside a larger value keeps nothing.Usage
Pass one or more AppMap files. By default, each file is overwritten in place; use
--output-dirto write the sanitized files elsewhere. Files are written atomically, so an interrupted run never leaves a partial AppMap. A malformed or unreadable file is skipped with a warning rather than aborting the batch — but the command then exits non-zero, because a skipped file keeps its original, possibly secret-bearing contents. Exit code 0 means every file is sanitized. The command reports the number of distinct values tokenized in each file:$ appmap sanitize tmp/appmap/minitest/*.appmap.json --allow pending --allow shipped sanitize tmp/appmap/minitest/Valid_login_redirect_after_login.appmap.json: 214 distinct value(s) tokenized, 1548288 -> 903112 bytesArguments
appmap sanitize <files..> Replace captured values in AppMaps with per-file equality-preserving tokens, so the files cannot carry secrets Positionals: files AppMap file(s) to sanitize [string] Options: --version Show version number [boolean] -v, --verbose Run with verbose logging [boolean] --help Show help [boolean] --allow Value to keep verbatim (repeatable). Exact whole-value match; meant for small public vocabularies such as state or role names [array] [default: []] --allow-file File of values to keep verbatim, one per line (# comments and blank lines skipped) [string] -o, --output-dir Write sanitized AppMaps here (default: overwrite each file in place) [string] -d, --directory Working directory for the command [string]archiveUse this command to build a compressed archive of AppMap Data from a directory containing AppMap Data. Running this command without additional options will result in a “full” archive created at
.appmap/archive/full/{git revision}.tar. Example:.appmap/archive/full/028e610386f2fc132c93e613f57011825a8ae6e0.tarUsage
The
archivecommand does not require any arguments to run, but must be run in a git project with a valid appmap.yml file with AppMap Data located in the directory defined byappmap_dir:in the configuration.Arguments
appmap archive Build an AppMap archive from a directory containing AppMap Data Options: --version Show version number [boolean] -v, --verbose Run with verbose logging [boolean] --help Show help [boolean] -d, --directory program working directory [string] -t, --type archive type [choices: "full", "incremental", "auto"] [default: "auto"] -r, --revision revision identifier. If not explicitly specified, the current git revision will be used. When this command is used in an CI server, it's best to explicitly the provide the revision from an environment variable provided by the CI system, such as GITHUB_HEAD_SHA, because the commit of the current git revision may not be the one that triggered the build. [string] --output-dir directory in which to save the output file. By default, it's .appmap/archive/<type>. [string] -f, --output-file output file name. Default output name is <revision>.tar [string] --analyze, --index whether to analyze the AppMap Data [boolean] [default: true] --max-size maximum AppMap size that will be processed, in filesystem-reported MB [default: 50] --filter filter to apply to AppMap Data when normalizing them into sequence diagrams [string] --thread-count Number of worker threads to use when analyzing AppMap Data [number]restoreUse this command to download the most current available AppMap Data from the available archives. The archived AppMap Data can be stored locally or within a GitHub artifact store if you are using the GitHub integration. The archive filename must match the git revision requested to be restored.
Usage
The
restorecommand does not require any arguments to run. By default, it will look for a valid AppMap tarball in the following location:.appmap/archive/{full,incremental}/{git revision}.tar. After finding a valid AppMap tarball in the default location, the command will extract the archive to the.appmap/work/{git revision}directory.Arguments
appmap restore Restore the most current available AppMap Data from available archives Options: --version Show version number [boolean] -v, --verbose Run with verbose logging [boolean] --help Show help [boolean] -d, --directory program working directory [string] -r, --revision revision to restore [string] --output-dir directory in which to restore the data. Default: .appmap/work/<revision> [string] --archive-dir directory in which the archives are stored [string] [default: ".appmap/archive"] --github-repo Fetch AppMap archives from artifacts on a GitHub repository. GITHUB_TOKEN must be set for this option to work. [string] --exact fail unless the specific revision requested is available to be restored [boolean] [default: false]compareUse this command to compare code behavior by analyzing two sets of AppMap Diagrams from different git revisions.
Usage
The
comparecommand requires--base-revisionto be passed to the command with a valid git SHA (i.e.028e610386f2fc132c93e613f57011825a8ae6e0). The head revision will be inferred based on the current git HEAD SHA for the git project in the current working directory.When comparing two git revisions, you will need to use the
restorecommand configuration flag--output-dirand set the output directory toappmap/change-report/$base_revision-$head_revision/{base,head}. For example if your base revision isc01273ab4929e7d555aa8539f83c188aba42972dand your head revision is028e610386f2fc132c93e613f57011825a8ae6e0, you will need to run the restore command on both revisions making sure your--output-dirlooks like the following:For the head revision (i.e.
028e610386f2fc132c93e613f57011825a8ae6e0):--output-dir .appmap/change-report/$base_revision-$head_revision/headExample:--output-dir .appmap/change-report/c01273ab4929e7d555aa8539f83c188aba42972d-028e610386f2fc132c93e613f57011825a8ae6e0/headFor the base revision (i.e.
c01273ab4929e7d555aa8539f83c188aba42972d):--output-dir .appmap/change-report/$base_revision-$head_revision/baseExample:--output-dir .appmap/change-report/028e610386f2fc132c93e613f57011825a8ae6e0-c01273ab4929e7d555aa8539f83c188aba42972d/baseBoth
baseandheaddirectories will require restored AppMap Data beforecomparewill run.After successfully running,
comparewill output adiffdirectory of AppMap Diagrams and achange-report.jsonwithin the.appmap/change-report/$base_revision-$head_revision/directory.Arguments
appmap compare Compare runtime code behavior between base and head revisions Options: --version Show version number [boolean] -v, --verbose Run with verbose logging [boolean] --help Show help [boolean] -d, --directory program working directory [string] -b, --base-revision, --base base revision name or commit SHA. [required] -h, --head-revision, --head head revision name or commit SHA. By default, use the current commit. --output-dir directory in which to save the report files. Default is ./.appmap/change-report/<base-revisi on>-<head-revision>. --clobber-output-dir remove the output directory if it exists [boolean] [default: false] --source-dir root directory of the application source code [string] [default: "."] --delete-unreferenced, whether to delete AppMap Data from --delete-unchanged base and head that are unreferenced by the change report [default: true] --report-removed whether to report removed findings, such as removed API routes, resolved findings, etc [default: true]compare-reportUse this command to generate a report document from comparison data generated by the compare command.
Usage
The
compare-reportcommand expects thecomparecommand to have successfully executed against two git revisions and generated achange-report.jsonfile. Thecompare-reportcommand expects the first argument passed to it is the directory containing thechange-report.json.Example:
appmap compare-report .appmap/change-report/$base_revision-$head_revisionArguments
appmap compare-report <report-directory>

Generate a report document from comparison data generated by the compare
command.

Positionals:
  report-directory  directory containing the comparison data [string] [required]

Options:
      --version     Show version number                                [boolean]
  -v, --verbose     Run with verbose logging                           [boolean]
      --help        Show help                                          [boolean]
      --source-url  Base URL to link to a source file. The relative path to the
                    source file will be added to the URL path.          [string]
      --appmap-url  Base URL to link to AppMap Data. A 'path' parameter will be
                    added with the relative path from the report directory to
                    the AppMap JSON file.                               [string]
  -d, --directory   program working directory                           [string]
GitHub repository
https://github.com/getappmap/appmap-js/tree/main/packages/cli
Thank you for your feedback!