To access the latest features keep your code editor plug-in up to date.
-
Docs
-
Reference
- AppMap for Visual Studio Code
- AppMap for JetBrains
- AppMap Agent for Ruby
- AppMap Agent for Python
- AppMap Agent for Java
- AppMap Agent for Node.js
- AppMap for Java - Maven Plugin
- AppMap for Java - Gradle Plugin
- AppMap Command line interface (CLI)
- Remote recording API
- Analysis Labels
- Analysis Rules
- License Key Installation
- Subscription Management
- AppMap Offline Install for Secure Environments
- Uninstalling AppMap
Advanced AppMap Data Management- Community
Record AppMap Data in Kubernetes/minikube
If you use minikube to run your application locally for testing and development, you can create and access AppMap data by mounting a volume into your minikube host and making this volume available to your Kubernetes application pod.
If you are unable to mount a directory using minikube, or if your Kubernetes cluster is running remotely in a dev or test environment, you can use alternative techniques such as
kubectl cpto copy AppMap data from a pod to your local machine for analysis, or you can leverage Remote Recording of your application instead.- AppMap and minikube Setup
- Add and Enable AppMap within your Application Pod Configuration
- Remote Record Application within Kubernetes Pod
- Copy AppMap Data from Application Pod to Local Machine
Appmap and minikube Setup
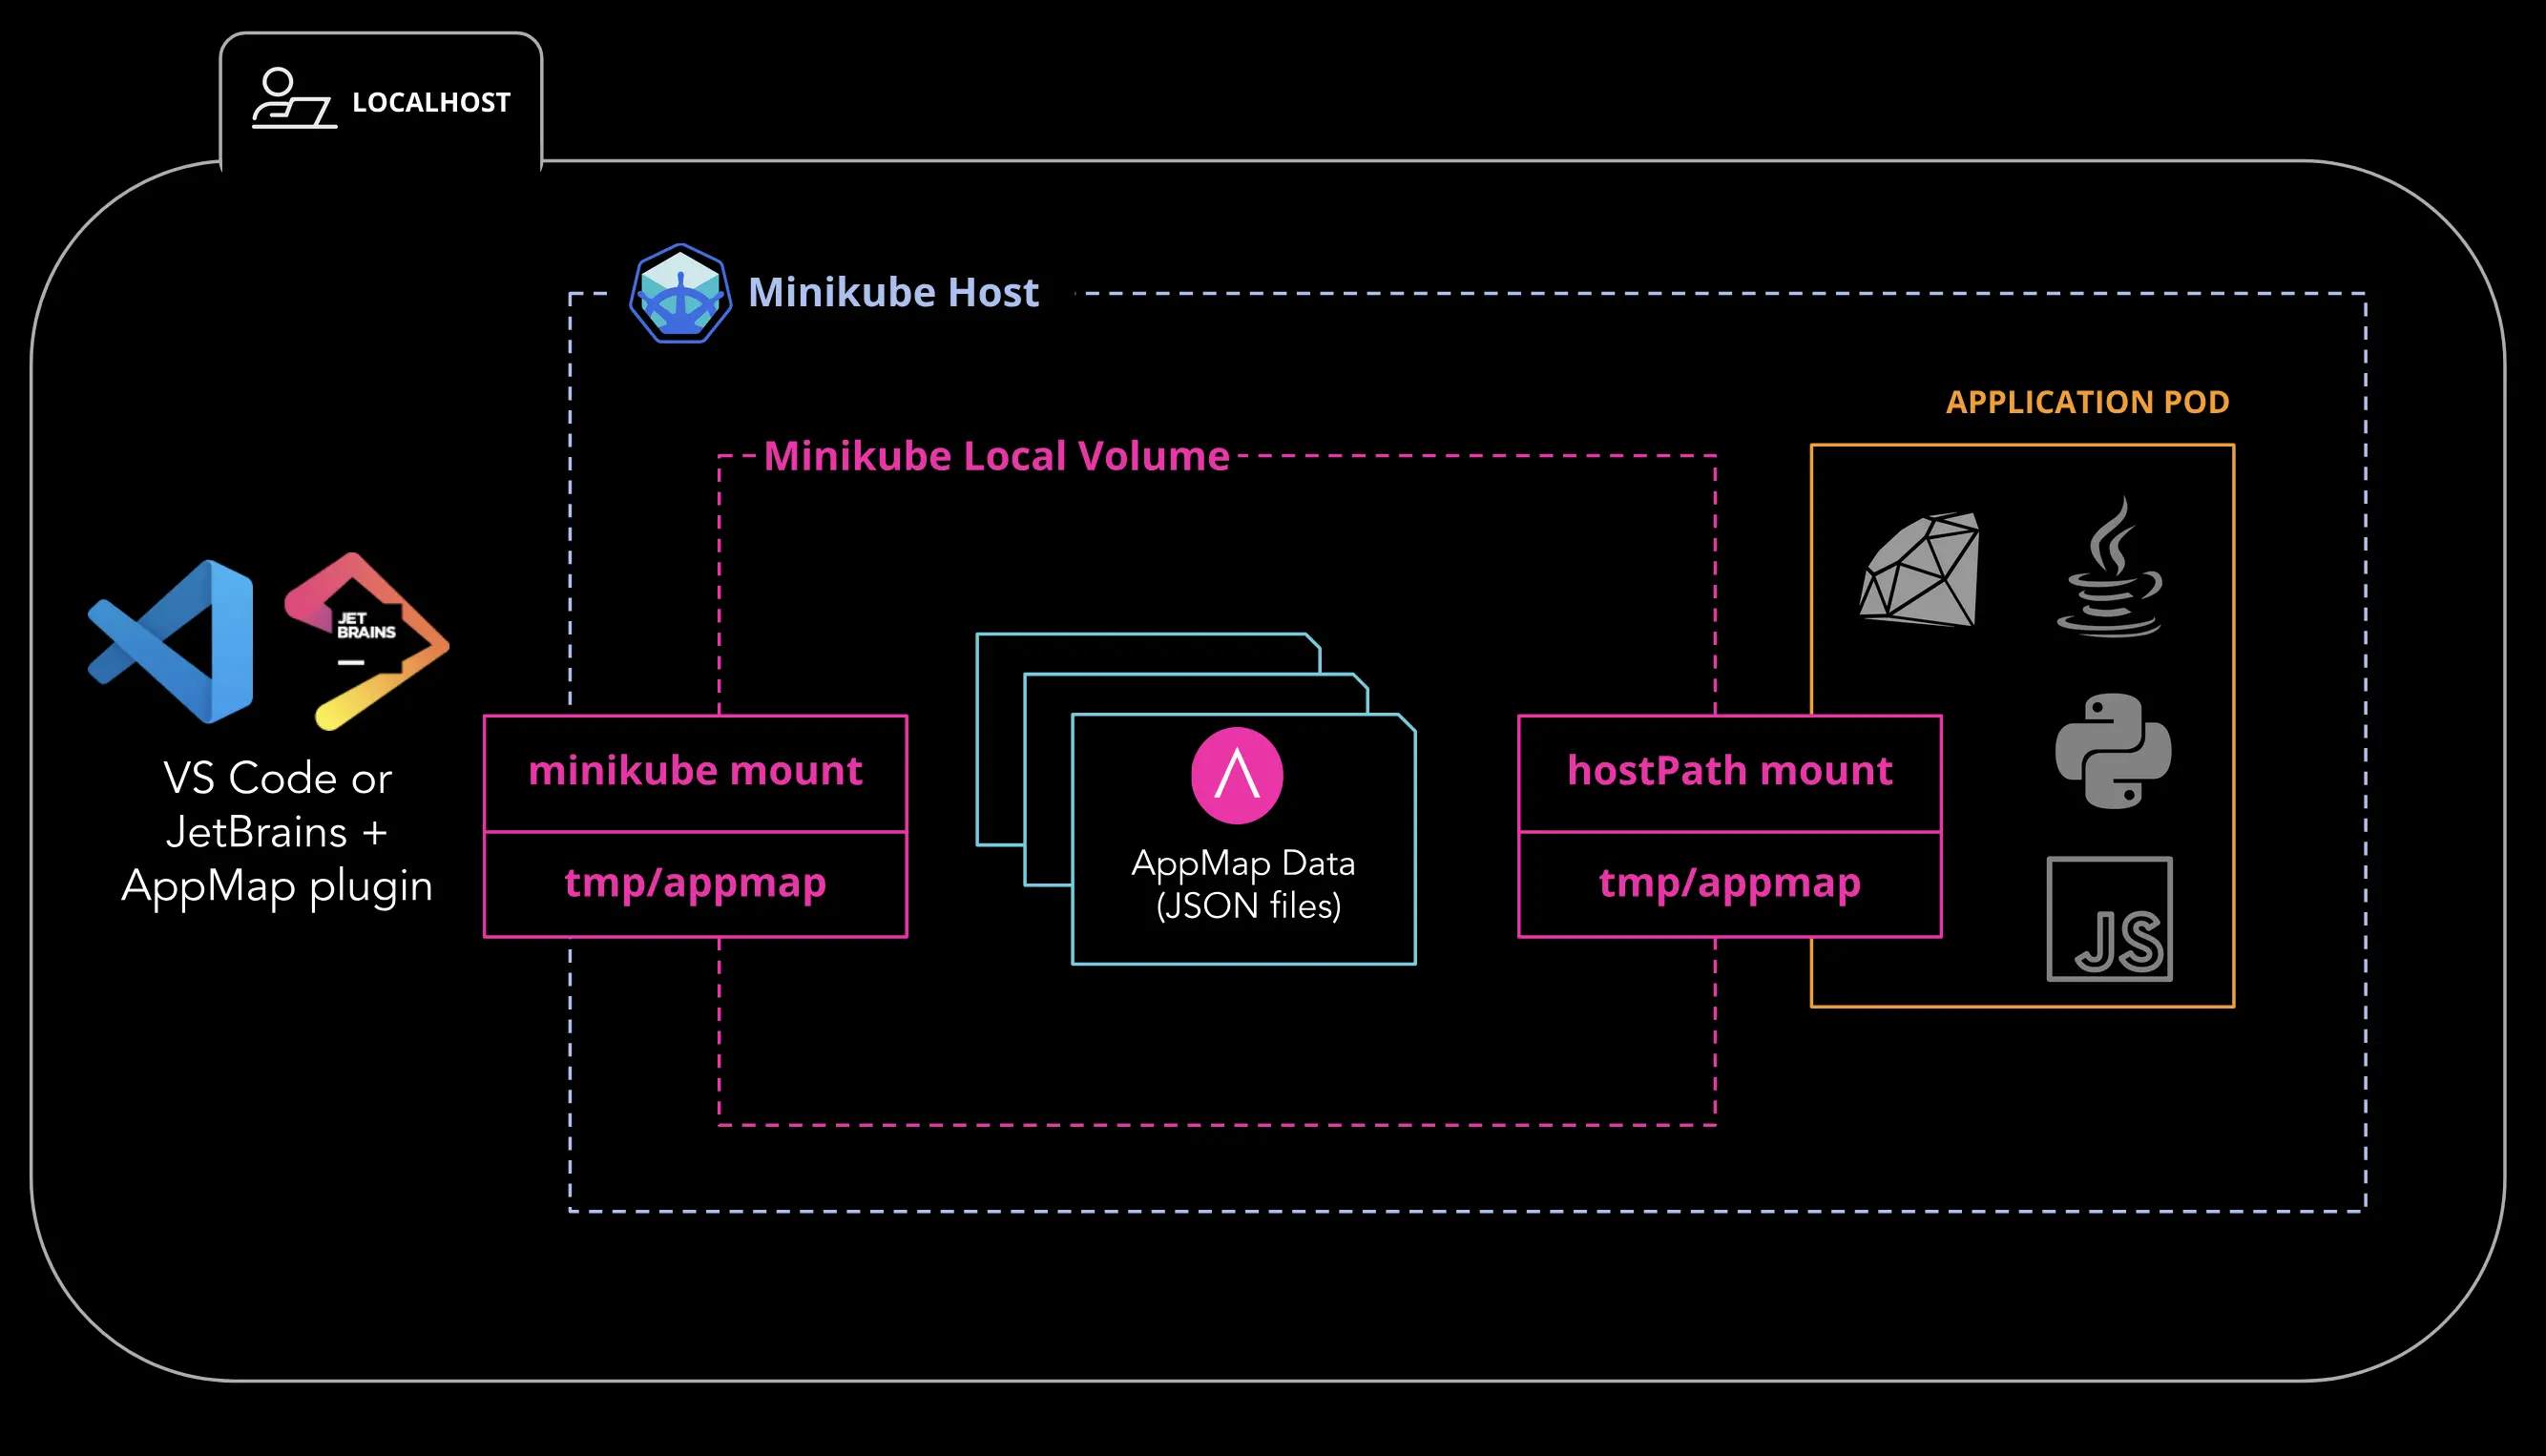
AppMap and minikube Architecture

Mount AppMap Data Directory into minikube Host
To get direct access to your AppMap data from within your Code Editor with the AppMap plugin you need to use the minikube mount command to map the
tmp/appmapdirectory in your project into your minikube virtual machine.Note: Mount this directory before you deploy your application pod to ensure the application can write into directory mount.
Refer to the minikube mount documentation for more details and requirements about this feature.
From your local machine, run the following command to map your local AppMap directory to a directory on your minikube host.
$ minikube mount <Local AppMap Dir>:<Remote minikube Dir>For example, to mount my
tmp/appmapdirectory from my local project to the/appmap-hostdirectory$ minikube mount tmp/appmap:/appmap-host 📁 Mounting host path tmp/appmap into VM as /appmap-host ... ▪ Mount type: 9p ▪ User ID: docker ▪ Group ID: docker ▪ Version: 9p2000.L ▪ Message Size: 262144 ▪ Options: map[] ▪ Bind Address: 127.0.0.1:50300 🚀 Userspace file server: ufs starting ✅ Successfully mounted tmp/appmap to /appmap-host 📌 NOTE: This process must stay alive for the mount to be accessible ...Connect Shared Volume into Application Pod via hostPath
After you have completed the previous step and mounted your local AppMap data directory into the minikube host, update your pod’s deployment file with a new
volumeMountsconfiguration as well as a hostPath volume.Add
volumeMountsConfigurationIn the
containerssection of the pod’s deployment file, add or append to thevolumeMountssection with the full path to the AppMap directory within your application’s working directory.volumeMounts: - name: appmap-dir mountPath: <Your application working directory>/tmp/appmapFor example, if your application is running in
/usr/src/app, set themountPathto/usr/src/app/tmp/appmap.Example:
volumeMounts:
  - name: appmap-dir
    mountPath: /usr/src/app/tmp/appmap
Add a
hostPathVolume to the PodWith the
volumeMountsconfiguration added to your pod’s deployment file, now add or append to yourvolumessection connecting the volume mount to the minikube host. Use the same directory you defined in the previous section using theminikube mountcommandvolumeMounts: - name: appmap-dir mountPath: <Remote minikube Dir>For example, in the
minikube mountcommand we mounted thetmp/appmapdir to the/appmap-hostdirectory within our minikube host. We’ll set themountPathequal to the/appmap-hostdirectory.volumeMounts: - name: appmap-dir mountPath: /appmap-hostUpdated deployment.yml File Example
For a fully working example project example, refer to the AppMap GitHub repo.
apiVersion: apps/v1
kind: Deployment
spec:
  replicas: 1
    spec:
      containers:
        - name: django
          image: petecheslock/django_oscar:latest
          imagePullPolicy: Always
          command: ["/bin/sh"]
          args: ["-c", "python appmap-python sandbox/manage.py runserver 0.0.0.0:8000"]
          ports:
            - containerPort: 8000
          envFrom:
            - configMapRef:
                name: django-config
          resources:
            limits:
              memory: 512Mi
              cpu: "250m"
            requests:
              memory: 512Mi
              cpu: "250m"

+          volumeMounts:
+            - name: appmap-dir
+              mountPath: /usr/src/app/tmp/appmap
+
+      volumes:
+        - name: appmap-dir
+          hostPath:
+            path: /appmap-host
Video Demonstration
Add and Enable AppMap within your Application Pod Configuration
For more information about how to enable your application to create AppMap data, follow the AppMap documentation based on your language and framework.
After adding the AppMap software libraries and other necessary configurations to your application, redeploy your pod with AppMap enabled. After your application starts, use the
minikube tunnelcommand to make a connection to yourLoadBalancerservices to allow ingress network connections to your application. Refer to the minikube documentation for more details and configuration settings for thetunnelcommand.Remote Record Application within Kubernetes Pod
If you are unable to mount a local directory from your machine into your minikube host, you can alternatively run a Remote Recording of your application to generate AppMap Data.
To learn more how Remote Recording works with your application, refer to the AppMap documentation with language specific setup details.
Video Demonstration
Copy AppMap Data from Application Pod to Local Machine
If you are unable to mount a local directory from your machine into your minikube host you can copy files using the
kubectl cpcommand from the container(s) in your application pod to your local machine into thetmp/appmapdirectory in your project.First, get the name of the pod you wish to copy files from. Run the
kubectl get podsto see a list of available pods.$ kubectl get pods NAME READY STATUS RESTARTS AGE django-d84f99988-5hvck 1/1 Running 0 62s my-nginx-5cd6fb64d5-c86t6 1/1 Running 0 62s my-nginx-5cd6fb64d5-c8wsm 1/1 Running 0 62s postgres-64ff95ff77-8hk2m 1/1 Running 0 62s redis-676d779f49-vnsvf 1/1 Running 0 62sThen, use the
kubectl cpcommmand to copy the files to your localtmp/appmapdirectory.$ kubectl cp <Namespace>/<Pod Name>:<Remote AppMap Data Dir> <Local AppMap Dir>For example, to copy all of the generated AppMap data from the
Djangopod in the example above, run the following command.$ kubectl cp default/django-7f4dbc8d58-z4xwl:/usr/src/app/tmp/appmap ./tmp/appmapRefer to the Kubernetes documentation for more details and advanced options for the
kubectl cpcommand.
Thank you for your feedback!
