Navie Reference
- Navie Supported Software
- Navie Commands
- Options
- Bring Your Own Model Examples
- OpenAI Key Management in VS Code
- OpenAI Key Management in JetBrains
- Accessing Navie Logs
- GitHub Repository
Navie Supported Software
AppMap Navie AI supports all software languages and frameworks for coding with static analysis and static diagrams based on the software.
AppMap supports the following languages for advanced runtime analysis and automated deep tracing of APIs, packages, classes, functions, databases, etc.
- Java
- Ruby
- Python
- Node.js
To learn how to make AppMap data of these languages, refer to the AppMap Navie getting started documentation
Navie Commands
You can ask free-form questions, or start your question with one of these commands:
@plan
The @plan command prefix within Navie focuses the AI response on building a detailed
implementation plan for the relevant query. This will focus Navie on only understanding the problem
and the application to generate a step-by-step plan. This will generally not respond with code
implementation details, consider using the @generate command which can implement code based on the
plan.
Examples
- @plan improve the performance of my slow product listing page.
- @plan implement a cache key for my user posting on my social media application.
- @plan migrate the /users/setting API endpoint from SQL to MongoDB.
@plan Video Demo
@generate
The @generate prefix will focus the Navie AI response to optimize for new code creation. This is
useful when you want the Navie AI to respond with code implementations across your entire code base.
This will reduce the amount of code explanation and generally the AI will respond only with the
specific files and functions that need to be changed in order to implement a specific plan.
Examples
- @generate Using the django-simple-captcha library add the necessary code for an offline captcha to my new user registration page.
- @generate Update the function for the physical flow export to include data type via physical_spec_data_type and physical_specification tables without changing the existing functionality.
- @generate Design and implement a cache key for user posts and show me how to implement it within this code base
@generate Video Demo
@test
The @test command prefix will focus the Navie AI response to optimize for test case creation, such
as unit testing or integration testing. This prefix will understand how your tests are currently
written and provide updated tests based on features or code that is provided. You can use this
command along with the @generate command to create tests cases for newly generated code.
Examples
- @test create integration test cases for the user setting page that is migrated to mongodb.
- @test create unit and integration tests that fully support the updated cache key functionality.
- @test provide detailed test cases examples for testing the updated user billing settings dashboard.
@explain
The @explain command prefix within Navie serves as a default option focused on helping you learn
more about your project. Using the @explain prefix will focus the Navie AI response to be more
explanatory and will dive into architectural level questions across your entire code base. You can
also use this to ask for ways to improve the performance of a feature as well.
Examples
- @explain how does user authentication work in this project?
- @explain how is the export request for physical flows handled, and what are the tables involved?
- @explain how does the products listing page works and how can I improve the performance?
@diagram
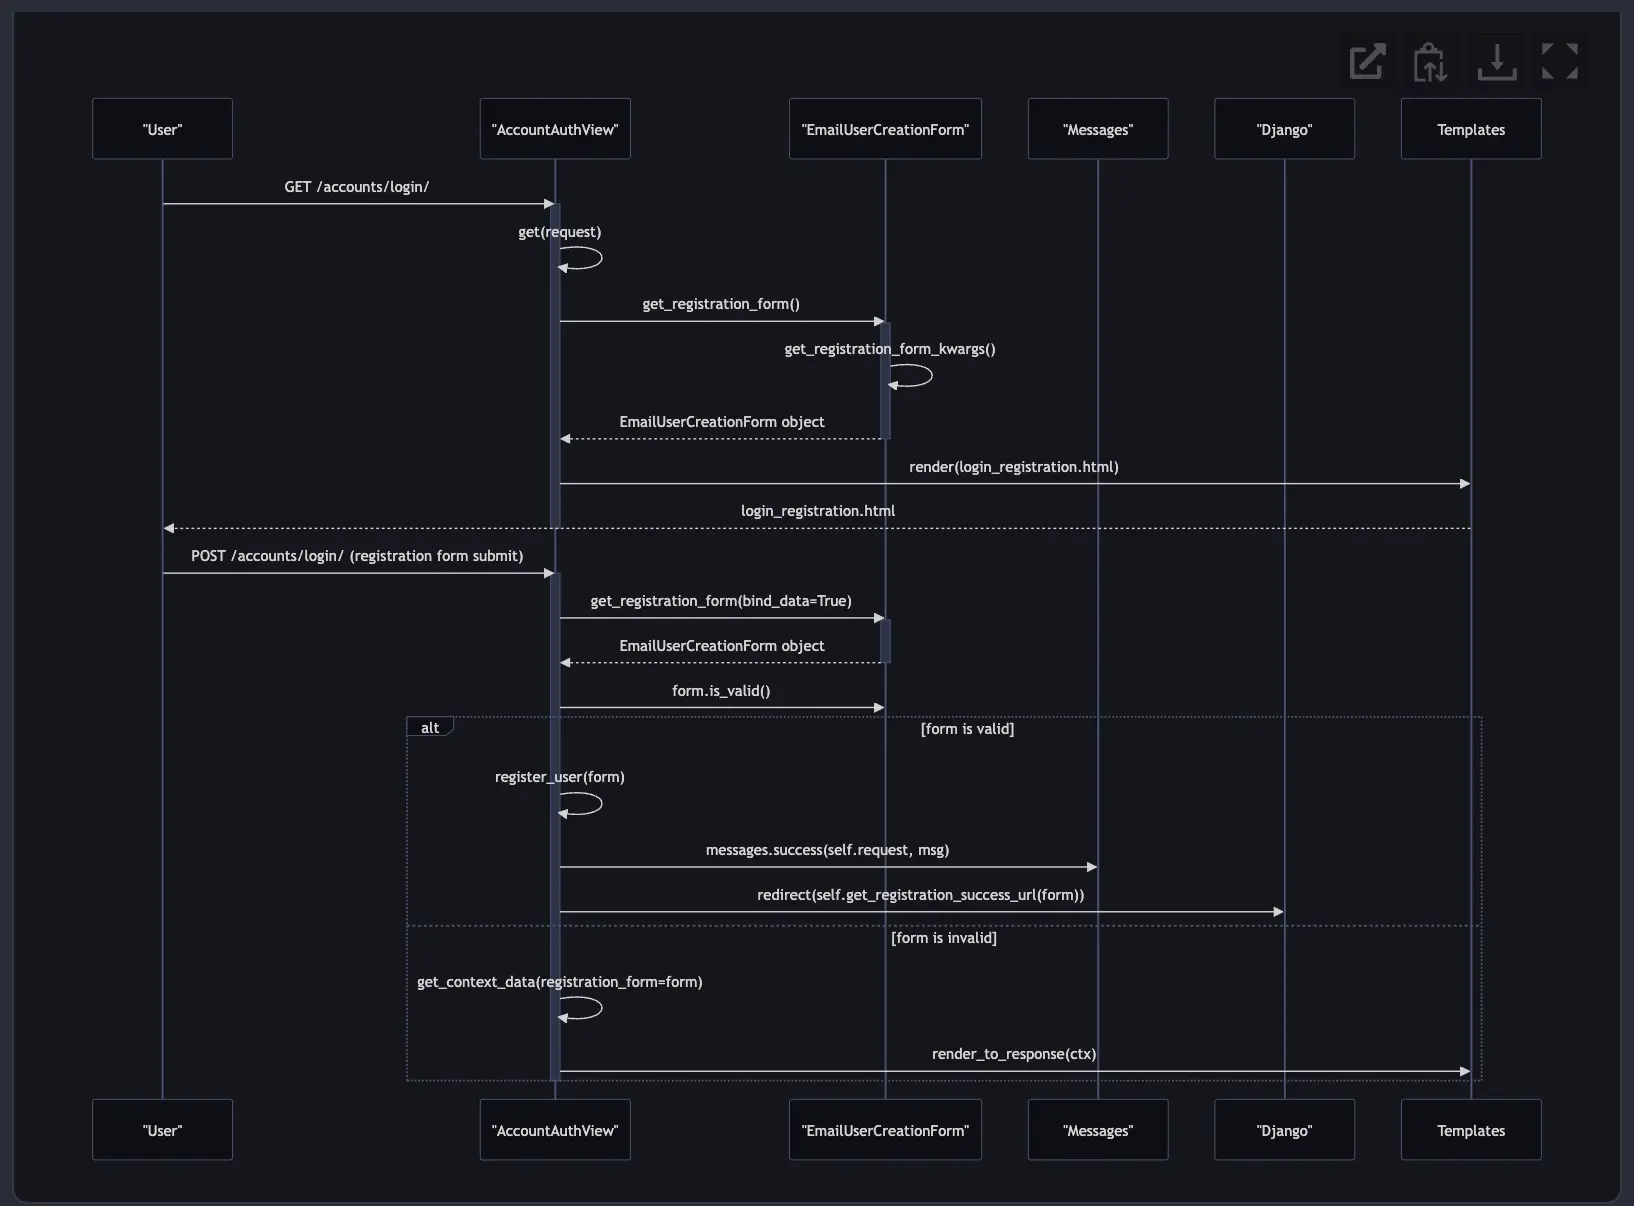
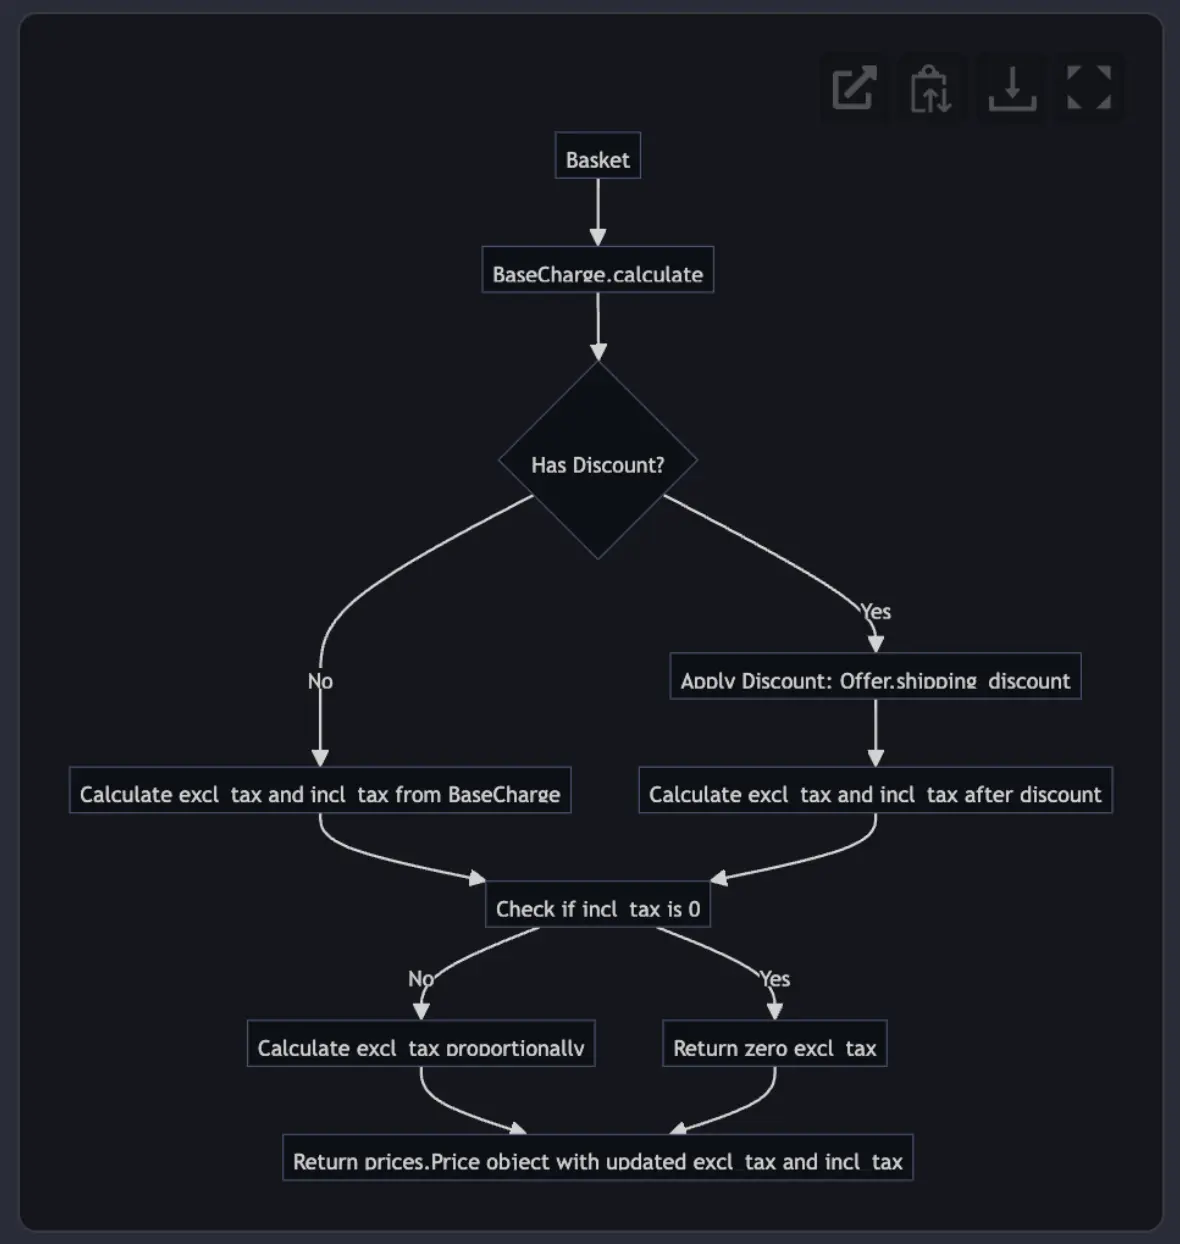
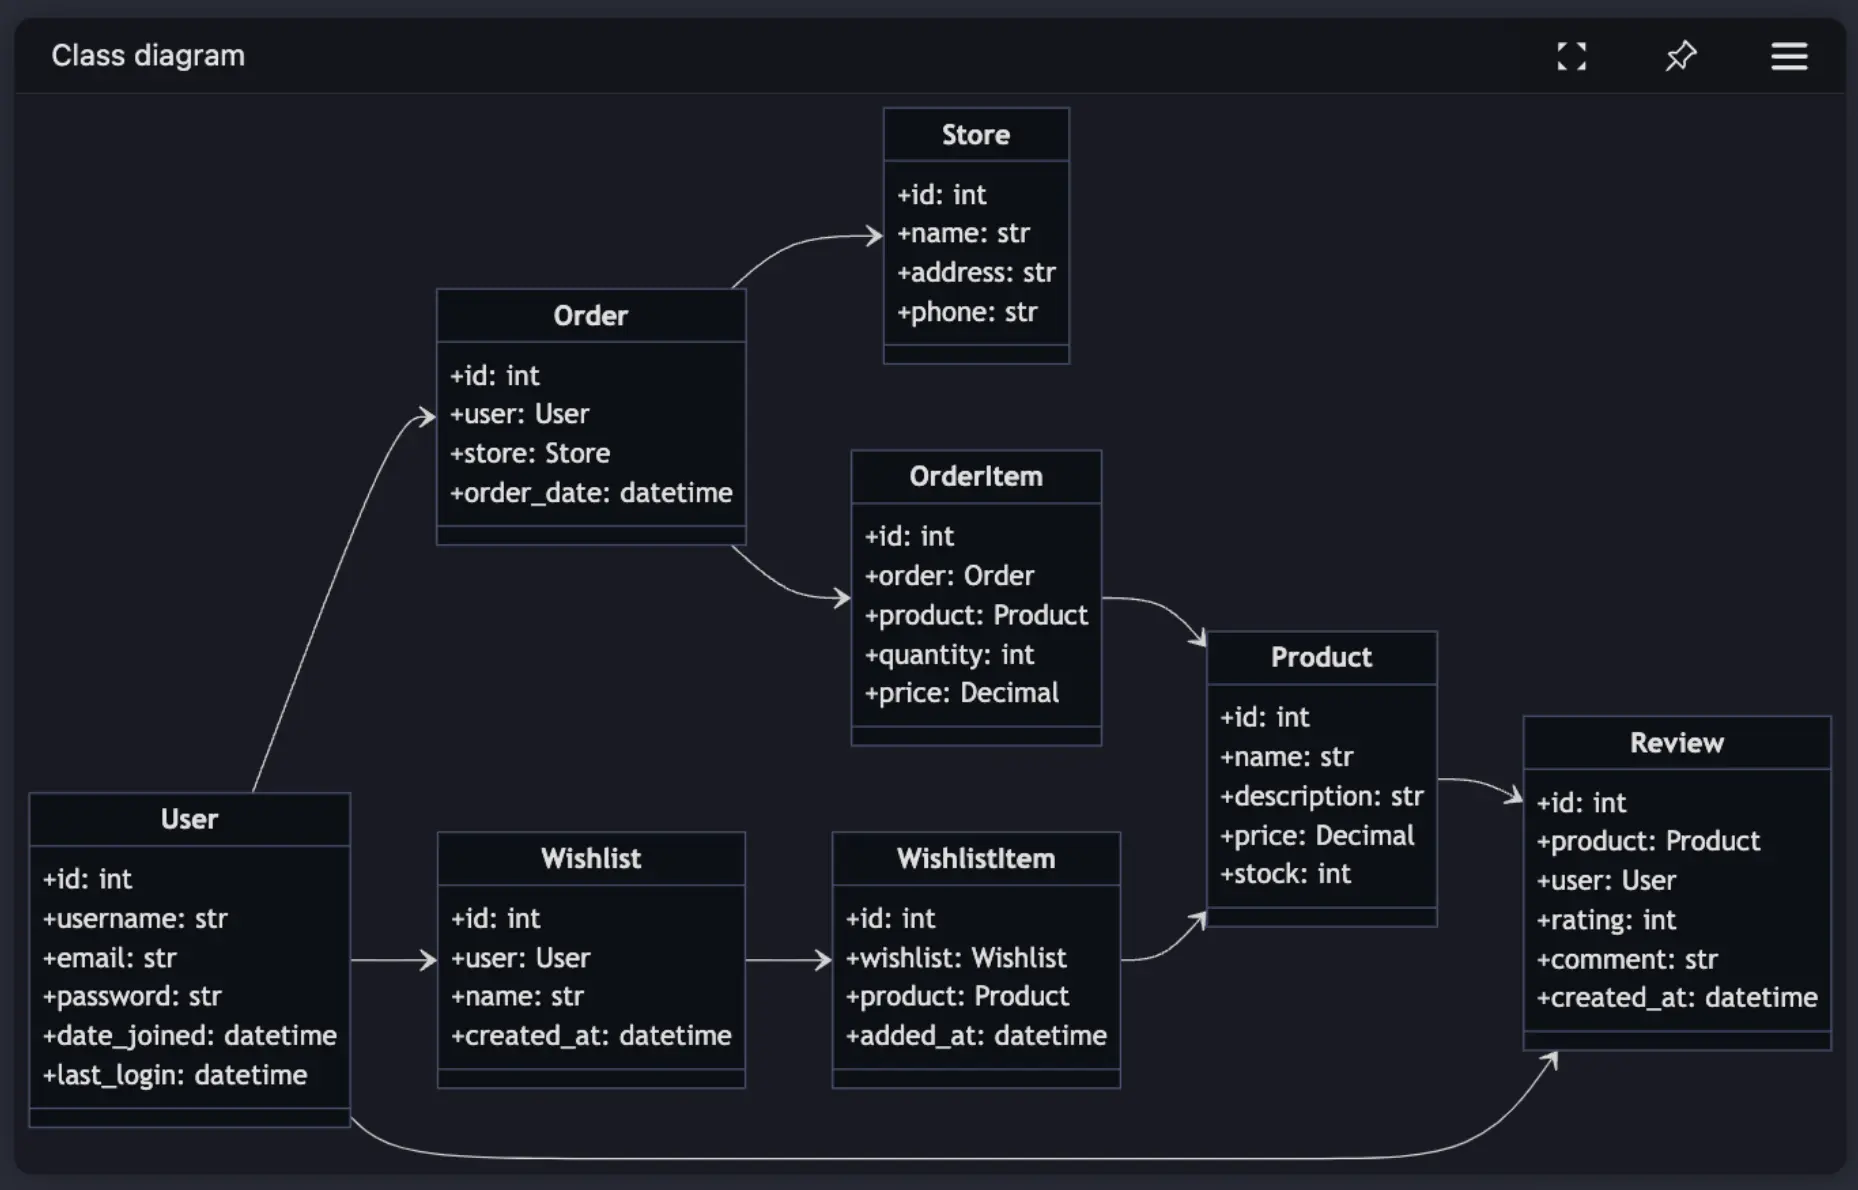
The @diagram command prefix within Navie focuses the AI response to generate Mermaid compatible
diagrams. Mermaid is an open source diagramming and charting utility with
wide support across tools such as GitHub, Atlassian, and more. Use the @diagram command, and Navie
will create and render a Mermaid compatible diagram within the Navie chat window. You can open this
diagram in the Mermaid Live Editor, copy the Mermaid Definitions to your
clipboard, save to disk, or expand a full window view. Save the Mermaid diagram into any supported
tool such as GitHub Issues, Atlassian Confluence, and more.
Example Questions
@diagram the functional steps involved when a new user registers for the service.
@diagram the entity relationships between products and other important data objects.

@diagram using a flow chart how product sales tax is calculated.
@diagram create a detailed class map of the users, stores, products and other associated classes used
Example Diagram Projects
Below are a series of open source projects you can use to try out the @diagram feature using
prebuilt AppMap data in a sample project. Simply clone one of the following projects, open into your
code editor with the AppMap extension installed, and ask Navie to generate diagrams.
@help
Navie will help you setup AppMap, including generating AppMap recordings and diagrams. This prefix will focus the Navie AI response to be more specific towards help with using AppMap products and features. This will leverage the AppMap documentation as part of the context related to your question and provide guidance for using AppMap features or diving into advanced AppMap topics.
Examples
- @help how do I setup process recording for my node.js project?
- @help how can I reduce the size of my large AppMap Data recordings?
- @help how can i export my AppMap data to atlassian confluence?
Options
Navie supports forward-slash options that can be included at the beginning of your questions to control various aspects of text generation.
/tokenlimit
The /tokenlimit option is used to specify a limit on the number of tokens processed by the system.
This parameter can help control the length of the generated text or manage resource consumption
effectively.
Syntax
/tokenlimit=<value>
-
<value>: The maximum number of tokens to be processed. This can be either a string or a number. If provided as a string, it will be automatically converted to an integer.
Description When executing commands, the /tokenlimit option sets the upper limit on the number
of tokens the system should utilize. The default token limit is 8000. Increasing the token limit
allows more space for context.
Example To set the token limit to 16000, you can use:
@explain /tokenlimit=16000 <question>
Notes
- It’s important to ensure that the value provided for
/tokenlimitis a valid positive integer. - The effect of
/tokenlimitcan directly impact the performance and output length of text generation processes. - The
/tokenlimitcannot be increased above the fundamental limit of the LLM backend. Some backends, such as Copilot, may have a lower token limit than others.
/temperature
The /temperature option is used to control the randomness of the text generation process. This
parameter can help adjust the creativity and diversity of the generated text.
Syntax
/temperature=<value>
-
<value>: The temperature value to be set. This can be either a string or a number. If provided as a string, it will be automatically converted to a float.
Description When executing commands, the /temperature option sets the randomness of the text
generation process. The default temperature value is 0.2. Lower values result in more deterministic
outputs, while higher values lead to more creative and diverse outputs.
Example To set the temperature to 0, you can use:
@generate /temperature=0 <question>
Notes
- It’s important to ensure that the value provided for
/temperatureis a valid float. - The effect of
/temperaturecan directly impact the creativity and diversity of the generated text.
/include and /exclude
The /include and /exclude options are used to include or exclude specific file patterns from the
retrieved context.
Syntax
/include=<word-or-pattern>|<word-or-pattern> /exclude=<word-or-pattern>|<word-or-pattern>
-
<word-or-pattern>: The word or pattern to be included or excluded. Multiple values or patterns can be separated by a pipe|, because the entire string is treated as a regular expression.
Description
When executing commands, the /include option includes files according to the words or patterns
specified, while the /exclude option excludes them. This can help control the context used by the
system to generate text.
Example
To include only Python files and exclude files containing the word “test”:
@plan /include=\.py /exclude=test
/gather
The /gather option is used to enable or disable the context gathering feature. This option allows
you to control whether Navie should gather additional context from the repository to enhance its
responses. By default, context gathering is enabled in the following situations:
- When performing
@generateand@plan. - When the
overviewclassifier is applied automatically by Navie to the question.
When enabled, gather will perform any or all of the following actions:
- List files in the repository.
- Fetch full the full content of a file in the repository.
- Search the repository for context by keyword.
Gatherer runs autonomously, there’s no user control over what actions it will take. To explicitly
control the context that’s available to Navie, you can other features such as pinned files,
/include and /exclude options.
Syntax
/gather=<true|false>
-
<true|false>: A boolean value indicating whether to enable (true) or disable (false) the context gathering feature.
Example To enable context gathering, you can use:
@generate /gather=true <question>
Bring Your Own Model Examples
GitHub Copilot Language Model
Starting with VS Code 1.91 and greater, and with an active GitHub Copilot subscription, you can
use Navie with the Copilot Language Model as a supported backend model. This allows you to leverage
the powerful runtime powered Navie AI Architect with your existing Copilot subscription. This is the
recommended option for users in corporate environments where Copilot is the only approved and
supported language model.
Requirements
The following items are required to use the GitHub Copilot Language Model with Navie:
- VS Code Version
1.91or greater - AppMap Extension version
v0.123.0or greater - GitHub Copilot VS Code extension must be installed
- Signed into an active paid or trial GitHub Copilot subscription
Setup
Open the VS Code Settings, and search for navie vscode
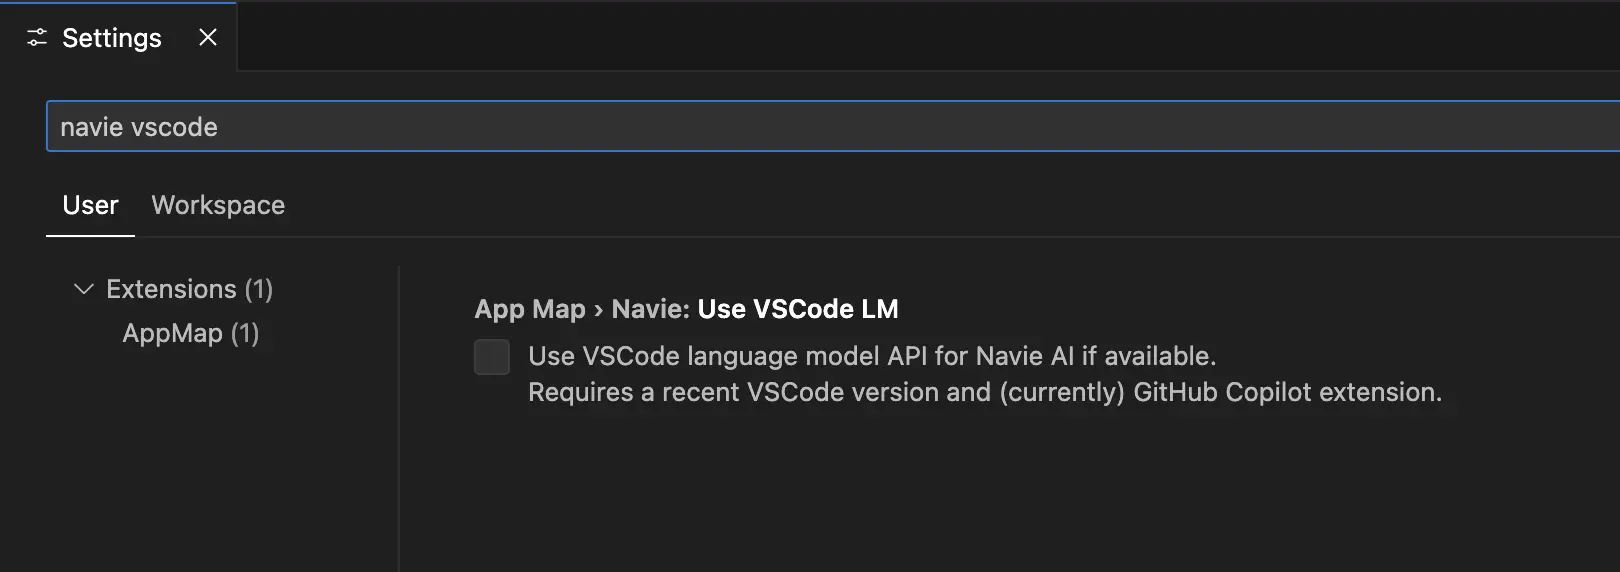
Click the box to use the VS Code language model...
After clicking the box to enable the VS Code LM, you’ll be instructed to reload your VS Code to enable these changes.
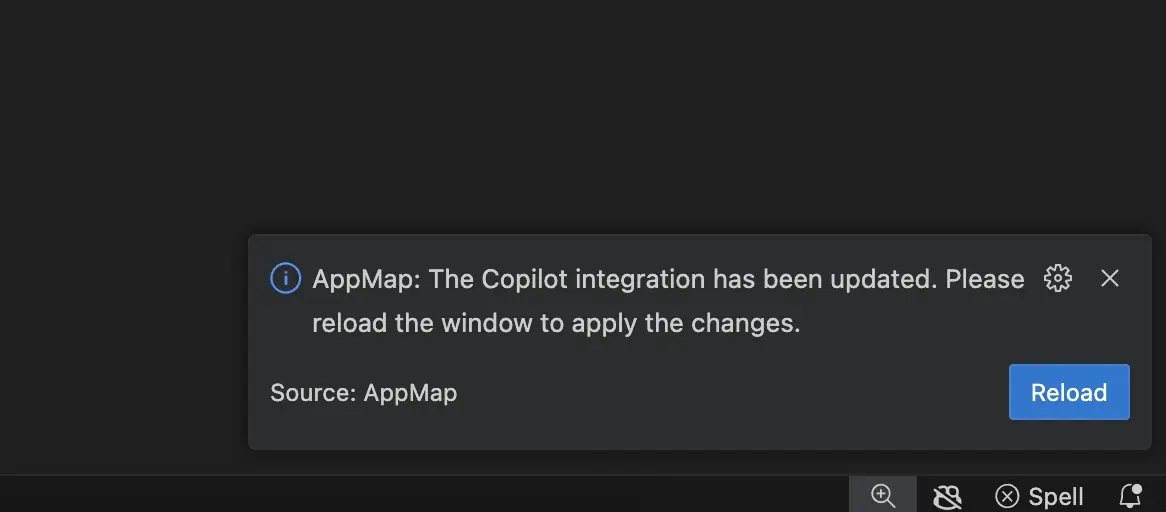
After VS Code finishes reloading, open the AppMap extension.
Select New Navie Chat, and confirm the model listed is (via copilot)
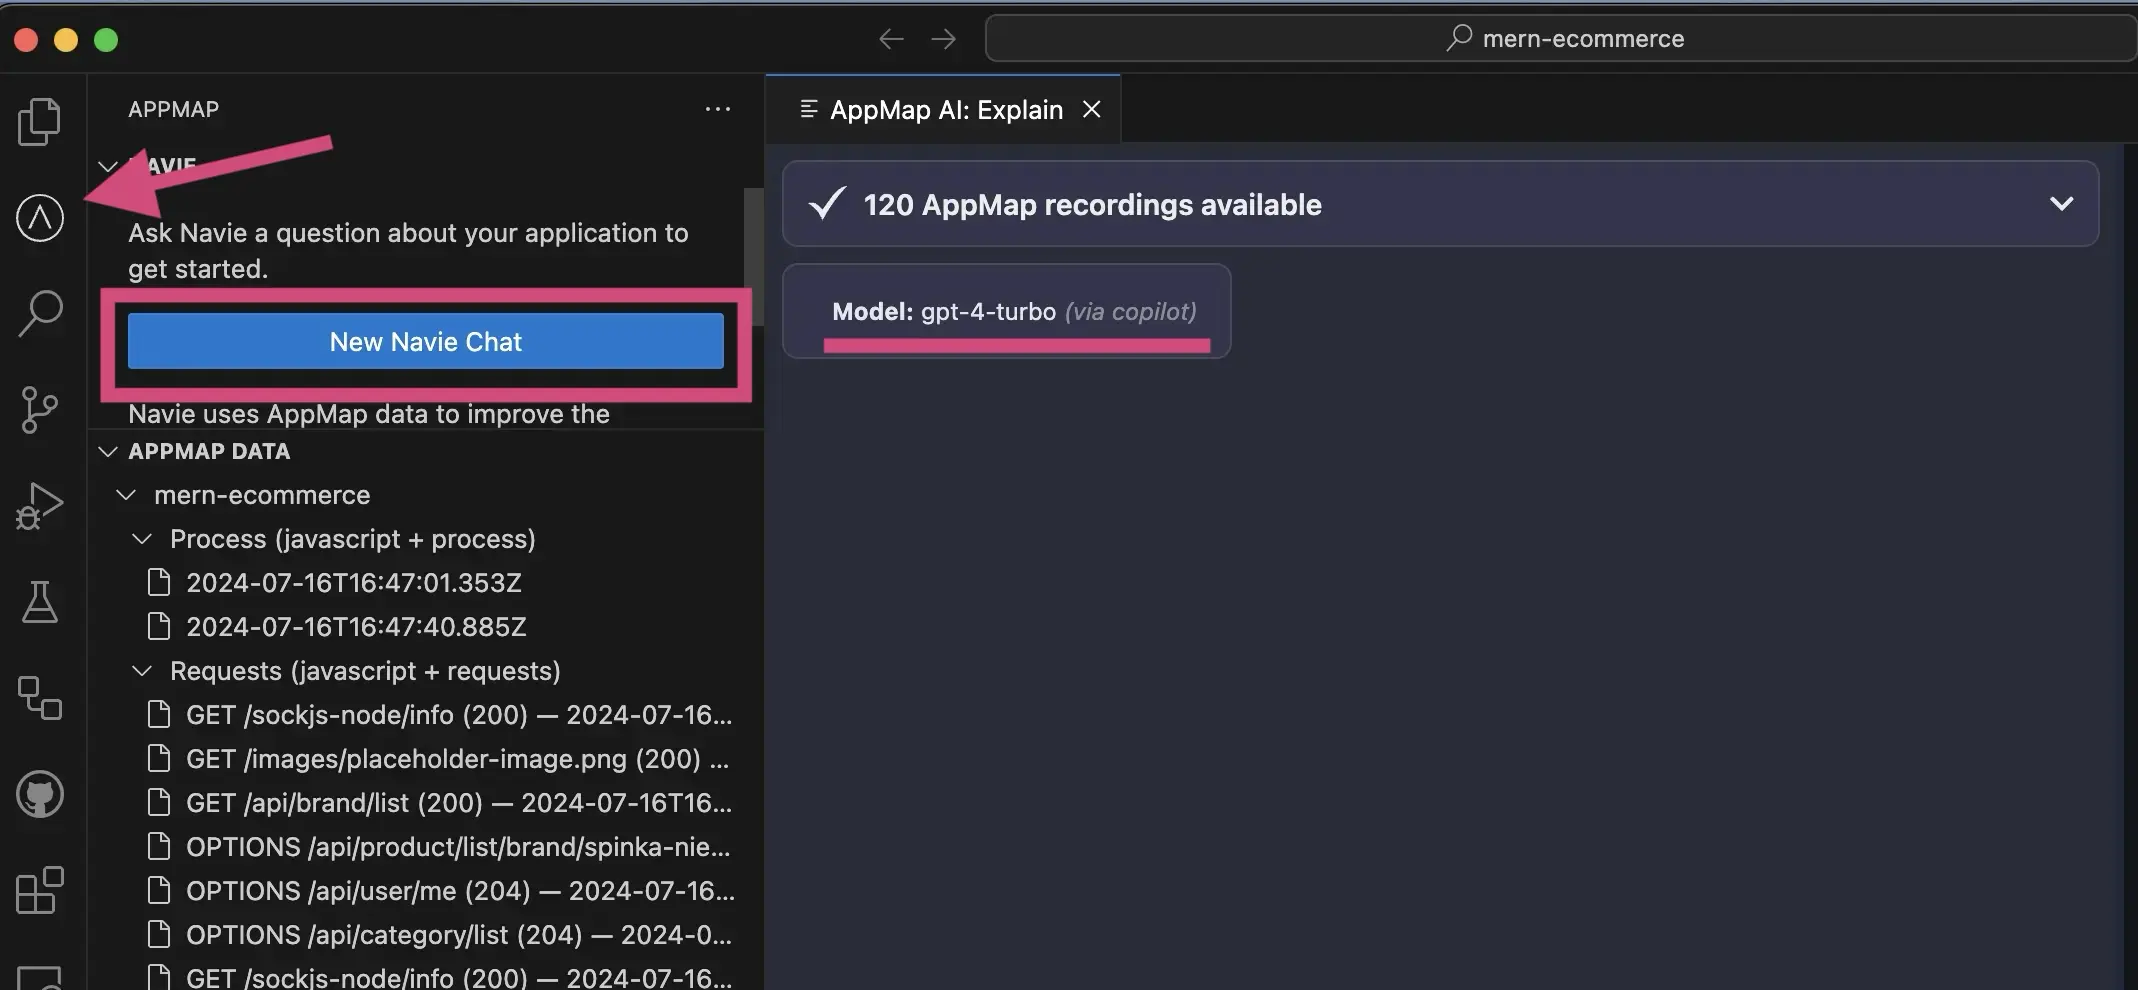
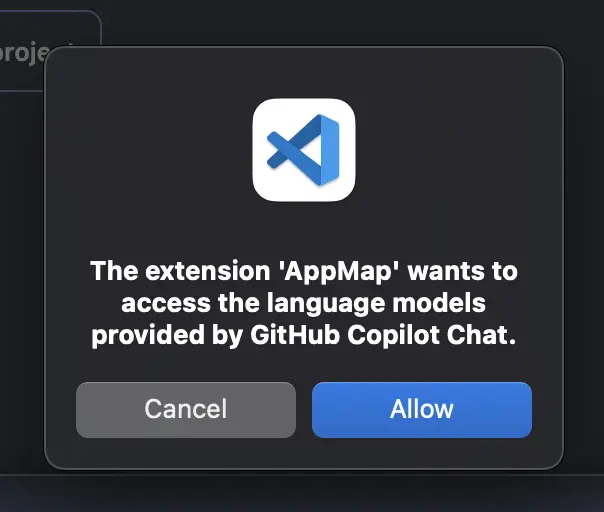
You’ll need to allow the AppMap extension access to the Copilot Language Models. After asking your
first question to Navie, click Allow to the popup to allow the necessary access.
Troubleshooting
If you attempt to enable the Copilot language models without the Copilot Extension installed, you’ll see the following error in your code editor.
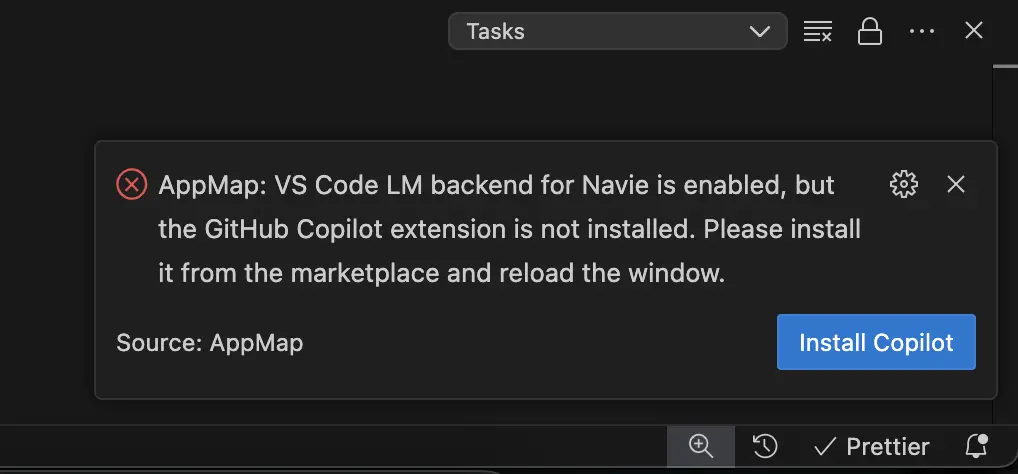
Click Install Copilot to complete the installation for language model support.
If you have the Copilot extension installed, but have not signed in, you’ll see the following notice.

Click the Sign in to GitHub and login with an account that has a valid paid or trial GitHub
Copilot subscription.
Video Demo
OpenAI
Note: We recommend configuring your OpenAI key using the code editor extension. Follow the Bring Your Own Key docs for instructions.
Only OPENAI_API_KEY needs to be set, other settings can stay default:
OPENAI_API_KEY |
sk-9spQsnE3X7myFHnjgNKKgIcGAdaIG78I3HZB4DFDWQGM |
When using your own OpenAI API key, you can also modify the OpenAI model for Navie to use. For
example if you wanted to use gpt-3.5 or use an preview model like gpt-4-vision-preview.
APPMAP_NAVIE_MODEL |
gpt-4-vision-preview |
Anthropic (Claude)
AppMap supports the Anthropic suite of large language models such as Claude Sonnet or Claude Opus.
To use AppMap Navie with Anthropic LLMs you need to generate an API key for your account.
Login to your Anthropic dashboard, and choose the option to “Get API Keys”
Click the box to “Create Key”

In the next box, give your key an easy to recognize name.
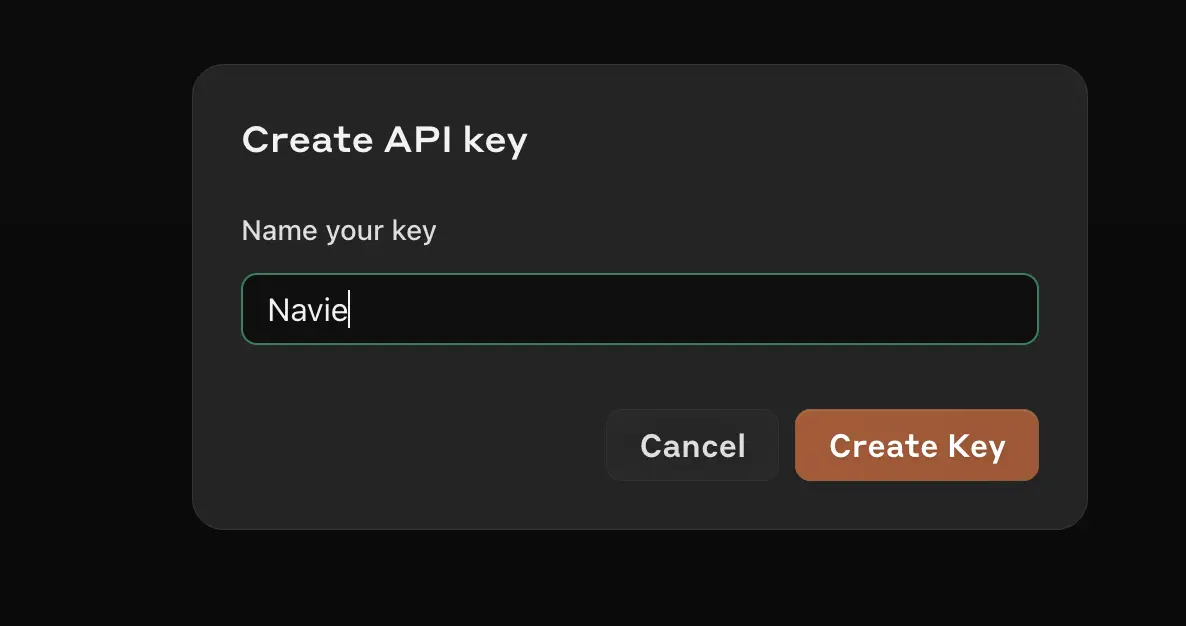
In your VS Code or JetBrains editor, configure the following environment variables. For more details on configuring these environment variables in your VS Code or JetBrains editor, refer to the AppMap BOYK documentation.
ANTHROPIC_API_KEY |
sk-ant-api03-8SgtgQrGB0vTSsB_DeeIZHvDrfmrg |
APPMAP_NAVIE_MODEL |
|
claude-3-5-sonnet-20240620 |
When setting the APPMAP_NAVIE_MODEL refer to the
Anthropic documentation for the
latest available models to chose from.
Video Demo
Azure OpenAI
Assuming you
created a
navie GPT-4 deployment on contoso.openai.azure.com OpenAI instance:
AZURE_OPENAI_API_KEY |
e50edc22e83f01802893d654c4268c4f |
AZURE_OPENAI_API_VERSION |
|||
2024-02-01 |
AZURE_OPENAI_API_INSTANCE_NAME |
contoso |
AZURE_OPENAI_API_DEPLOYMENT_NAME |
||
navie |
AnyScale Endpoints
AnyScale Endpoints allows querying a selection of open-source LLMs. After you create an account you can use it by setting:
OPENAI_API_KEY |
esecret_myxfwgl1iinbz9q5hkexemk8f4xhcou8 |
OPENAI_BASE_URL |
|
https://api.endpoints.anyscale.com/v1 |
APPMAP_NAVIE_MODEL |
||
mistralai/Mixtral-8x7B-Instruct-v0.1 |
Consult AnyScale documentation for model names. Note we recommend using Mixtral models with Navie.
Anyscale Demo with VS Code
Anyscale Demo with JetBrains
Fireworks AI
You can use Fireworks AI and their serverless or on-demand models as a compatible backend for AppMap Navie AI.
After creating an account on Fireworks AI you can configure your Navie environment settings:
OPENAI_API_KEY |
WBYq2mKlK8I16ha21k233k2EwzGAJy3e0CLmtNZadJ6byfpu7c |
OPENAI_BASE_URL |
|
https://api.fireworks.ai/inference/v1 |
APPMAP_NAVIE_MODEL |
||
accounts/fireworks/models/mixtral-8x22b-instruct |
Consult the Fireworks AI documentation for a full list of the available models they currently support.
Video Demo
Ollama
You can use Ollama to run Navie with local models; after you’ve successfully
ran a model with ollama run command, you can configure Navie to use it:
OPENAI_API_KEY |
dummy |
OPENAI_BASE_URL |
http://127.0.0.1:11434/v1 |
||
APPMAP_NAVIE_MODEL |
mixtral |
Note: Even though it’s running locally a dummy placeholder API key is still required.
LM Studio
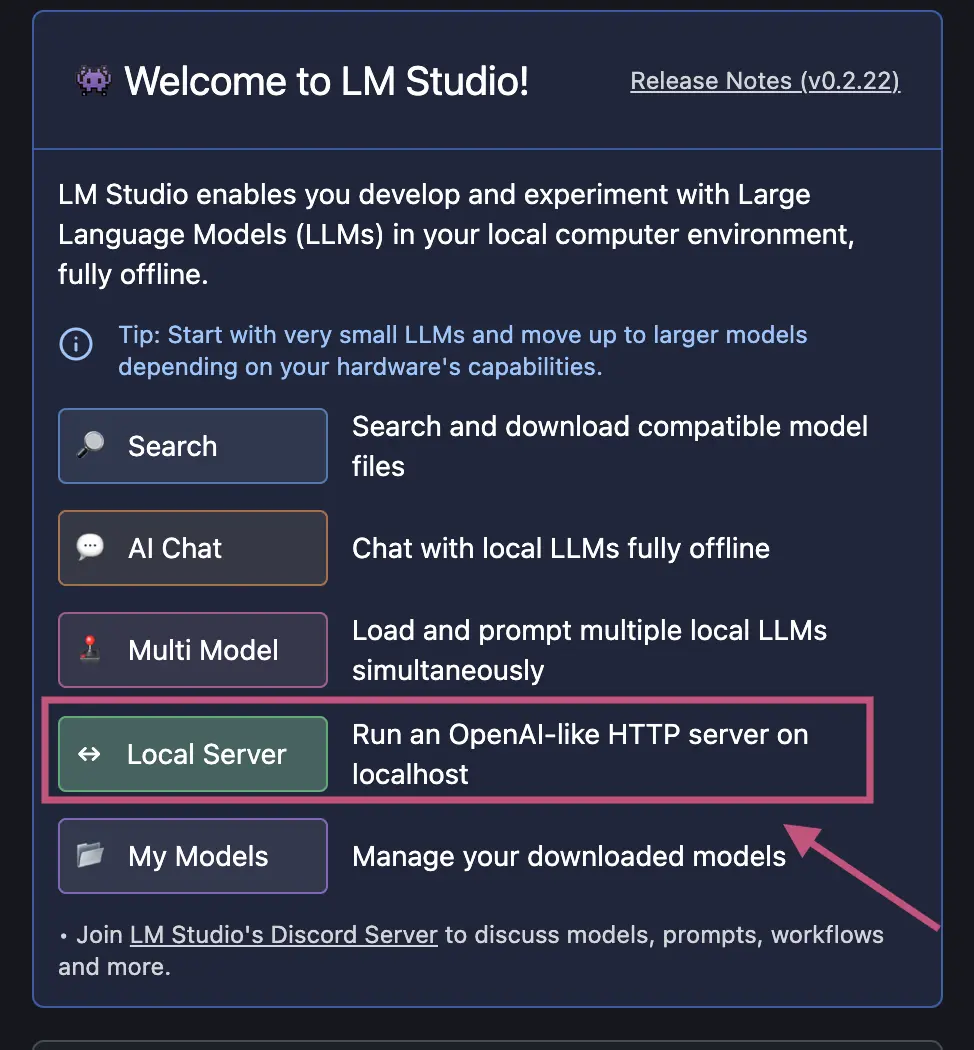
You can use LM Studio to run Navie with local models.
After downloading a model to run, select the option to run a local server.
In the next window, select which model you want to load into the local inference server.
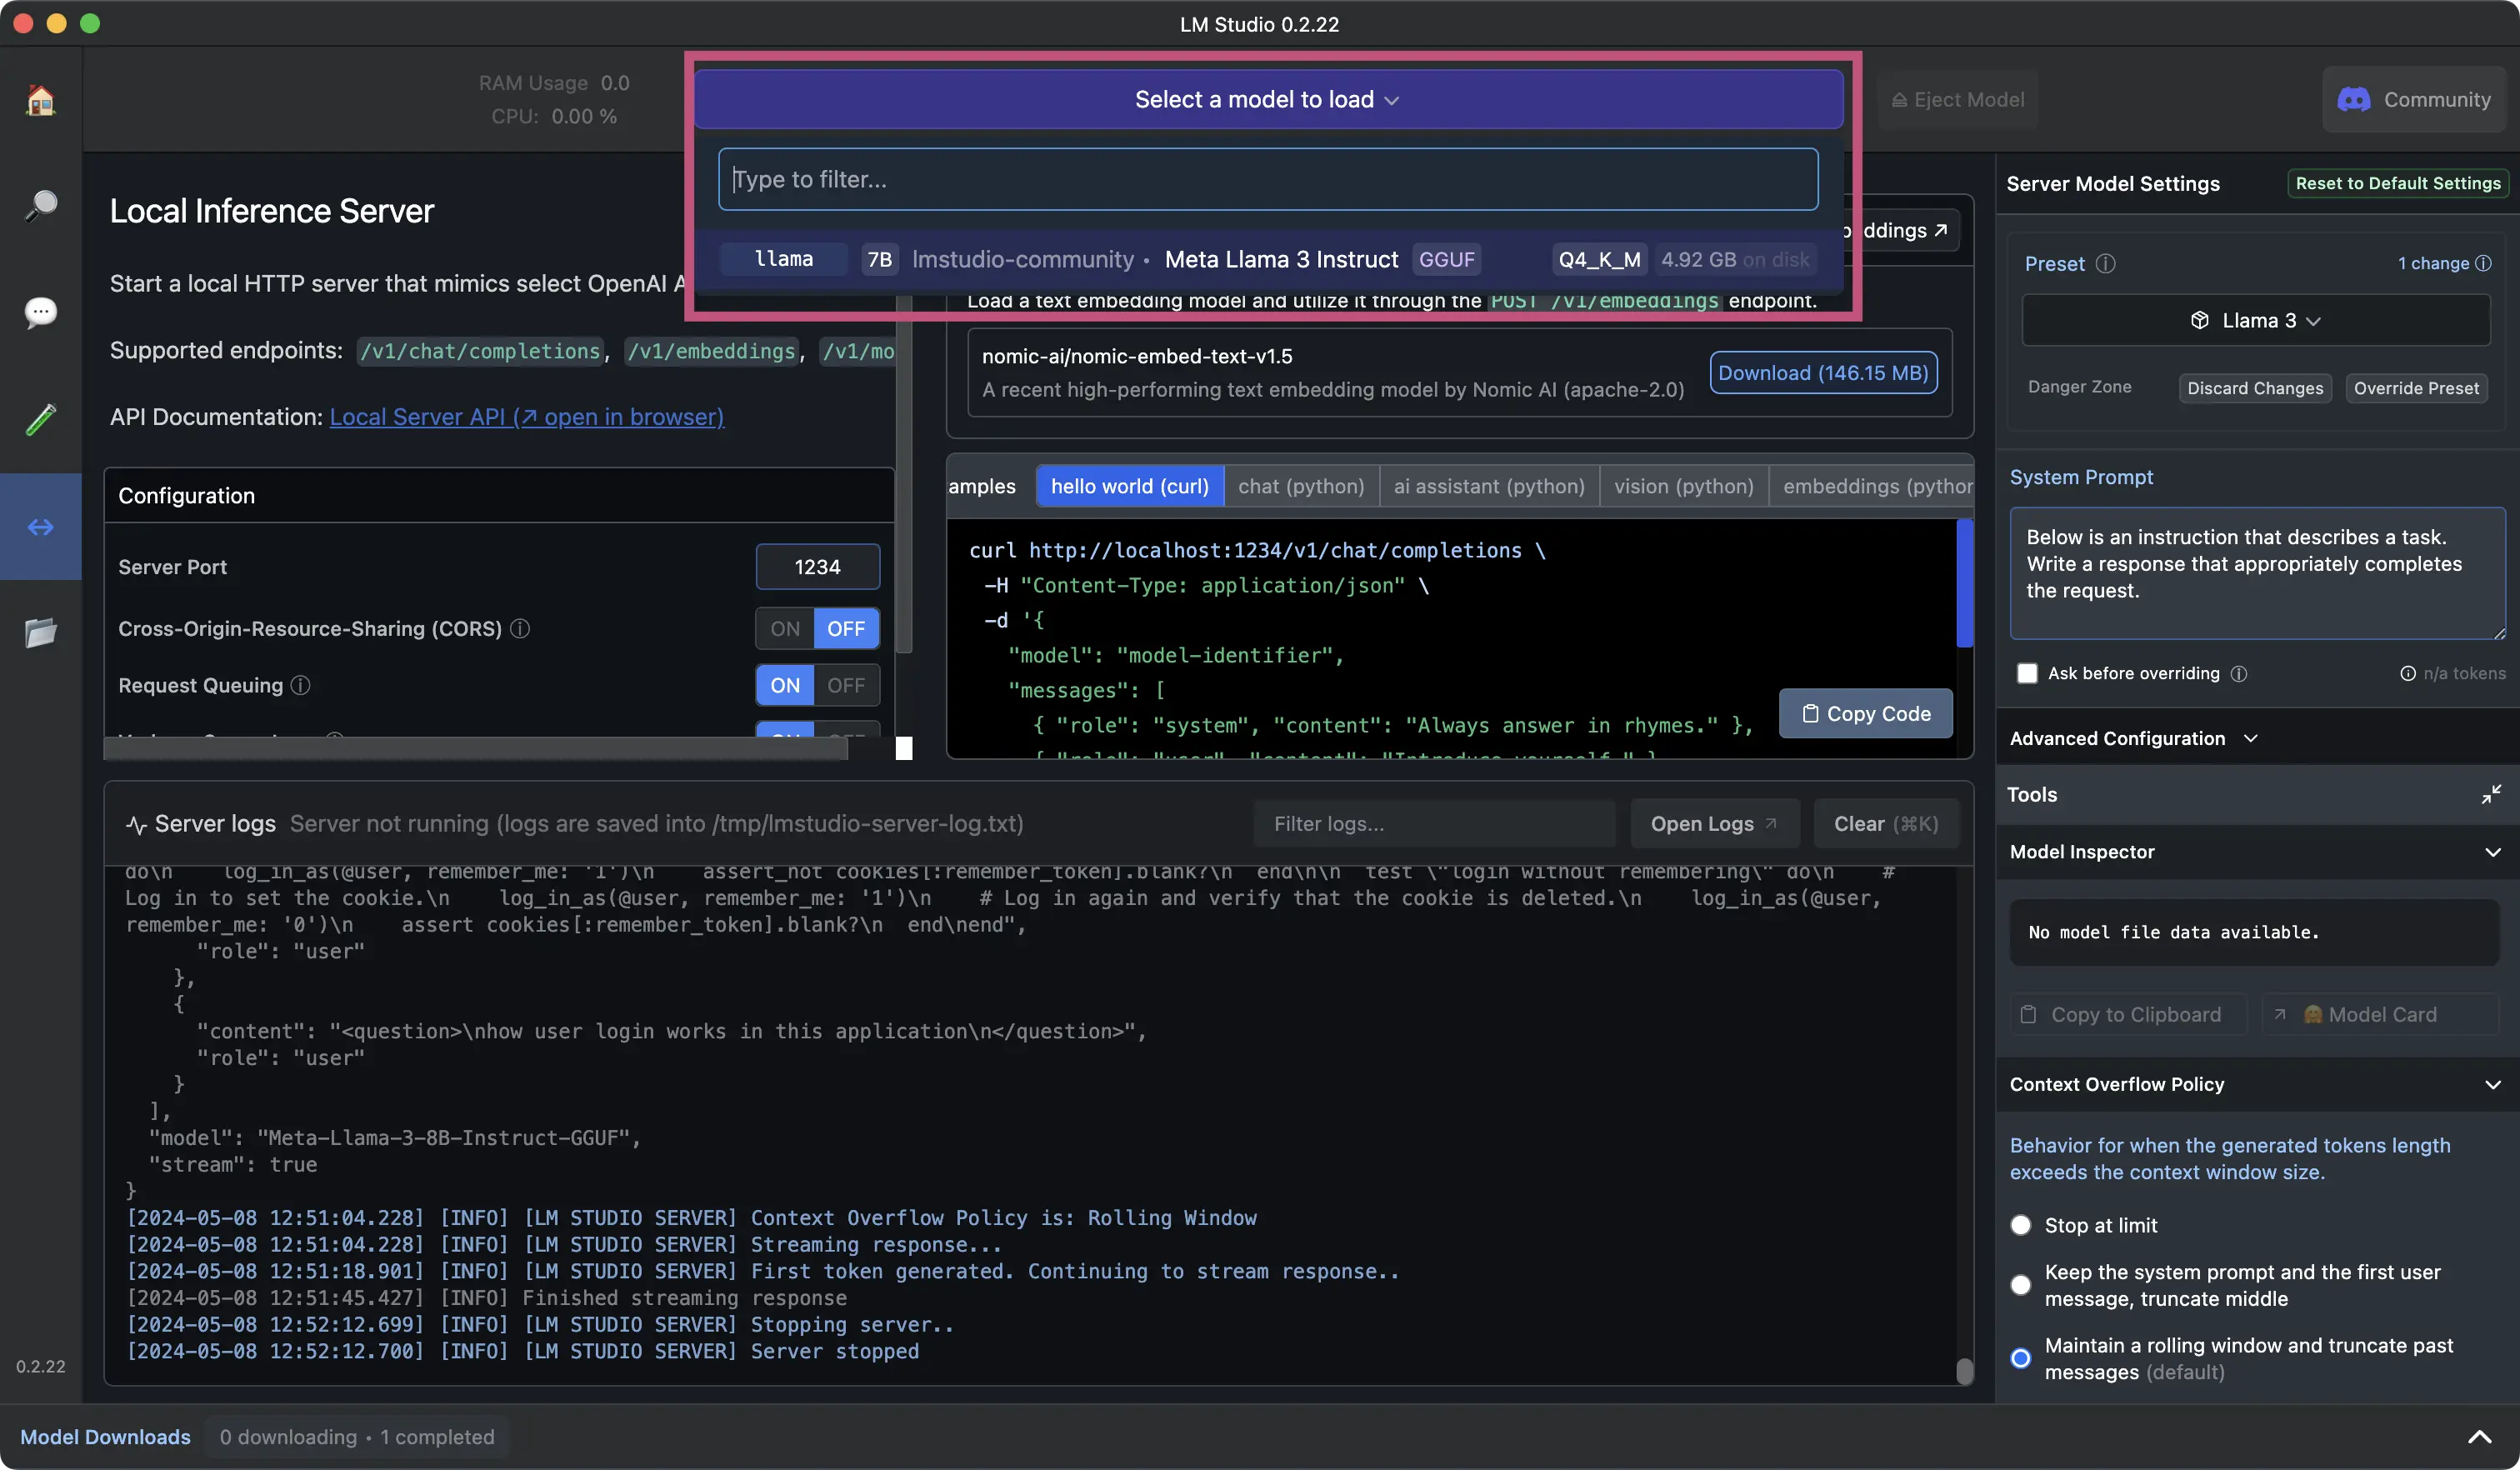
After loading your model, you can confirm it’s successfully running in the logs.
NOTE: Save the URL it’s running under to use for OPENAI_BASE_URL environment variable.
For example: http://localhost:1234/v1

In the Model Inspector copy the name of the model and use this for the APPMAP_NAVIE_MODEL
environment variable.
For example: Meta-Llama-3-8B-Instruct-imatrix
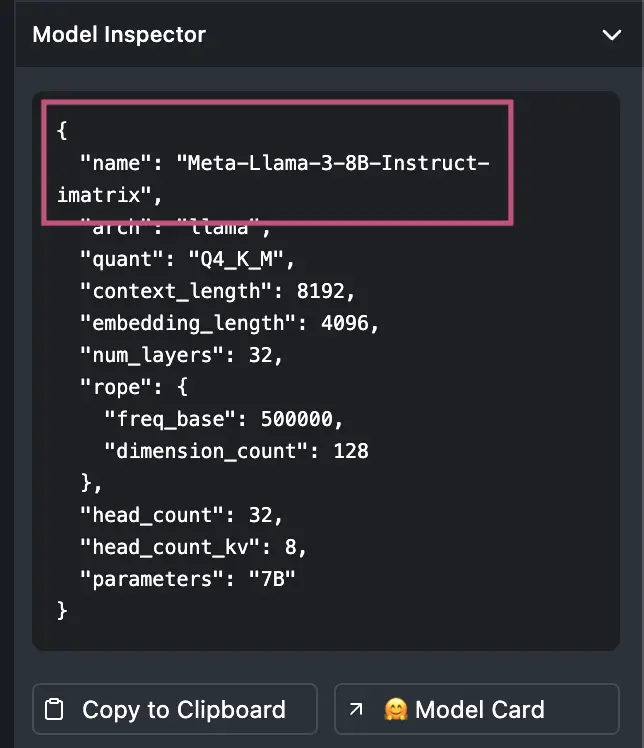
Continue to configure your local environment with the following environment variables based on your LM Studio configuration. Refer to the documentation above for steps specific to your code editor.
OPENAI_API_KEY |
dummy |
OPENAI_BASE_URL |
http://localhost:1234/v1 |
||
APPMAP_NAVIE_MODEL |
Meta-Llama-3-8B-Instruct-imatrix |
Note: Even though it’s running locally a dummy placeholder API key is still required.
OpenAI Key Management in VS Code
Add a new OpenAI Key in VS Code
The standard way to add an OpenAI API key in VS Code is to use the gear icon in the Navie chat
window, but you can alternatively set the key using the VS Code Command Palette with an AppMap
command option.
In VS Code, open the Command Palette.
You can use a hotkey to open the VS Code Command Palette
- Mac:
Cmd + Shift + P - Windows/Linux:
Ctrl + Shift + P
Or you can select View -> Command Palette

Search for AppMap Set OpenAPI Key
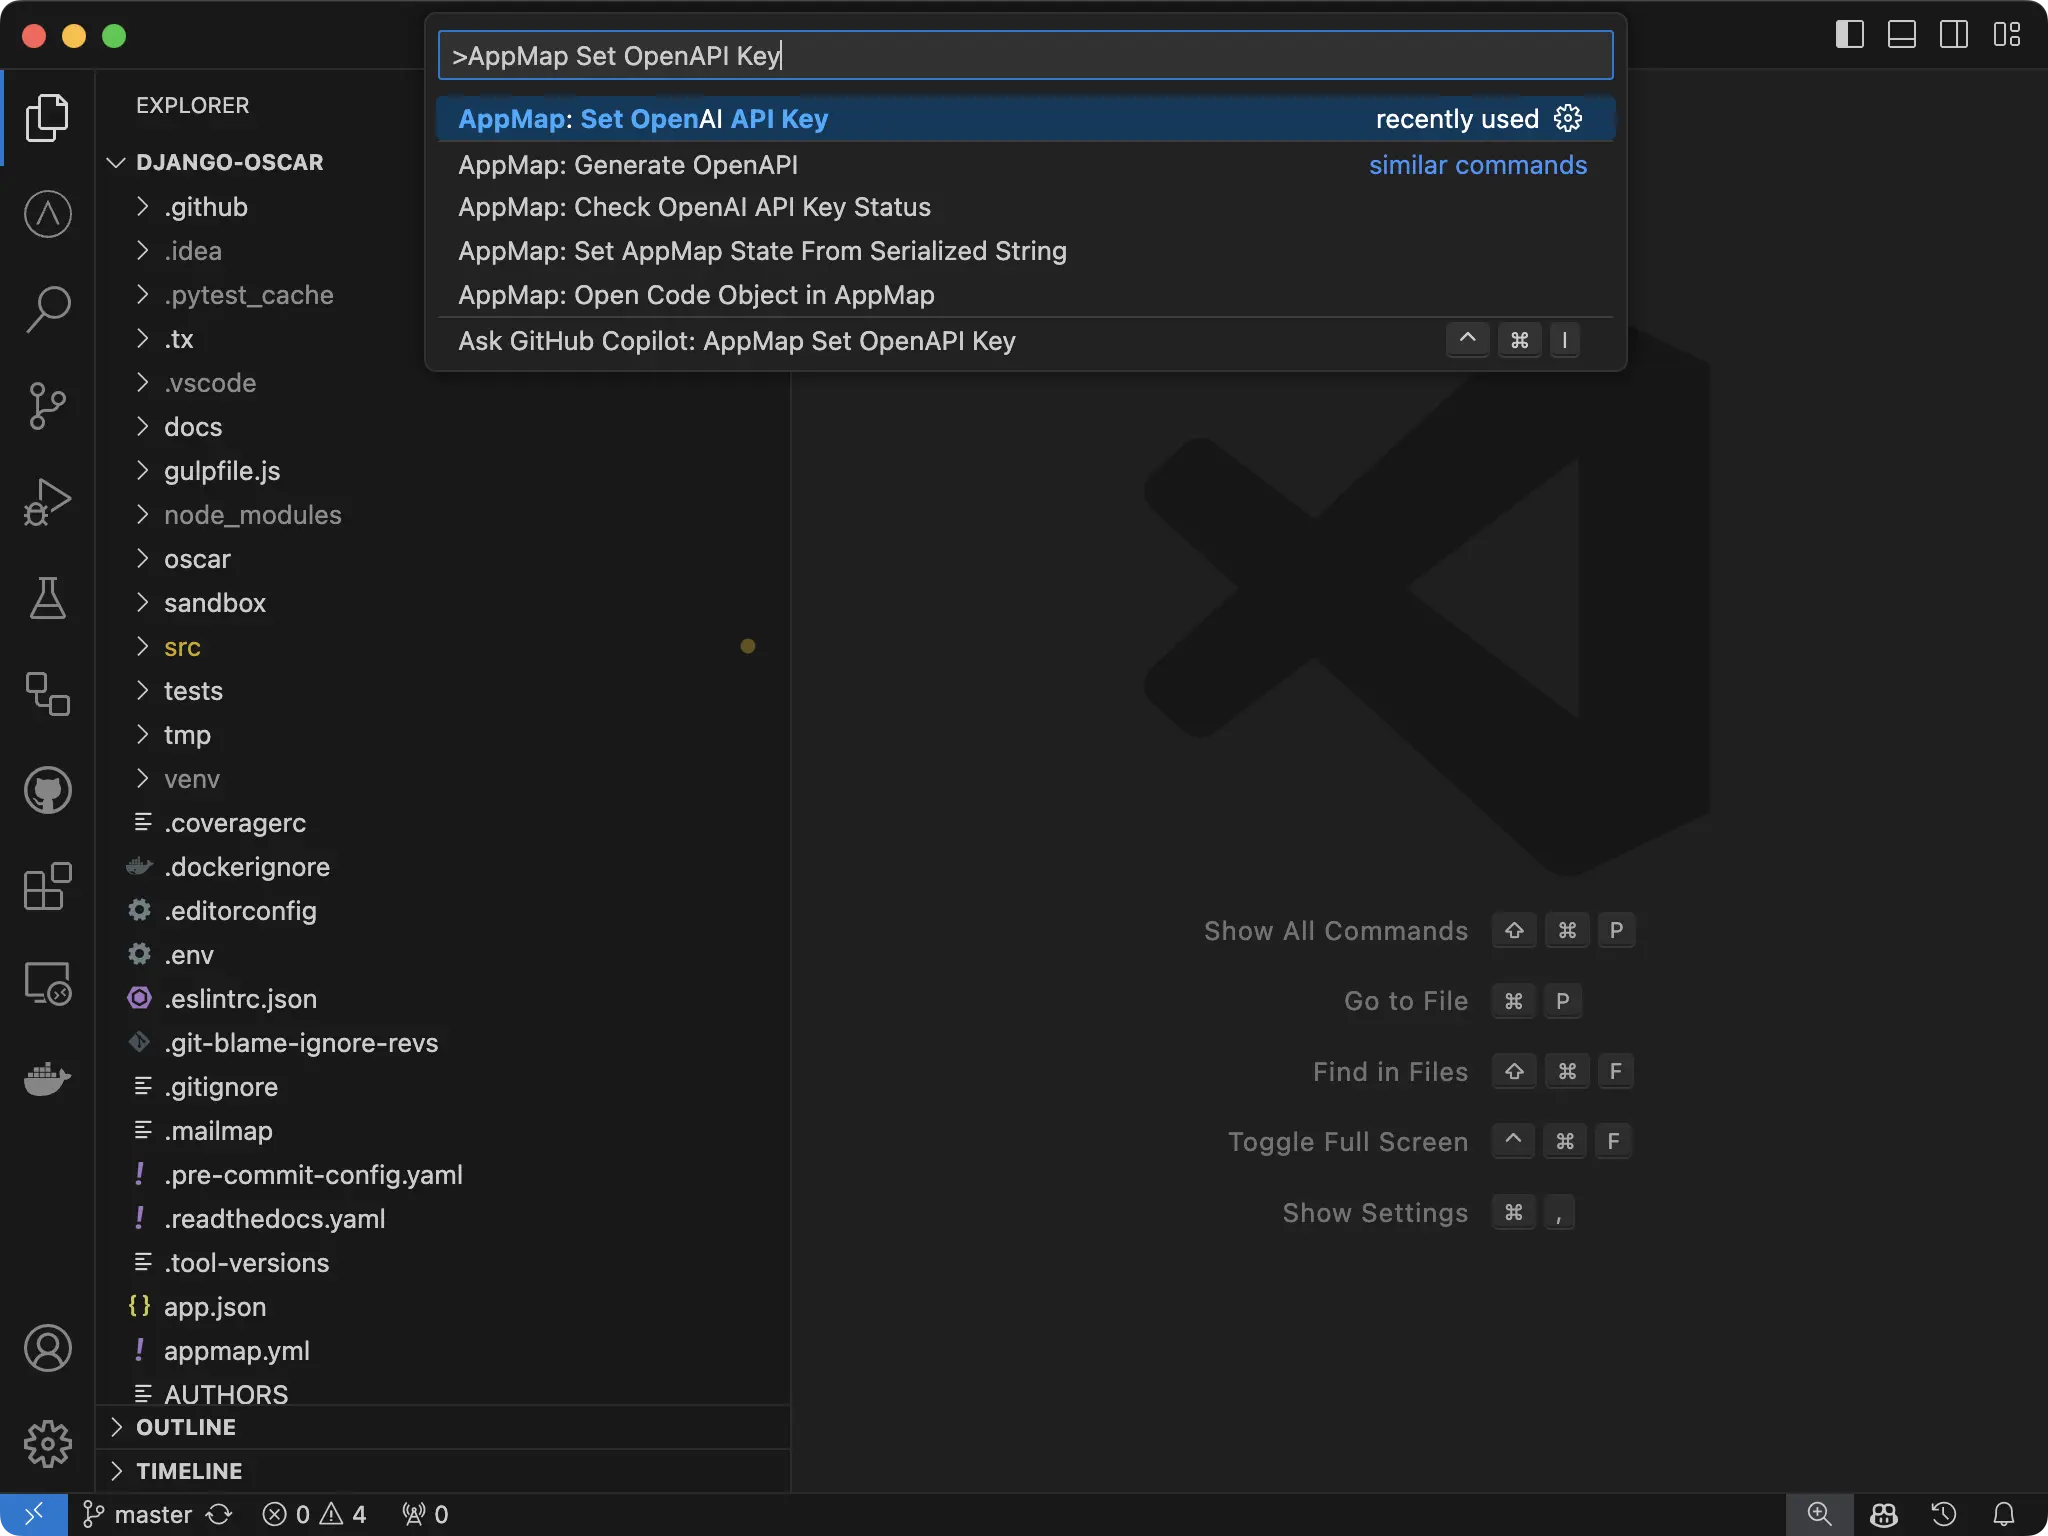
Paste your key into the new field and hit enter.
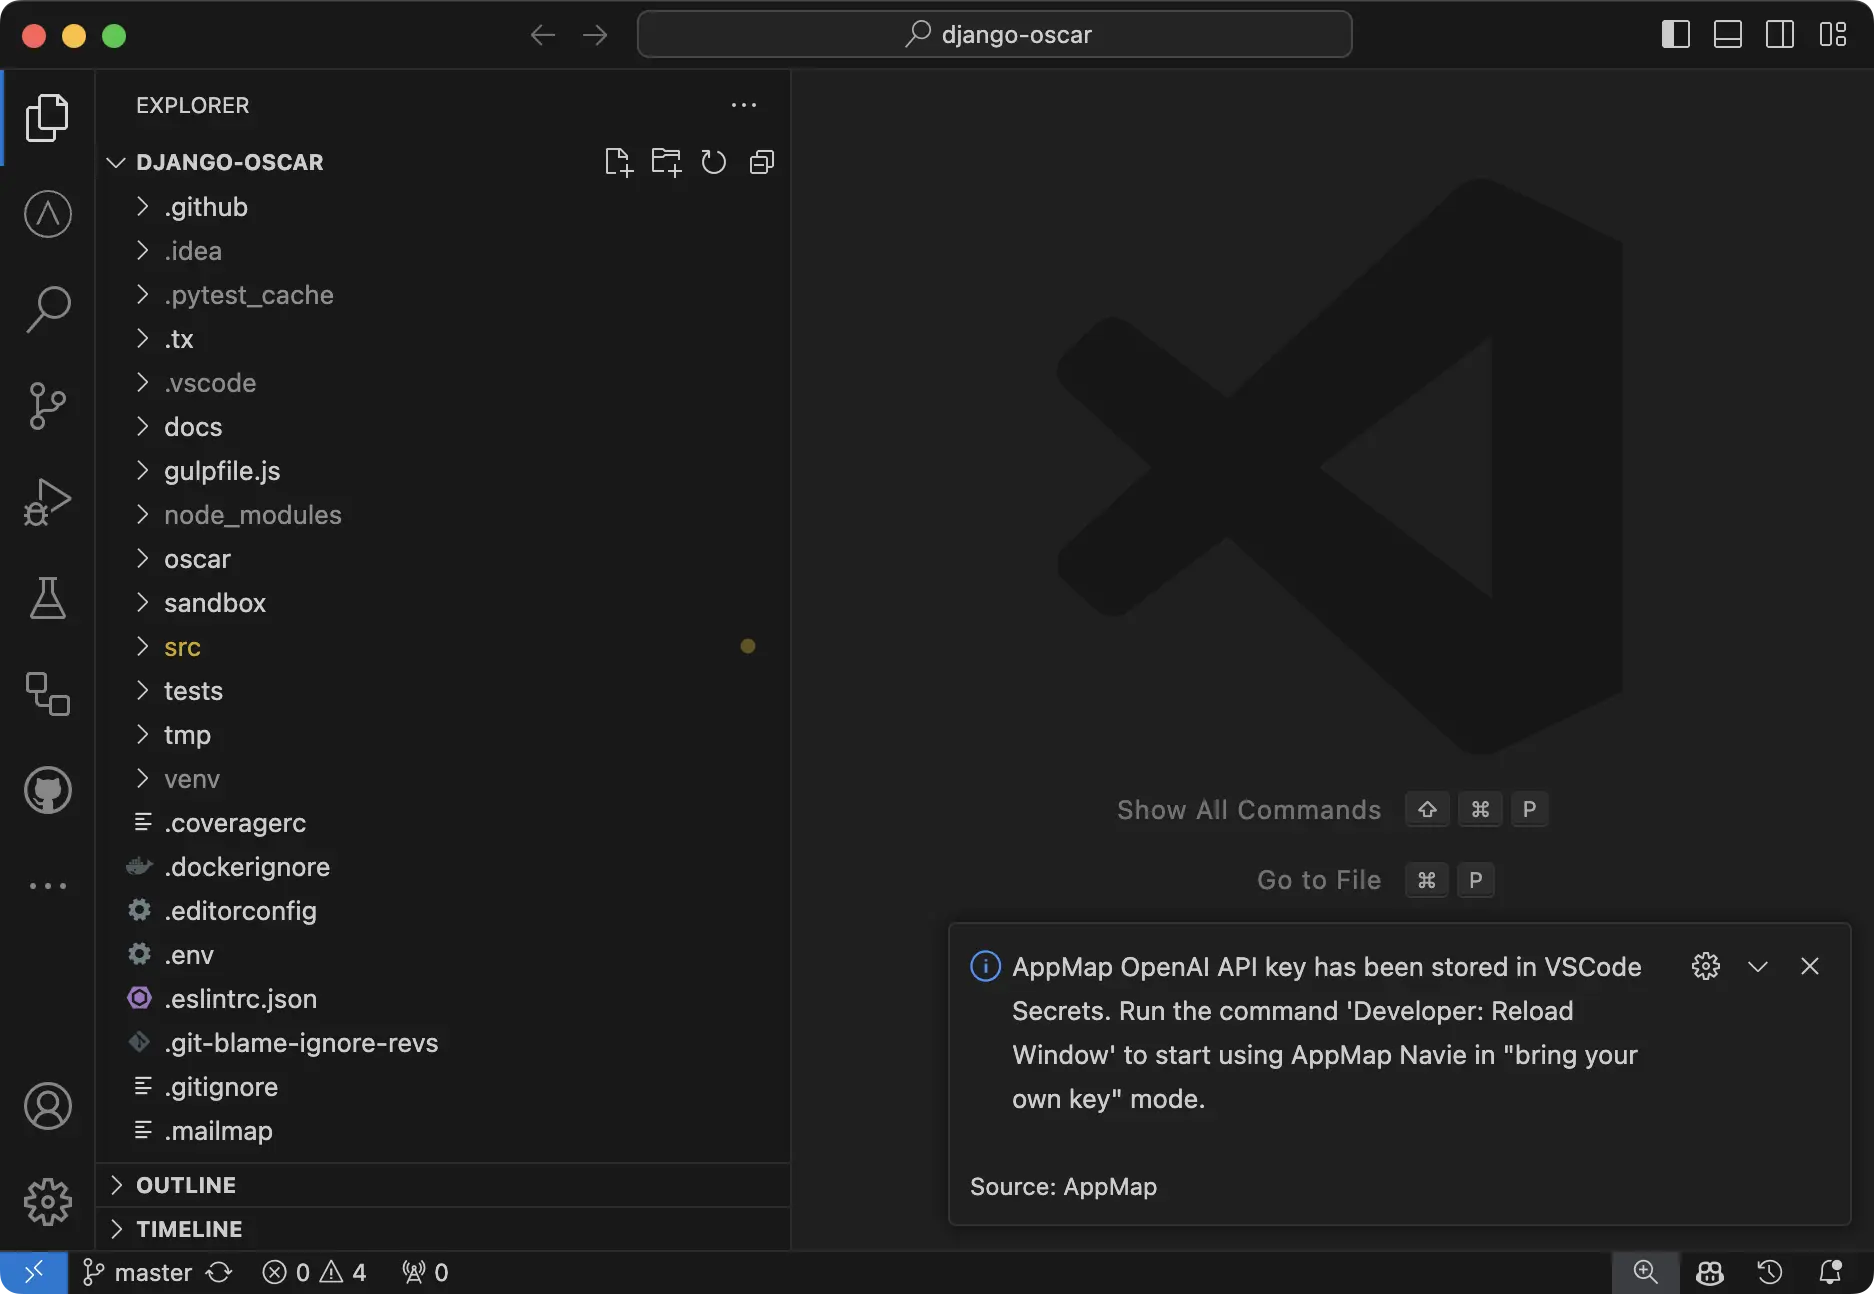
You’ll get a notification in VS Code that your key is set.
NOTE: You will need to reload your window for the setting to take effect. Use the Command
Palette Developer: Reload Window
Delete a configured OpenAI Key
To delete your key, simply open the Command Palette
You can use a hotkey to open
- Mac:
Cmd + Shift + P - Windows/Linux:
Ctrl + Shift + P
Or you can select View -> Command Palette

Search for AppMap Set OpenAPI Key

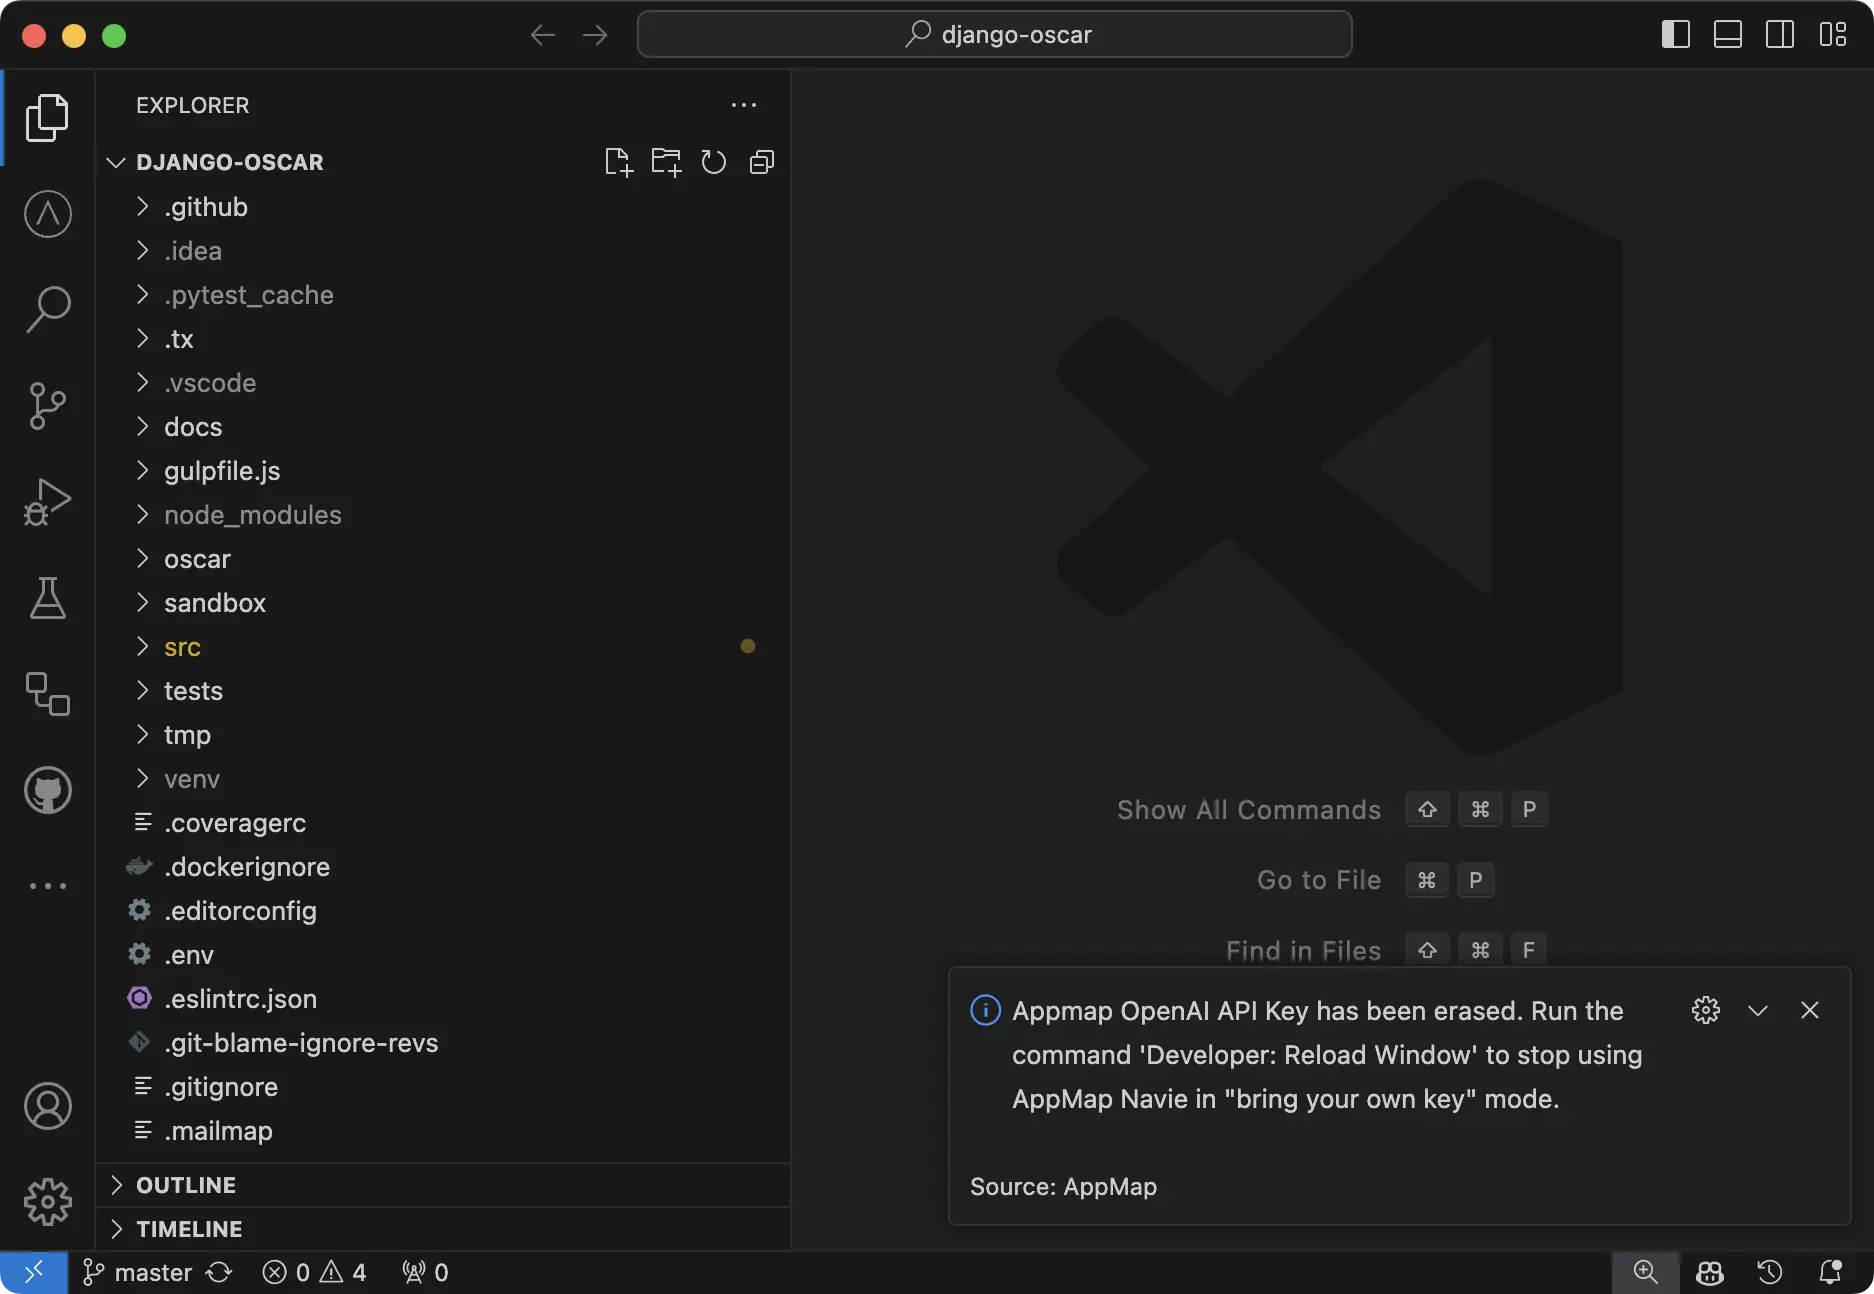
And simply hit enter with the field blank. VS Code will notify you that the key has been unset.
NOTE: You will need to reload your window for the setting to take effect. Use the Command
Palette Developer: Reload Window
How is my API key saved securely?
For secure storage of API key secrets within AppMap, we use the default VS Code secret storage which
leverages Electron’s safeStorage API to ensure the confidentiality of sensitive information. Upon
encryption, secrets are stored within the user data directory in a SQLite database, alongside other
VS Code state information. This encryption process involves generating a unique encryption key,
which, on macOS, is securely stored within Keychain Access under “Code Safe Storage” or “Code -
Insiders Safe Storage,” depending on the version. This method provides a robust layer of protection,
preventing unauthorized access by other applications or users with full disk access. The safeStorage
API, accessible in the main process, supports operations such as checking encryption availability,
encrypting and decrypting strings, and selecting storage backends on Linux. This approach ensures
that your secrets are securely encrypted and stored, safeguarding them from potential threats while
maintaining application integrity.
OpenAI Key Management in JetBrains
The standard way to add an OpenAI API key in JetBrains is to use the gear icon in the Navie chat
window, but you can alternatively set the key directly in the JetBrains settings.
Adding or Modifying OpenAI API Key in JetBrains
In JetBrains, open the Settings option.
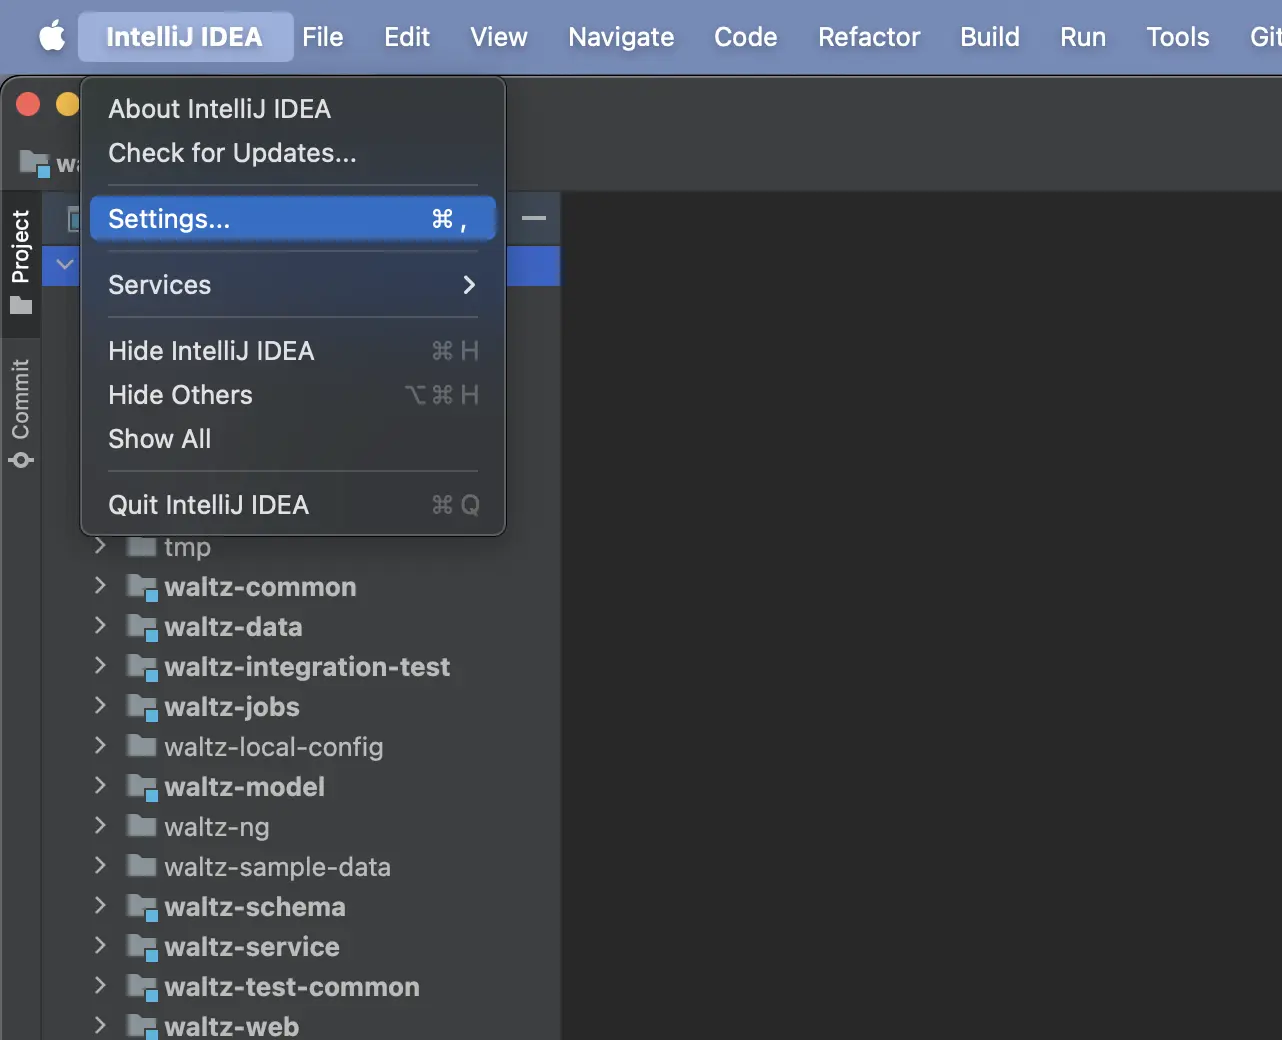
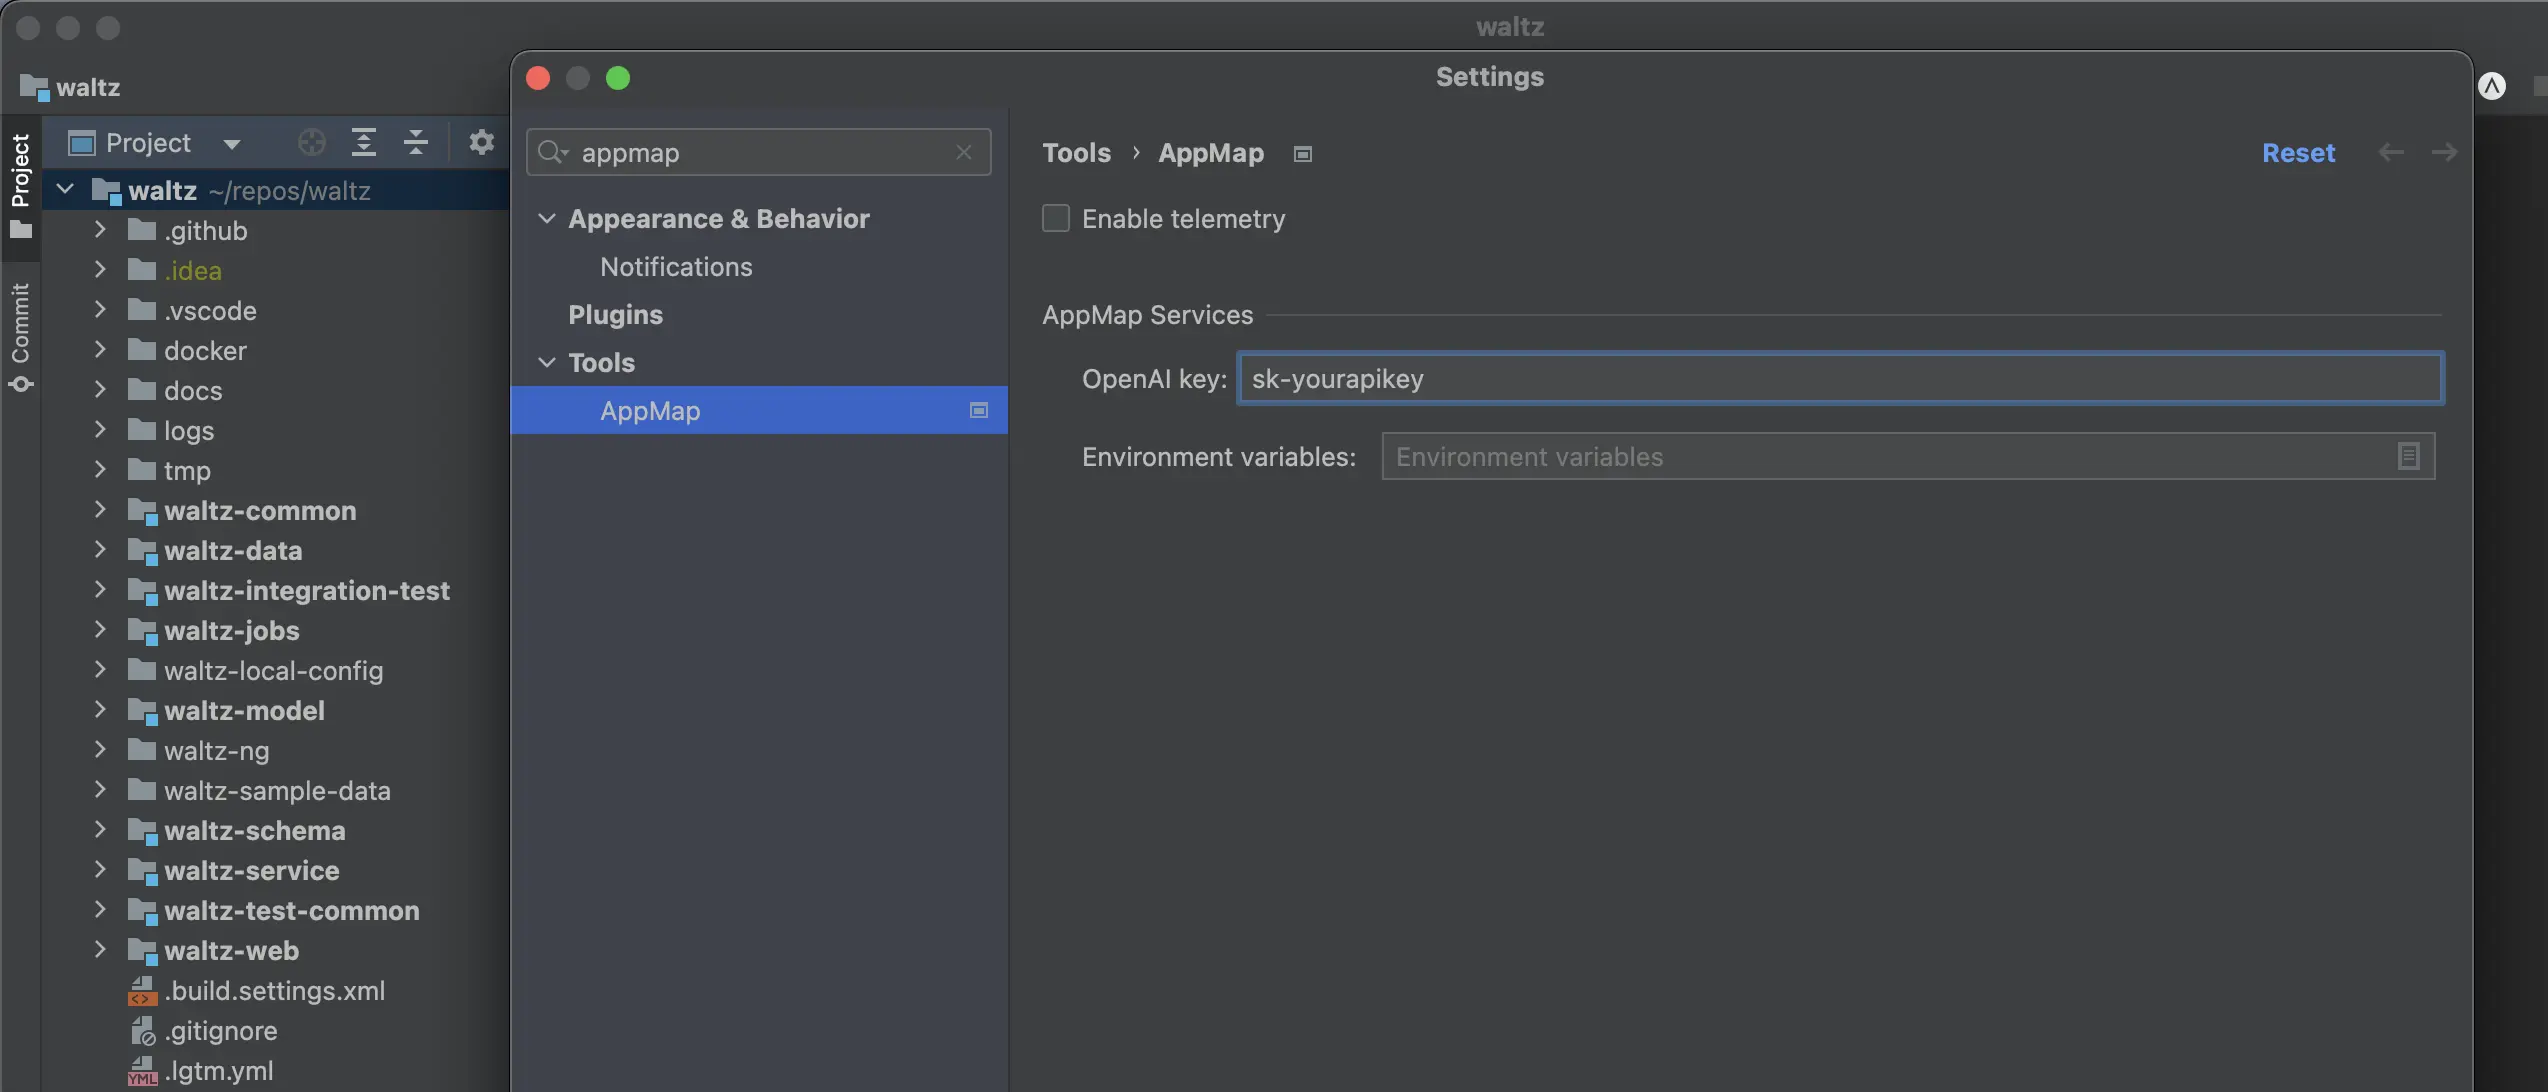
In the Settings window, search for appmap in the search bar on the side. Under the
Tools -> AppMap you will see a configuration option for your OpenAI API Key in the
AppMap Services section. This is the same section you are able to add/edit/modify your other
environment settings for using your own custom models.
How is my API key saved securely?
AppMap follows JetBrains best practices for the storing of sensitive data. The AppMap JetBrains
plugin uses the PasswordSafe package
to securely persist
your OpenAI API key. The default storage format for PasswordSafe is operating system dependent.
Refer to the
JetBrains Developer Documents
for more information.
Accessing Navie Logs
In VS Code
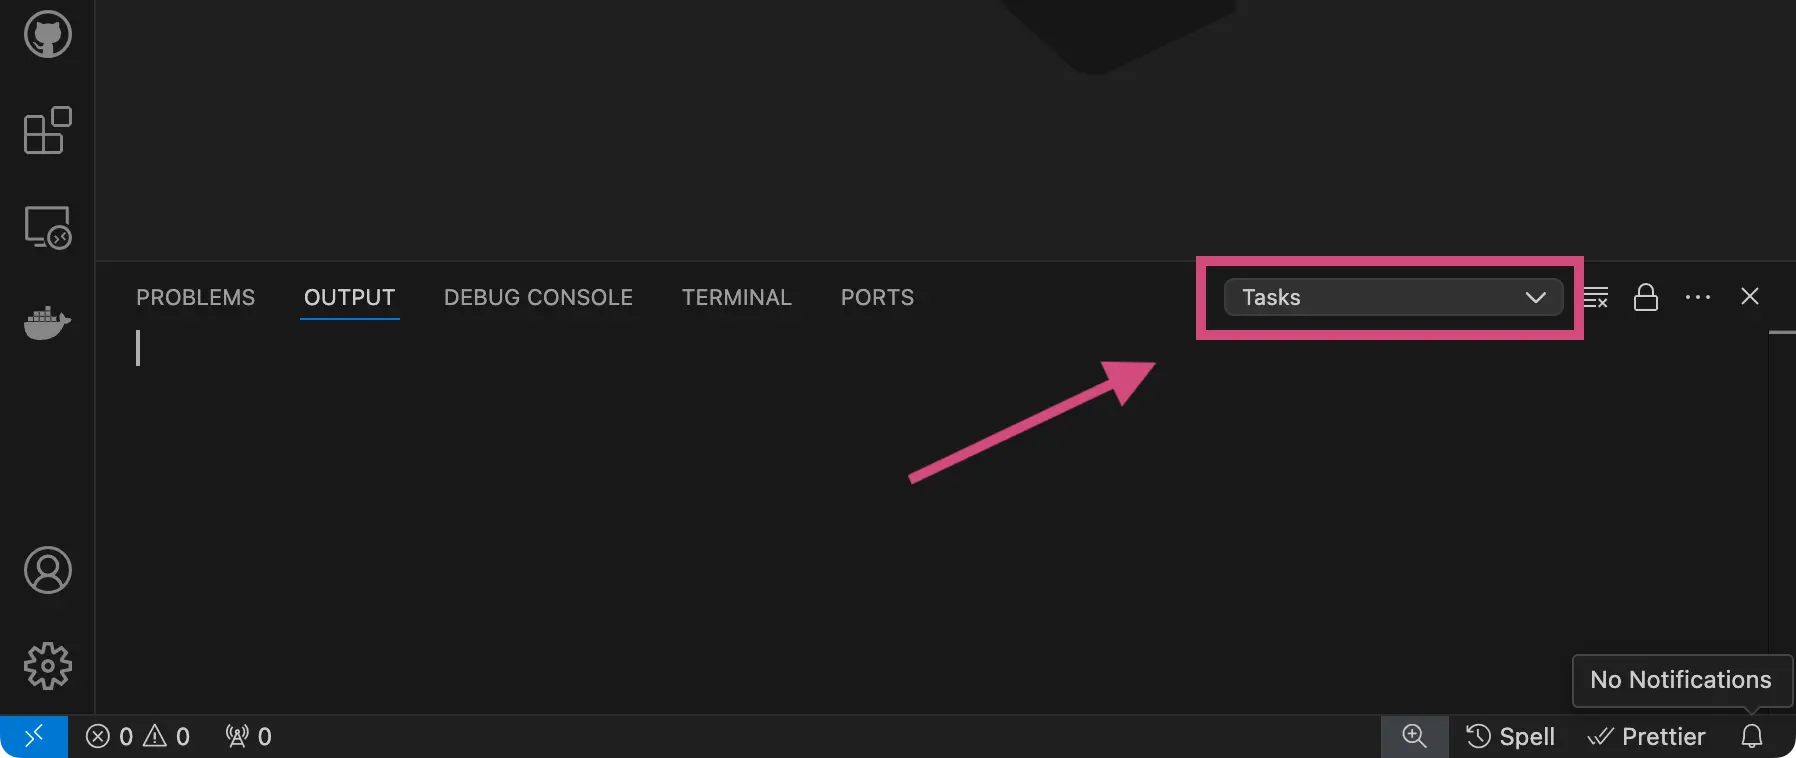
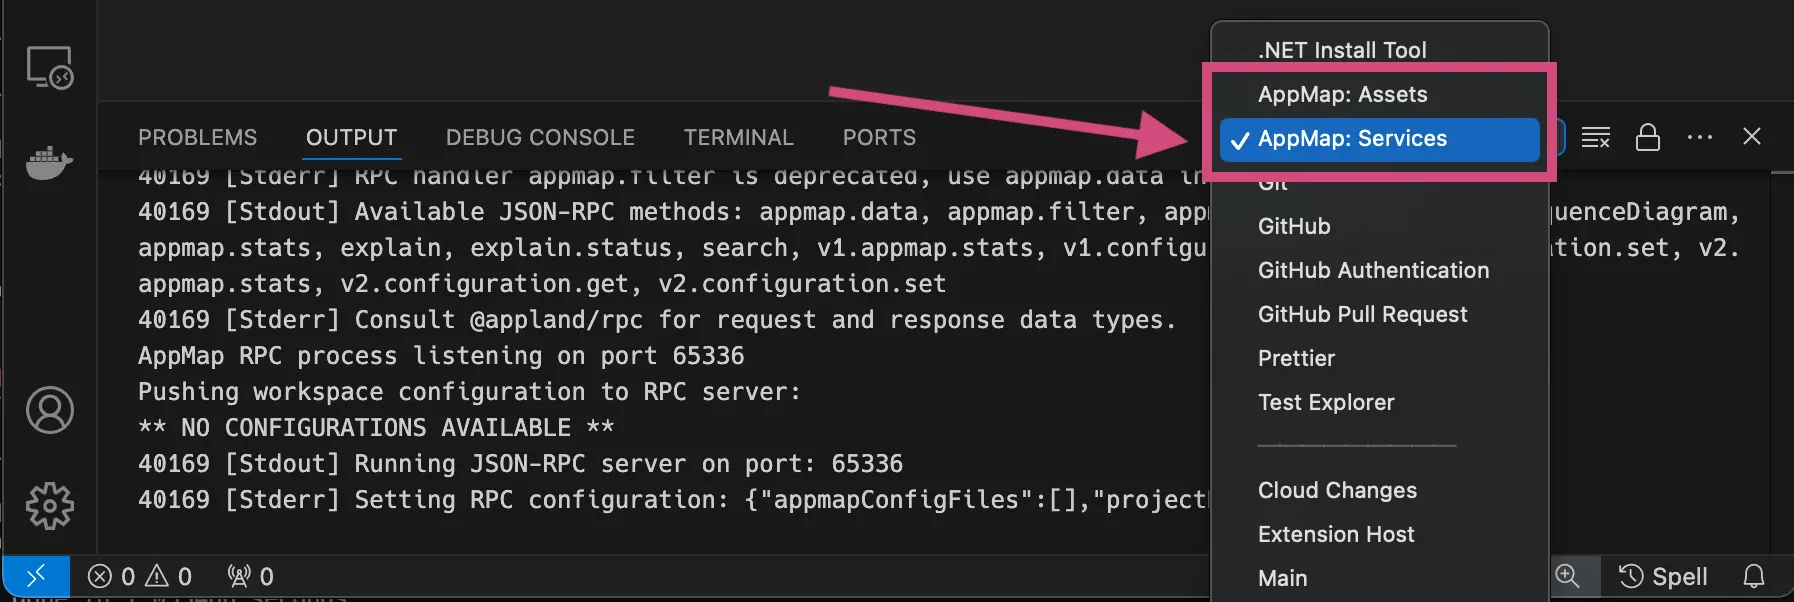
You can access the Navie logs in VS Code by opening the Output tab and selecting AppMap Services
from the list of available output logs.
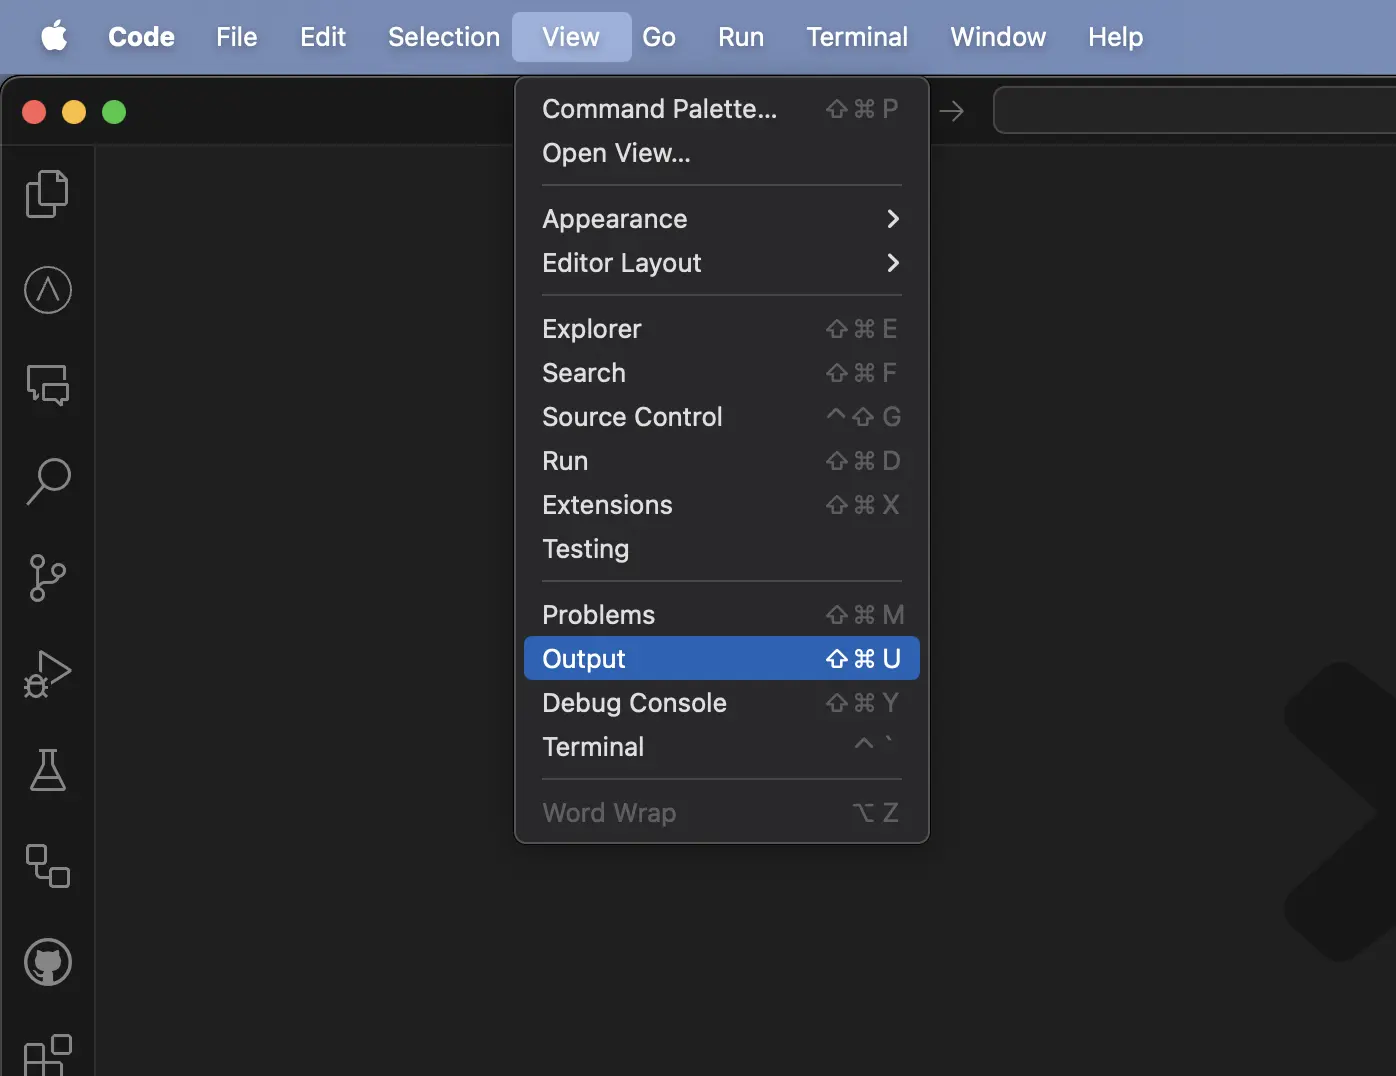
To open the Output window, on the menu bar, choose View > Output, or in Windows press Ctrl+Shift+U
or in Mac use Shift+Command+U
Click on the output log dropdown in the right corner to view a list of all the available output logs.
Select on the AppMap: Services log to view the logs from Navie.
In JetBrains
You can enable debug logging of Navie in your JetBrains code editor by first opening Help >
Diagnostic Tools > Debug Log Settings.

In the Custom Debug Log Configuration enter appland to enable DEBUG level logging for the AppMap
plugin.

Next, open Help > Show Log... will open the IDE log file.

GitHub Repository
https://github.com/getappmap/appmap
