To access the latest features keep your code editor plug-in up to date.
-
Docs
-
Reference
- AppMap for Visual Studio Code
- AppMap for JetBrains
- AppMap Agent for Ruby
- AppMap Agent for Python
- AppMap Agent for Java
- AppMap Agent for Node.js
- AppMap for Java - Maven Plugin
- AppMap for Java - Gradle Plugin
- Command line interface (CLI)
- Remote recording API
- Analysis Labels
- Analysis Rules
- License Key Installation
- Subscription Management
- AppMap Offline Install for Secure Environments
- Uninstalling AppMap
Advanced AppMap Data Management- Using AppMap Diagrams
- Navigating Code Objects
- Exporting AppMap Diagrams
- Handling Large AppMap Diagrams
- Reading SQL in AppMap Diagrams
- Refining AppMap Data
- Generating OpenAPI Definitions
- Using AppMap Analysis
- Reverse Engineering
- Record AppMap Data in Kubernetes
Integrations- Community
Using Navie for Solving Issues
AppMap Navie is designed to help developers solve issues and add features in their codebase by leveraging runtime data and AI-driven commands. By following a structured workflow, you can maximize Navie’s capabilities to plan, generate, and verify your code changes with precision. This guide outlines the recommended workflow and provides an overview of the key command modes used throughout the process.
Recommended Workflow
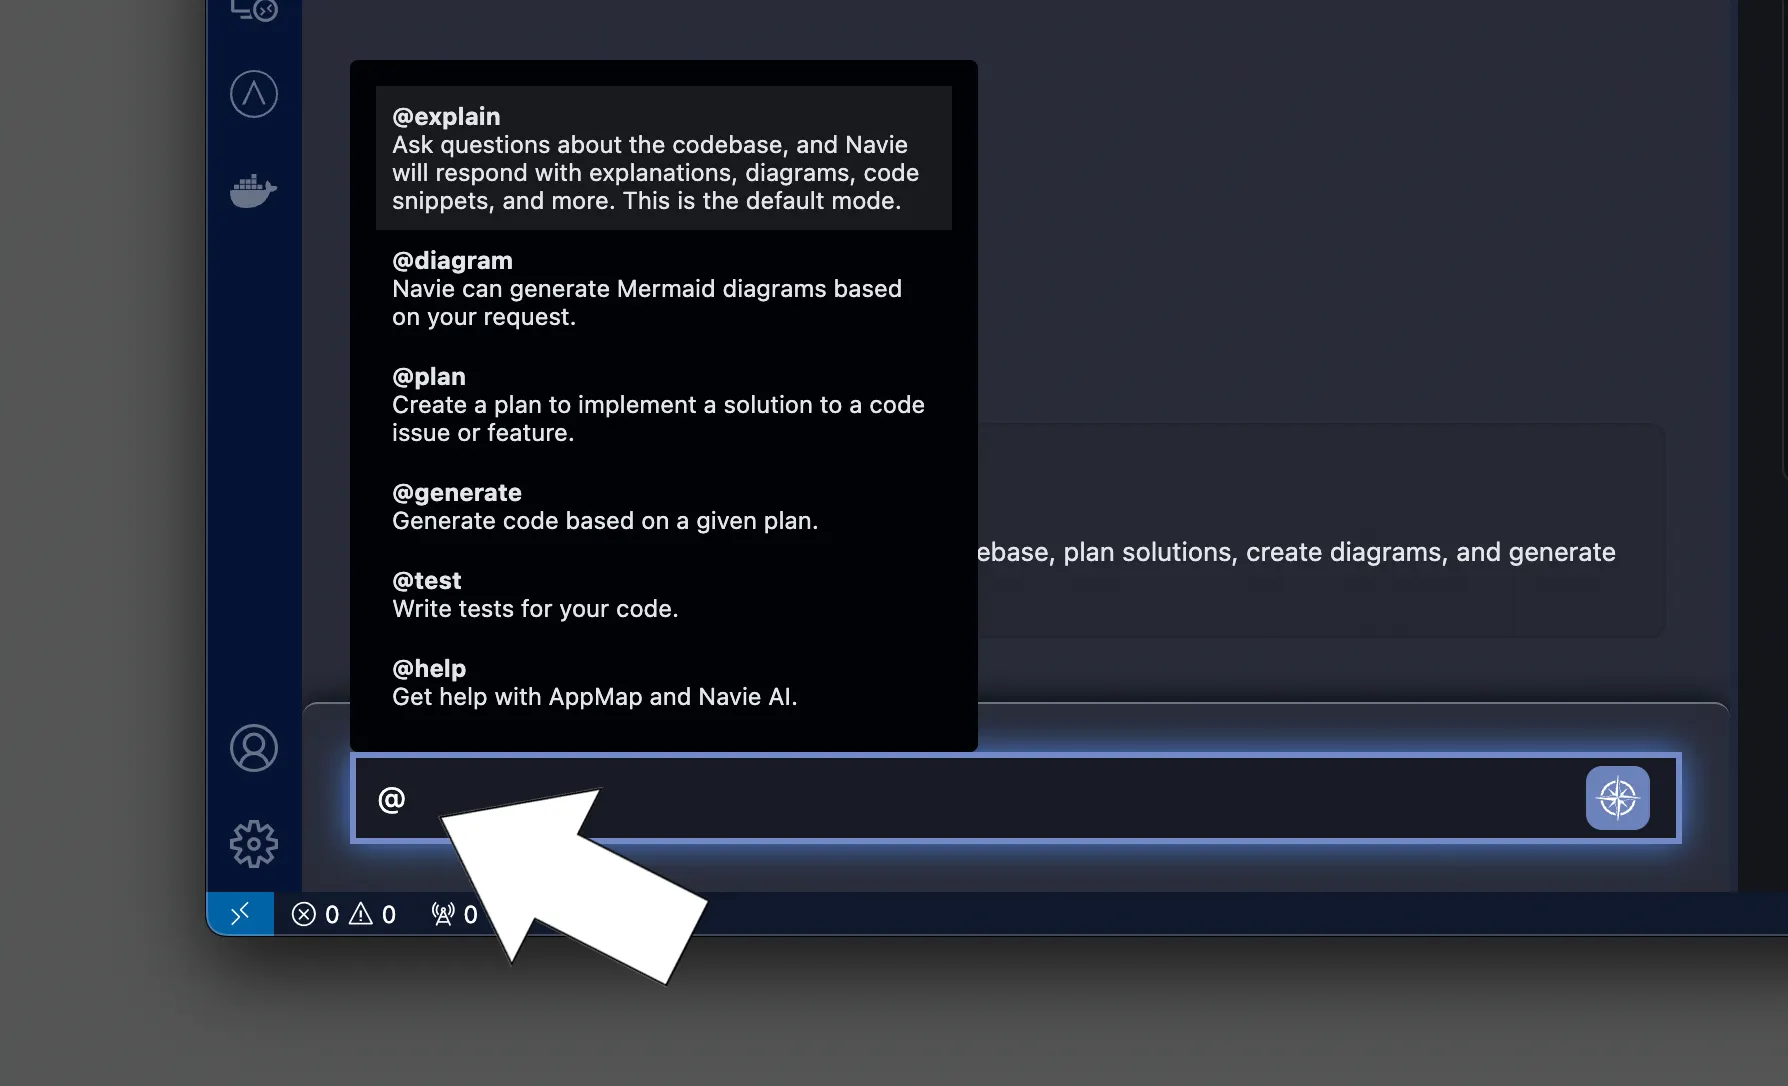
To achieve the highest quality results when using Navie, we suggest using the following command modes when prompting Navie. Simply type
@into the chat input to access the list of available command modes.
-
@explain(default)
The @explain command helps you learn more about your project. It prompts Navie to be more explanatory and dive into architectural level questions pulling information from across your entire code base. -
@diagram
The @diagram command prompts Navie to create visual diagrams such as sequence diagrams, class diagrams, and flow charts. These diagrams are based on the code and runtime data associated with the issue or feature. Navie diagrams are exportable, compatible with Mermaid, and can be used to enhance technical documentation or shared with team members. -
@plan
The @plan command helps you generate a step-by-step, multi-file plan that aligns with your application’s design. Based on the issue you are working on, Navie will propose a solution with code snippets, flow charts, and runtime context to ensure accuracy. -
@generate
With a defined plan, the @generate command allows Navie to create, lint, and repair code automatically. Navie generates the necessary changes across multiple files while adhering to the plan. -
@test
Navie can also assist in generating and refining test cases. The @test command is used to generate tests for both new and existing code to ensure functionality and catch breaking behaviors. -
@review
Finally, the @review command allows you to compare the newly generated code with your existing codebase, ensuring that the changes are in line with the desired functionality and do not introduce regressions.
Step-by-Step Example of Solving an Issue with Navie
The Navie command modes are available to be used in any sequence at any time. However, building up understanding through the iteration of the following process has proven to maximize the quality and consistency of positive results.
Step 1: Collect Data and Plan the Solution
Copy the details of your issue, including the steps to reproduce it, into Navie using the
@plancommand.@plan <Paste issue text from GitHub, Jira, or any issue tracking system>Navie will analyze the runtime data (if available) and relevant code to create a detailed plan for resolving the issue. You can review and adjust this plan by conversing with Navie.
When you ask Navie a question, the default mode is
@explain, which you can use to understand code behavior and refine the plan.For complex issues that require runtime analysis, Navie will suggest that you record AppMap data. You may decide that runtime analysis is needed to understand the detailed behavior of your running application. See the When to Create AppMap Data section below to choose the best method for your issue.
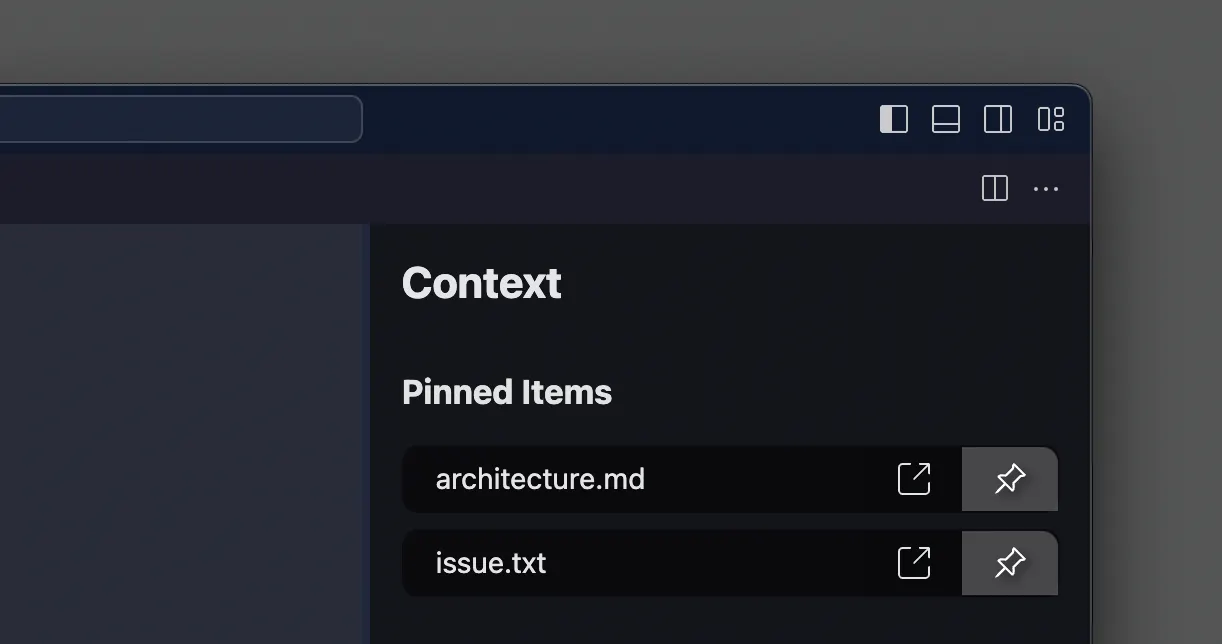
Pin specific data files to your conversation with Navie to include data sources you know are relevant to the issue. This includes pinning the text of the issue itself.

Pin code from Navie responses to your conversation when a Navie response contains code that you want to reference in subsequent prompts.

Visualize code behavior using the
@diagramcommand to create visual explanations of the existing code or proposed changes.Supported diagram types include sequence diagram, flow chart, entity-relationship, and class diagram.
@diagram
<Insert details for the code behavior you want diagrammed>
If AppMap data is available for the issue you’re working on, Navie will have a deep understanding of your application’s architecture. This enhances the quality of insights you receive when asking questions. Navie can search through your AppMap data to pinpoint the files, methods, and external services involved in processes like user registration.
Navie can also provide comparative analysis and recommendations based on patterns in your existing codebase.
Step 3: Generating Code
Once the plan is confirmed, use the
@generatecommand to produce the necessary code changes.@generateNavie will generate code based on the approved plan, updating multiple files if needed. The changes will be consistent with your project’s architecture and runtime context.
Step 4: Testing the Changes
The
@testcommand helps you generate test cases. It works best when you specify the code that you want to test. You can do this by selecting the relevant code directly or by indicating the files to be tested in your conversation with Navie.To guide Navie, you can:
- Pin files containing the code you want to test in the Navie context window
- Select code and use the lightbulb icon in your editor (VS Code or JetBrains) to add it to the conversation.
This way, Navie knows exactly what to focus on and can generate precise, relevant test cases based on the code you want to validate.
@testAfter Navie generates test cases, insert them into your project’s test suite and run them using your test framework. Navie ensures that all test cases pass successfully.
AppMap Navie empowers developers to solve issues and implement features efficiently by combining runtime data, AI planning, and code generation. Using commands like
@explain,@plan,@generate,@test, and@diagram, Navie offers a streamlined approach to addressing codebase changes with minimal manual intervention. Follow the recommended workflow and utilize these powerful commands to improve your development process while maintaining high-quality code.
Thank you for your feedback!
